Hi all! I am making a render for a customer that wants
STITCHUP SKP FOR HELP.skp (1.8 MB)
channel letters, I am trying to push pull the letters and the needle and thread. I found great success, except for the letters that have a hole in them. Like “O” “A” etc… WHen I try to push pull the letter “without pulling the hole too” it always pulls the entire letter including its hole. I humbly ask if there is an easy workaround I can use to “not” highlight the hole when=n all I want to highlight is the letter shape itself. I tries tracing the holes with the pencil tool and I end up with unwanted lines. Your help is appreciated. Thanks, Rob

You’ve also created a strange Tag issue.

Good catch. I didn’t look at tags. Doesn’t seem like it’s even appropriate at this stage of the model to have a tag.
I’m curious why you’ve applied the yellow material to the back faces of the model.

I’m also curious about your intent for the model since there are no faces on the bottoms of the shapes.
Hi Dave…The customer I am making the sketch for wants a rooftop billboard. Not really in my purview but he keeps asking for a sketch for the Zoning board. I used yellow fill so I could see what I’m doing. I brought in the Logo design using a DXF and adhered (I think) it to a rectangle surface. My plan was to pull them, and then mount them on the 3D billboard model. I would very much prefer the backs be on the letters so I can mount them. Here is an example of my radius work of trying to make each letter autonomous and able to be grouped and dragged to the docking area. Guess I’m trying to be the hotshot CAD man that I am not (yet). I do love Sketchup tho. And I appreciate your help DaveR.
Rob

The yellow field was applied to the rectangle before docking the logo image which “adopted” the yellow automatically.
R
Before you start applying materials make sure face orientation is correct. What version of SketchUp are you using? Please complete your forum profile.
That explains the missing faces on the back. If you’d deleted the surrounding face and the faces inside the closed glyphs immediately after Intersect Faces and before Push/Pull, you’d have less work to do to close the backs.
When you get your geometry cleaned up, select all of it and make a component. Set the component’s origin and axes to make placing it easier. Here I’ve placed the component’s origin centered on the back. I don’t know if that’s the best place in your application but with the axes set that way, dragging the component in from the Components window will make it simple to place.

You’ll also need to look at the size of the thing. The one you uploaded is pretty small for a billboard.
I think I should have sent that last one as an SKP. Therein you see what my goal was. Just ti lift the logo up onto the signframe. But in this first attempt, the backs of the letters pulled back etc…needing expensive editing. That’s when I decided to make the yellow rectangle.
Thx Dave,
R
Yes, you have a bunch of work ahead of you. Face orientations to fix, backs of letters to fill, and some bad geometry to fix. Lots of edges to soften, too. I would suggest that you just leave the materials alone until your geometry is all correct.
Dave, that is gorgeous. Is it an SKP so I can play with it? You are amazing!
R
Yes. It is.
I fixed the second file you uploaded. Here it is. You can play with this one.
ZZZ=FIRST TRY TOP STITCH-SKP1.skp|attachment (1.3 MB)
Dave, I tried recreating the Top Stitch Logo, this time with a bounding box around it, in the hopes that the bounding box would provide a plane for the letters to be pulled from. It was saved also as a DXF. Tied importing it and it doesn’t show up. If it was something I could do with the 3D text tool, that I know how to do, but it is custom lettering and Logo. I will try whatev you recommend Dave. And am thankful as always.
Rob
Hard to say what’s going on with the .dxf without seeing it. Did you create it? What kind of entity is it in AutoCAD?
This is a DXF. I created it with Vector Magic from a clean JPG, saving it as a DXF. This is that DXF. Is another format better for saving a JPG as a vector in SU? Thx, R
ZZ-top stitch roof sign ZZ DXF.dxf (1.58 MB)

FWIW, I would suggest you set the import option to something larger. I used Meters. That alllows the glyphs in MARINE to import separately. Some of those are one blob of geometry in your files.

Dave, Hello again…Vector Magic imports JPGs mostly, but can export as EPS EMF SVG PDF and AI. Vector Magic smoothes out JPGs and makes pretty clean output in any one of those extensions. There is “supposed” to be an asset in my SU called “workplane”, but I can’t find it my 2020 Pro. Since we last talked, I created a somewhat larger DXF logo file but it is still miniscule. Stretched it out, apparently docked onto the rectangle I drew, insected faces with model, turned the lettering into a component, but still no luck. 2-3 letters turned into solid “pullable” entities, but the rest wouldn’t. I think I’m getting fairly close to getting it right, but I already put around 10 hours into getting this far. I also own Rhino 6, but it is too much for me. Attached is a Casino sign image that shows the effect I am trying to get. The letters just mount on my billboard frame the same way.
Thx,
R

Even manually you should be able to do this in a few minutes with lots of clicks, with a couple of extensions it is very simple if you follow what @DaveR said and Import at Meters. This doesn’t mean make a bigger dxf it means adjust the Import options, there is an option button on the import dialog, change that to meters.
You could basically open the imported dxf and trace an edge on each letter to fill in the faces and then pushpull them. Or use a face making extension and joint pushpull to do them all in one go.
Took longer to type this than it did you create this.

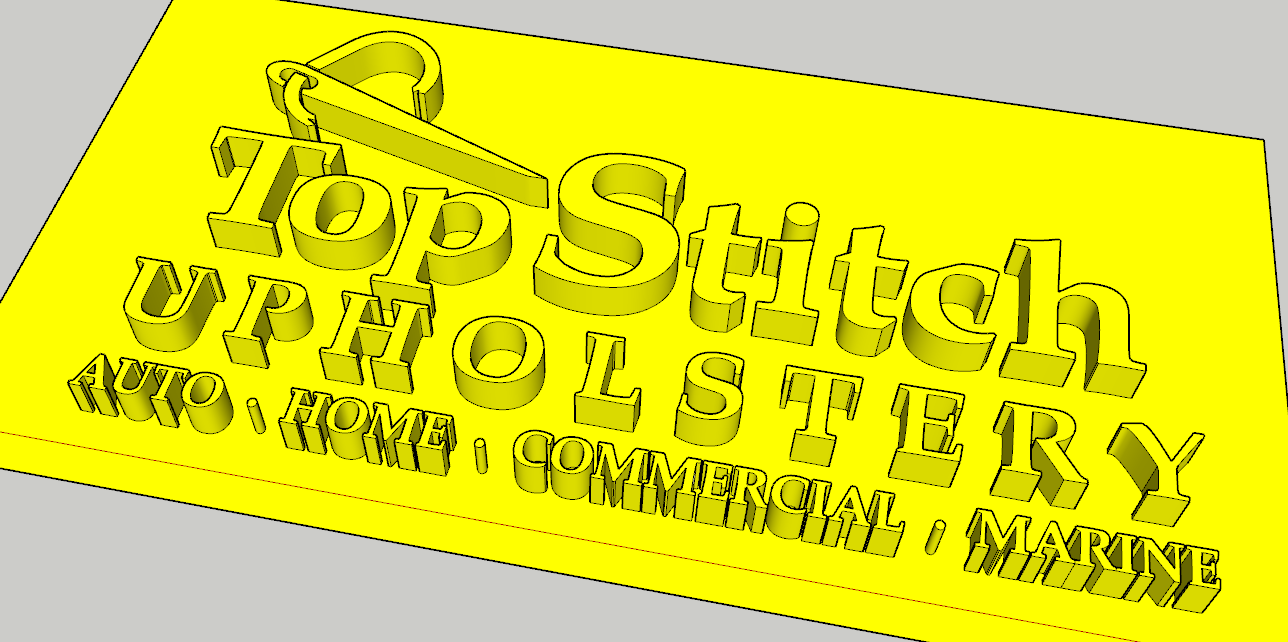
I’ve added a model with the letters all as separate solid groups, you can move them individually or group them into words or whatever and scale to whatever size you want.
Also, please correct your profile so we know what version you are using.
Top Stitch.skp (2.1 MB)
hi @AltaB
please fill in your profile completely, right now it’s mostly nonsense.

you’re using the free plan despite not having access to a computer ? ![]()
also, go introduce yourself, and let’s not revive 2y old threads for nothing ![]()
Click in sequence on the scenes tabs of this SU file for a few additional ideas.
3D text for billboard.skp (726.2 KB)