What I want to do is 1) to import a floor plan, resize it to 1/4". 2) draw some walls on the image 3) then import an image from a different scale drawing. 4) resize it to match the same scale as 1) 5) move it into position over the floor plan
A) - is this possible?
B) - am I wasting my time, and instead open LO, import the floor plan, open another viewport, of the second image and move the view port over the first?
C) or do something involving layers in SU, and if so how would I do it?
There is a way with the tape measure tool to have the model resize itself. You click at one end of a known sized object, then the other end of the object, type in the length it should be, and the model can be resized to make it match.
That works inside groups too. You could import two differently scaled models and make them be groups, then go into the group and use the tape measure trick, to rescale just the contents of the group.
Open the group you want to resize for editing and then use the Tape Measure tool to resize only the active group.
I don’t know why you would want to scale your images to 1/4" in SketchUp, though. You have to convert all of the dimensions you enter. Why not just do the modeling at 1:1 the way SketchUp is intended to be used?
The Rubysketch scale tool will scale the specific groups you click on and not affect the rest of the model, but as Colin says, the native "tape measure too"l will work if applying “within” a group. The ruby tool just saves a step of opening the group, but it does have a couple of other functions too.
Hi Dave. Um. Perhaps I misspoke. Since the two images are from different plans, they have different scales. When I resize the floor plan using the tape measure set to 24’8", the image rescales so my tape measure measures the dimensions correctly. I made it a group per the earlier suggestion.
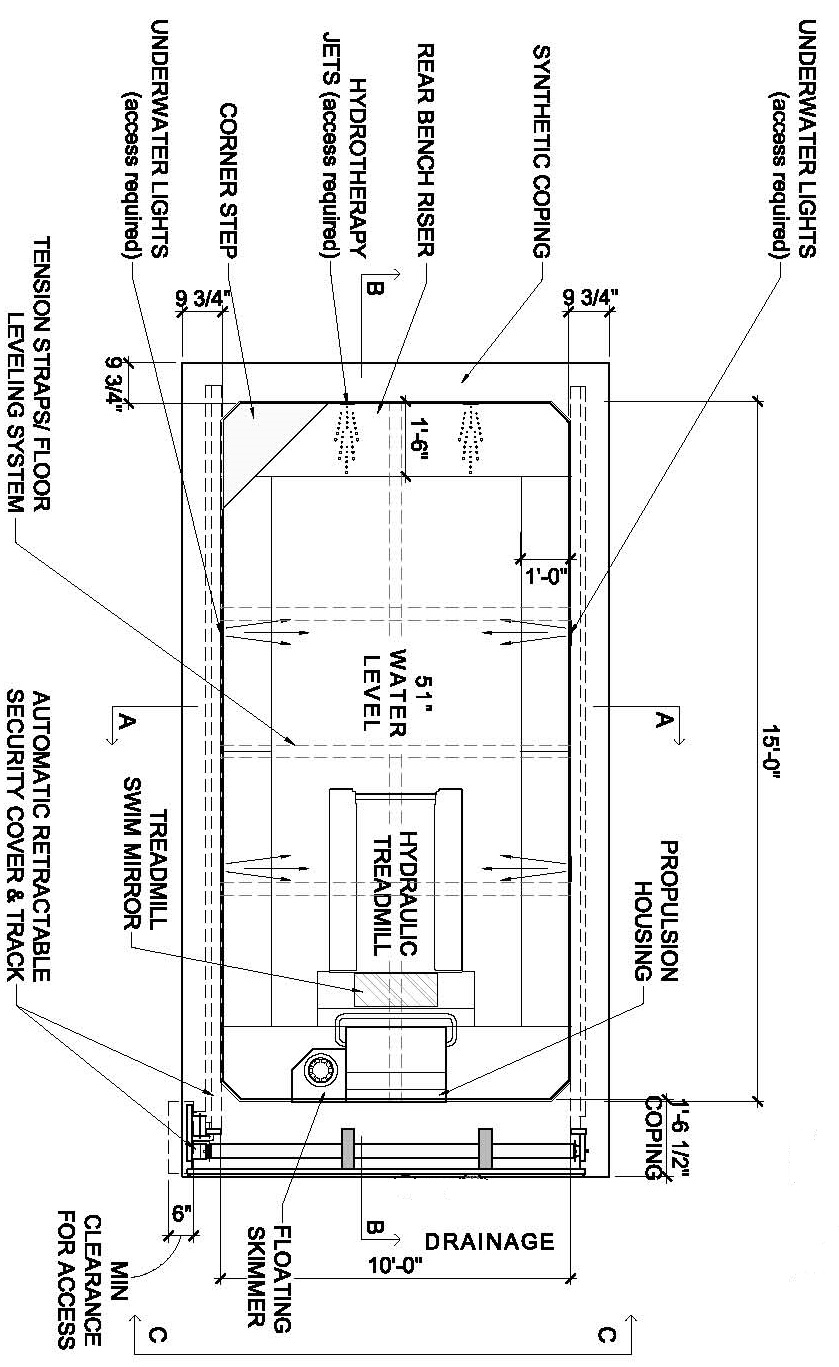
Then I imported the pool, made it a group, then using the 15’ dimension and the tapemeasure tool, rescaled the group. but the plan resized.
What I expected to happen was the pool would shrink to the same scale as the floor plan, and I could drag it in place, and Bob’s your Uncle.
Of course, I realized there’s another problem, I need to give the pool a transparent background. Otherwise I won’t see the floor plan.
Which is why I instructed you to open the pool group for editing before trying to resize it with the Tape Measure tool.
Once you’ve imported the image and corrected its size, explode the image (not the group you put it in) and it will convert into a face with a texture applied to it. You can edit that texture to reduce the opacity until you can see the underlying image as needed.
Thanks. I discovered a different problem, the pool image was not drawn to scale. If I resize it for 15 ft e-w, n-s it is not 10 ft but 8 ft and some inches. The authors of the plan simply changed the dimensions, not the plan itself. So much for copy and pasting the image.
I wish I could say the steps worked, but alas, no. I ended up scaling the exploded image as a work around to make it the proper size, then scaled it to correct the wrong n-s dimension.
I was able to make the image’s background transparent with PS and the magic wand tool though. So, it wasn’t a complete waste. I learned a new tool.
Thanks for your help,
I appreciate it a lot.
G
IF you are going to model these things, it looks like you could just model the pool based on the “correct” way it was originally drawn and then adjusting the wrong length in your model (with the move tool).
Good point. This is how it came out, elongated type and all.
I decided to do a test of your posts Dave and Colin, and what I don’t understand is: if I select from left to right there’s no make group option, however, if I select right to left there is a make group option. I bet that’s why I had trouble making my plan work doing what I thought it was you asked of me to do.
When I did my test, your suggestions worked when I selected going right to left. I never realized there was such a difference in selecting from one direction to another.
Thanks Dave, Colin, Whiterabbit and pbacot for your help. G
Left to right selects only what is fully inside the selection fence, right to left selects anything it touches.
One is a solid rectangle the other is a dashed rectangle.