Anssi’s method is good.
But an alternative, if it’s just for an initial meeting is to trace it manually using the freehand tool.
Then lift each line up to the desired height.
Then use sandbox to create the mesh.
This method just involves tracing, but the key is to decide what level of detail you need for each part of the site.
You only really need to trace the contours at the ridges, and bottoms of valleys, or any other specific features. If the slope is consistent then you won’t need to trace all the contours between the ridge and valley.
This should take minutes.
Then you add more contours/edges around buildings, the driveway, etc.
But there’s an even better (and potentially quicker) method to learn.
First, we must remember that contours are , themselves, a rough approximation of a surface. When computers generate a 3d surface from contours they simplify the information even further, by connecting the edges with straight lines, along the shortest or most convenient path (you’ll notice these connections don’t make sense whenever complex contours are present). Computers cannot actually understand if contours represent a ridge, or a valley, a hilltop, a road or a building.
People can read ridges, valley and physical features. We know if there’s a hill, or a road… So…why don’t we model it as a hill, instead of a series chunky edges?
When you trace contour lines manually you can actually add back in the missing ‘features’ by adding detail or manipulating the finished surface to define flat areas, curves or other shapes in a more realistic manner. You can also remove detail…nobody wants a surface generated from tiny edges (the surface is too complex to work with and may represent unwanted things). The SketchUp function “Simplify Contours” is handy to use, to remove the unnecessary complexity. But it then introduces yet another layer of computer-simplification and error.
Consider this diagram above where we are looking side-on at some contour lines (dark purple) and there are various possible ways of interpreting the terrain. The computer will just draw straight lines between each edge (endpoint), which is the most average method. The two possible curvers (orange and light blue) are something a human can create…and there can be quite a difference between one interpretation versus another, or versus the “average”.
In 3d modelling, we can add as much detail as we like - not just adding contours, but adding shapes in 3d. This a powerful ability and is unique to programs like SketchUp.
By adding edges, curves, points or faces to the model, according to where the physical features are, we change the terrain-making process from using Contours (a 2d-centric method) to adding “Feature Lines” (a 3d-centric method).
This involves adding edges, points (or small edges), faces and curves in 3d.
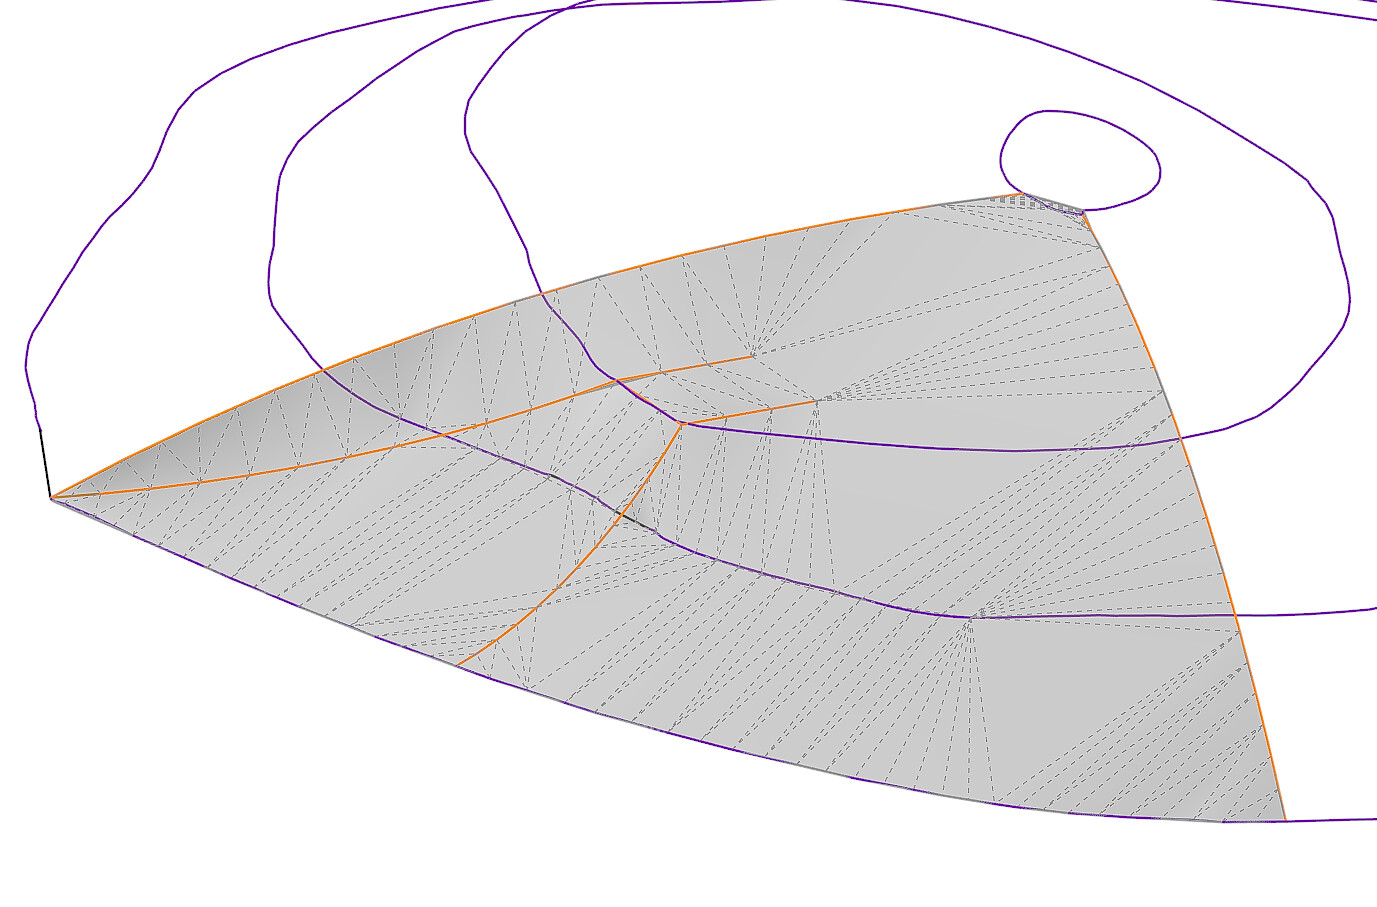
This is the sort of result you may get (orange are the feature lines):
Surfaces made from “feature lines”* are generally:
- More accurate.
- Result in less unnecessary geometry
- Far easier to adjust, manipulate and edit later
- Can provide accurate set-out edges (for example to inform construction).
- Can create a more naturalized and realistic appearance.
- Faster to produce (compared with tracing lots of contours and then manipulating them later).
…And, of course, once you have created a surface using whatever method you like, it’s not too difficult to then create Contours to represent that surface in 2d (or, I like to now use the 2023 LayOut function to add Spot Heights to my drawings!)
(*this is borrowing an Autodesk term…not sure what the generic team is!)