Hi Sketchup pros. I ducked in a for quick question. I am trying to do a photomatch model. When I import the photo, my toolbars all gray out. I tried every setting I could find, and even tried rebooting. Then I pressed “view” and selected toolbars, they turn on until I try to do anything related to photomatching. Is there something am missing. I would be very appreciative for your suggestions. Have an amazing Christmas and New Year to the Sketchup Community! Robbie
The toolbars should all gray out and be unavailable while you are setting up the matched photo. You should have the Match Photo window open during that time. Once you’ve completed the set up for Match Photo and clicked Done the toolbars will be avail again.
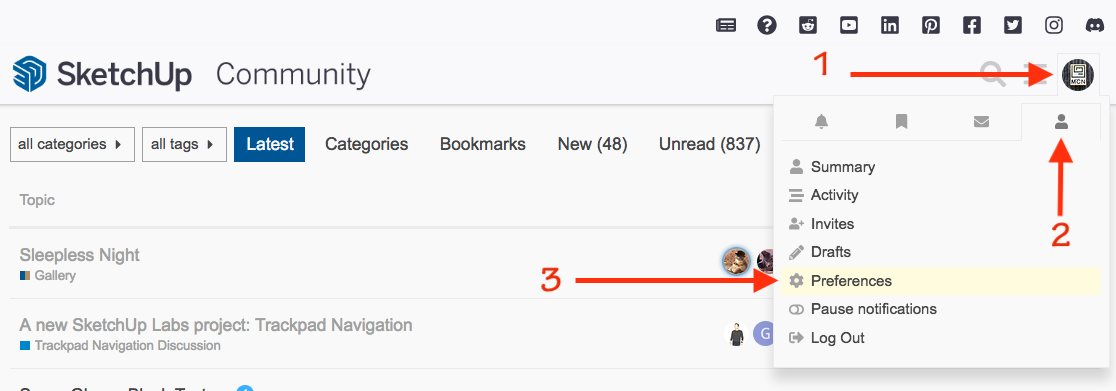
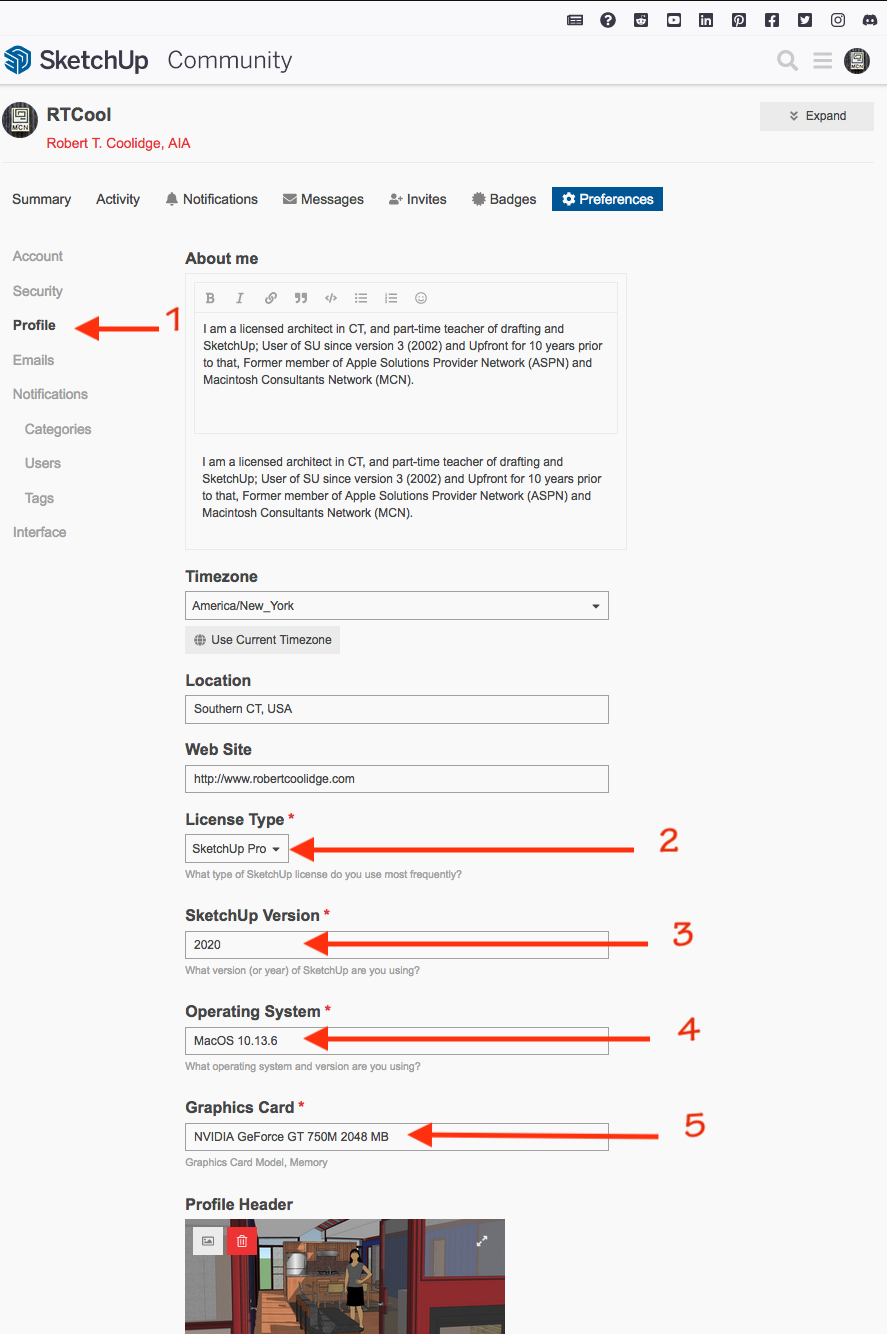
What version of SketchUp are you using? Complete your profile.
Thankyou Dave…I am using SU Pro 2020…Thinking about upgrading. I didn’t realize that the tools become unavailable while setting up a photomatch. I should have known. Wishing you and your Family an amazing Christmas, and a safe and Happy New Year! Robbie
1 Like
I don’t expect any help on Christmas, unless there is someone there who does it for fun and enjoyment. I spent a couple days doing and redoing this barn for photomatch practice, and decided to put in a couple dormers to see if I was good enough to add something to a slanted surface. I also wanted to see if I can bring a round pipe out of the roof for the wood burning stove. Seems impossible because of the slant in the roof. I will be patient. Spending the holiday enjoying the wonders of Sketchup Pro 2020 as my own Christmas present. Thankyou in advance. Much appreciation. ~Robbie
BARN SAMPLE.skp (306.2 KB)
What is actually the problem? Maybe you just need to orbit around a little so you have a better vantage point for drawing in those elements.

I do have a much better render of the barn but it was 10MB and wouldn’t send. As far the dormers and stovepipe, being a slanted surface, I am not sure of the choreography, meaning where to start these shapes. I tried orbiting and working from the crows view, then push pull tool, but it refused to pull in the right direction. YOUR dormers and stovepipe are gorgeous. Admittedly, I cannot perceive the order of creation. If it wasn’t slanted, it would be cake. It almost looks as if you drew the shape out on the roofs edge, and possibly pushed it to the building, then closed up the geometry by capping the lines where they meet on the slanted roof? I’m just guessing, still a novice but know a little more than I did when I met you a few years ago. Thankyou. Robbie
That describes 99% of all posters on this forum. A tiny fraction of posters are Trimble employees (who hopefully also post because it is fun, not just because it relates to their employment).
3 Likes
Thanks for charming in Tom and Happiest of New Years! Robbie
“Chiming” in…I tried to post another query today and couldn’t find where to attach an SKP file. After getting help on the barn project I used to learn more, I dove into a sketch I need to make for a non profit called Hope Cafe…They have this bldg in Syracuse that needs new letters and asked me to do a mockup. So, using what I learned over the weekend, I did a loose model of his bldg and tries to dock his logo over the Corbett logo. SO I imported it as a DXF , but can’t seem to dock it, or paint it or even push pull it after it is docked. I’m hoping someone knows what I should do. Usually I treat a DXF almost like a line of 3D text and it snaps right to the model. Any help/suggections are appreciated. The Cafe Hope logo is laying in the ground on the sidewalk, and the leading edge…
Thanks, Robbie
HOPE HELP STEEL LETTERS.skp (15.4 MB)
It would be done exactly in the same way you attached it in this post.
What do you mean by “dock it”? Like any imported CAD file there’s no faces to paint or use Push/Pull on. You need the faces first. You can open the component for editing and tracesingle edges in each character with the Line tool to create faces. There are also a number of different extensions that will make faces. Check the Extennsion Warehouse for one from Eneroth. (Undrstanding how to create the faces manually is a good thing and I would recommend you do that before employing an extension.) Once you have the faces you can extrude them to make them 3D and you can apply materials to them.
You should be able to rotate the component and move it into place with just the basic Move tool. Something like this.

Thankyou for the reminder, now that I think of it, you reminded me a year or 2 ago about drawing a line across a shape to make it able to be painted , moved or dealt with in other ways. I will try that now. And thankyou for you help yesterday and today … Robbie
Oh, by “dock it” I mean that if I am dragging an asset around on a building, and want to place it on a wall, it’s like docking it or sticking it to a surface. I don’t know the long term for it. After you last message, I took the liberty of exploding the Hope Cafe logo, then I drew a line through each letter and each letter turned white and I could see that the push pull tool works in the divided segmenting.Once I completed that, I tried to go back and erase the lines that I used to create the white letters, and when I do that, it chops the letters off along that line. I can’t seem to remove the line segments without losing parts of the letters themselves. I feel like I’m almost there. All I have left to do is remove the unwanted lines, drag the logo onto the building surface, then pull them to the desired thickness and paint them. I am hoping I can copy that process and paste it onto the other face of the building. Thanks for the dormer lesson and the stovepipe. I turned the model upside down for the stovepipe and puller it up through the roof. It came out amazing. That barn was practice for this sign mockup. Happy “day after” Christmas. added to post: The copping of the letters and shapes only occurs in the curved letters and shapes. Letters like “E” “F” “H” are no issue…But “C” “O” “P” and the curves in the coffee cup won’t co-operate. Thx…
Dave, Not sure if you are the Dave that keeps prompting me to fill out my profile. I have never seen the word “profile” anywhere in the SU Community…I did find a place to put my picture, and my name was spelled Brizino instead of Orizino. There was nowhere to list my system (Win 10 Pro) or anything like that…I did see somewhere that said Win 7 Pro, but it was uneditable. I am horrible at filling out forms, including taxes and memberships. Let me know if I have not filled out this thing called my profile, so I can blend in with the other artists and users of Sketchup. I love what you did with that barn…I learned from you handily and easily did it and more on my model, even putting a skylight on the other facet. I actually brought the dormers up through the base of the model and trimmed them to shape after the push pull technique. I don’t actually understand the exact structure of the Sketchup Community. Who sponsors it, who maintains it, who can moderate dialogue, what are their names. It would be nice if a moderator was marked “moderator” so one would know if the person we are talking to is self appointed representative or just another schmuck like me… All I want to do is learn…and share. Nothing more, nothing less. I like treating folks with respect and a polite approach, and expect that wherever I go regardless where that might be. You have always been great with me, a little impatient from time to time when I learn something too slow. But to that I digress, being nothing more than a grasshopper in the scheme of 3D design. I do have my own skillset though I do not tout it on the SU Community. I hope we can all be Friends and help one another up the learning ladder with a nice flow of positive energy and respect. Robbie