This is interesting! I am modeling a kitchen island and have an assembly of dynamic cabinets. I have a top in place with overhangs. I want to place a manufacture’s product into the top surface. Previously I had it set in the cabinets but no top was modeled. Copied and removed the product and then tried placing it in the correct spot but will not drop through the surface. The top is a component now. Do I need to create a void space to drop it into or something? what happens to the base cabinets and will they allow the product? As if they were alive…
Give us the description from the 3D Warehouse or something to identify it. Or better, upload your SKP file here with the Upload button, seventh from the left in the row above the window where you type your message.
Upload failed as the file size is too big! Tried sending the whole kithcen file. I will create another file that is more of a detail. Thanks for your patience, Dave!
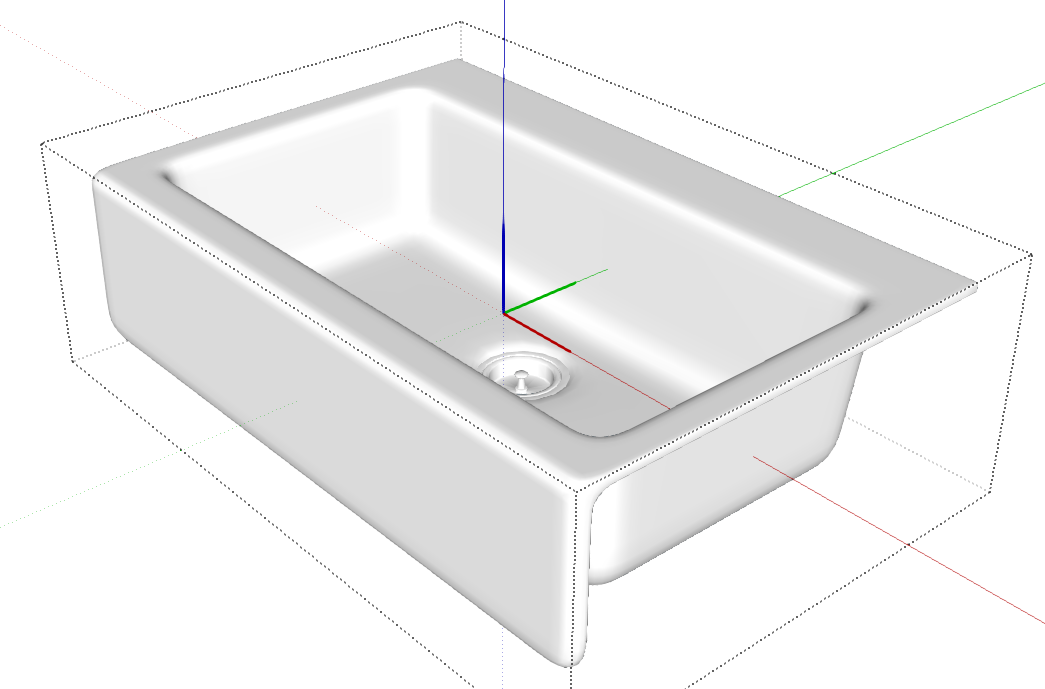
Island top detail with sink not sunk…
Sink will not attach or place into surface to be co-planer.
Once placed will it stick to the base cabinets below the top?
Upload fails with just the top and sink saved. File size still to big…hmm
OK. It’s due to the location of the sink component’s origin. The origin is the insertion point for the component so when you drag it in from the Components window, you will have hold of it by its origin. In your sink, it is located well below the rim of the sink.
No. You would set the origin so that it can be placed on the reference surface. I expect you would want to place the sink on the top so its lip sits down as the real one does.
Well, you should make a group or component of the counter top to keep it from sticking to other stuff. If you were to set up the component to cut an opening in the top, you would need to place the sink on the face inside the group or component. Keep in mind this opening is sort of an illusion. If you move the sink, the hole would move with it. If you remove the sink, the hole goes way, too. Not all that useful if your drawing is to be used for dimensioned drawings/plans. You might be better off to draw the top with the hole in it for the sink.
FWIW, as you make (or collect) components of a similar sort such as sinks, it would be a good idea to set their origins and axes in the same relative location. That makes it easy to swap one with another. In my work I wind up drawing a lot of case pieces with drawers and doors. Every knob or pull I create has the origin set in the same relative location so that I can not only place them in position without screwing around, I can also exchange them in an instant by selecting all of them and then right clicking on the new one in the Components window and choosing Replace Selected.
Thanks for that. Origins is confusing but I understand the strategy. Still not successful so maybe I have changed the sink is some way…
Will try it with your file and thanks!
Readjust the stile in your model to show edges and turn on Hidden Geometry in the View Menu. This will help you place guidelines with the Tape Measure tool such that they intersect where you want the origin. Then right click on the component and choose Change Axes. Click on the intersection to place the origin, drag out and click for the red direction toward the right side of the sink. Then drag and click to set the green toward the back of the sink.
OK, thanks to you I have it placed! But the top of island and the sink perimeter show with the cabinets outlines too. The sink outline or face shows but everything is shaded. Does that mean that the top island surface is not closed geometry?
Do I need to intersect faces with the model?