My disaster area

Hello, here I selected your fireplace group:

Using the Move Tool, I moved the Fireplace group out of the way to have a closer look:

What remains is ungrouped, untagged geometry. First guess would be that at some point you started drawing but forgot to click back into the fireplace group (maybe because you were doing close up measuring/layout).

I selected it and moved it over. You could select these lines and copy or move them back into the Fireplace group but there’s a little clean up needed:

Also, you could increase “Fade” or “Hide rest of model” when groups are selected so you’d have move visual cues that you are clicked into a group:

This would hide your guidelines as well… which leads to another point: the Grid Lines are nested under Front Planter:

That may be making them more difficult to work with than need be. Drag them out.

A final ‘thing’: You could separate the ‘survey’ from the Grid Lines. That may make things easier to work with as well.

I like your model - good work!

Something else that might help… after I exploded the Fireplace group and moved the stray lines back onto the fireplace (which merged the geometry), I re-grouped and made the Fireplace group again.

When I moved the Fireplace group back into position, the overlap between the Fireplace and Stair Wall caused that confusing overlapping flicker.

So, I’m selecting and ‘clicking into’ the Stair Wall and using Push-Pull to move the wall back so it does not overlap the Fireplace. I drew a line from the point I wanted to Push-Pull to so I could see it (actually to move the Fireplace back, but in either case it was a visual marker).

There is still an overlapping face, so I deleted it. Now your walls don’t overlap.

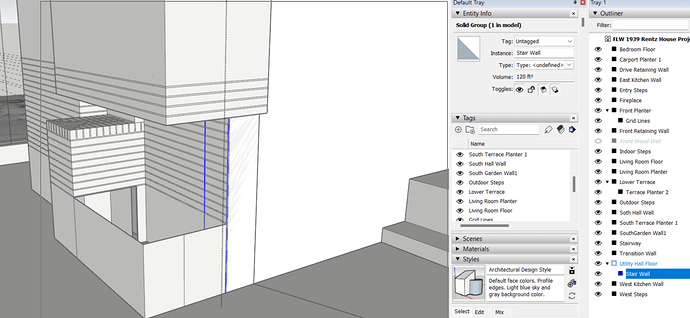
Looking at the Stair Wall, there is something up with the lines on the top corner.

I selected it, then moved it so I could see what was grouped.

Those dark lines are just stray geometry. Select delete.

The face that is sticking past the wall is tagged, “West Kitchen Wall”, but is not in the West Kitchen Wall group.

I selected the face and some extra lines to delete.

The selected line in the corner is tagged, “West Kitchen Wall”, but it is not part of the West Kitchen Wall group. Delete.

These two highlighted lines are untagged… but they are part of your Upper Ground Floor… but Upper Ground Floor is a TAG, not a group.

Double click, Make Group. Name, “Upper Ground Floor”. Assign tag, “Upper Ground Floor”.

Now select that little line (hard to see) for deletion:

Here is one final thing that may help. Turn off visibility of all groups in the Outliner (not tags).

The difference is that when you turn off tag visibility, you are turning off stray lines and faces that are tagged but ungrouped. When you turn off group visibility you can see geometry that is not grouped. The geometry that is not grouped is what is causing the problems.

Thank you so much for the in-depth analysis of my model’s issues. I could swear that I had the fireplace in edit group mode when adding my brick lines. It’s been a bit of a pain since I’ve had to select the face and try to measure and draw my lines on that blue selected background.
I knew I had a conflict between the stair wall and the Fireplace; I just hadn’t gotten around to fixing it yet.
I think you have given me more useful tools in your two posts than I’ve gleaned from the last three tutorial videos I’ve watched. Thanks again.

1 Like

I modeled my house for remodeling work (okay, I went a little overboard on it). This was back when Sketchup was still owned by Google.

When it came to the roof, much of it wouldn’t close. Huh. So I zoomed in all the way and wouldn’t you know I had lines that I THOUGHT were parallel that really weren’t even vaguely close. Part of the danger with Sketchup is that it TRIES to predict what you think you want to do. Sometimes, it guesses wrong. Sometimes, you end up creating “hidden” geometry (ask me about my game assets! Is that really blue or is your normal wrong?).

I’ve learned that groups and tags REALLY help a lot.

Bottom line: I’m going to have to remodel it from scratch (I now know a little more what I’m doing!) — it’s daunting, but honestly, it could be a lot worse.

Stray lines, two lines that look like one, lines that are ALMOST but not quite perpendicular, geometry hidden by other geometry, all of these can make your life really hellish.

A carpenter can get something that is off by 1/64th of a measuring unit to work (the technical term is “get a bigger hammer”). CAD programs are a little more fussy.

Hand me the persuader please …

No… The big one.

4 Likes

Glad I could help.

This might be useful:

Click into the group. I measured the distance from top (of paired lines) to top of (of paired lines), which was 2 5/8". I then made a guide point 2 5/8ths down from the top of the two lines. I selected the top line then selected the second line (ctrl+left click). Using the Move Tool, I clicked the corner of the top line, then clicked ctrl to copy and moved the corner of the selected line to the guide point. Click to place and then entered x7 to make seven evenly spaced copies. I guess I should have guessed x8 or x 9, but, tada, lines copied.

2 Likes

Thank you, Lloyd and 3DxJFD,
This program has driven me to such levels of frustration that I wouldn’t trust myself with a bigger hammer.
I have been trying to edit my fireplace, but the edit mode doesn’t seem to work. Everything is a negative image that will not select or edit. Trying to add lines to the group with Select and + doesn’t work. I found that I’d made the Utility Hall floor part of the fireplace group, but it has it its own tag. I ended up destroying it to remove it from the fireplace.
I’ve been trying to use Select and right-click erase to get rid of all the stray bits and pieces in the model, but many just sit there selected blue at me. I’m sure I could add them to various appropriate groups but I still have not found a reliable tool for doing that. I tried to make all my fireplace changes and refinements a component that I could add to the fireplace group, but that idea as always went down in flames.
I’ve essentially had to destroy the entire Utility-Hall Floor to ungroup it from the Fireplace.
I have a SketchUp for Dummies book arriving Wednesday. I’ve looked up Problems with Sketchup on YouTube, but there is little on editing or modifying groups.

FLW 1939 Rentz House Project 2 (2).skp (8.9 MB)

1 Like

I feel your pain. What I am learning is that a disciplined work order, making components, editing components correctly, and constantly using inspector to check it out helps keep things under control. When you notice that you forgot to right click and choose “edit component”, erase every guide, line or thing you did, go to edit component and do it again. Right after you have the component edited make a tag right then and don’t forget to assign the tag. That saves lots of time later to tag as you go instead of at the end.

You started with such a high level project. Honestly what you’ve accomplished is pretty forking amazing. I often ‘forget’ to enter a group to drop geometry on it or something similar. like this morning I had to go back to an earlier model where I wasn’t as ‘well behaved’ as I am becoming, and had to rescue things stuck to the slab etc etc… my preferred style for adhesive rescue is to grab as much of it as I can and just group that. Then I move that group in a direction away from its origin a specific distance (ie. 20’ on red) and then I explode it out there where it’s not touching anything and just plug away at fixing it. Then I leave it there and come back into the model where there’s now a hole (several holes) and I plug away at fixing that. Somehow it helps me mentally if I know they’re nowhere near touching. Then when Everything is grouped and non-sticky I pull that first group back that specific distance and sigh a sigh of relief.

Until I realize that I have more fixing in other areas :laughing:

You’re doing great. You obviously have some talent here.

Thanks Danimaupin and Royce!
I got so mad at the second model that I went back and tried to fix my first one. I made real progress fixing the tears in my ceilings with careful measuring and redrawing it. Of course, this malevalent program will not allow me to win, so it is refusing to save my changes. It’s been telling me it is saving for the last hour.
I don’t want to lose my changes but after clicking the Save button multiple times with no resolution, I am at a loss for what to do.

Hi Robert, stick it out through the frustration. Your model is looking good. You just need to gain facility with the tools by practicing. In my case, I am ‘practicing’ for hours per day trying to learn to write extensions… but it is failure, after failure, after failure. Frustration is the word. It’s also embarrassing because I can’t find or figure out answers and I don’t even know what questions I should be asking. As a serious estimate, I struggle for about 5 hours for every 5 minutes of ‘learning’/success. So, it will be my pleasure to help you if I can… just don’t bring up extensions :).

I’m not sure if direct answers to some of your comments is the right approach… I’m thinking some videos might show things you’re not seeing.

So here goes.

First see what’s going on:

I’m just ‘grabbing’ the components/groups with the Move Tool. I either escape or undo (ctrl+z) to snap back.

Because the fireplace is jumbled up, I’m going to (clumsily) nest the fireplace groups together and then explode them. That will merge the geometry. Then I’m making a new Fireplace Component out of the aftermath. This could really be a group… but I’m going with a component.

Had to chop video… Some of the lines aren’t in Fireplace group. Explode the final group. Then create component.

Some of the geometry inside of the Fireplace component is tagged, while the new Fireplace component is not tagged. I’m going to remove those interior tags with TIG’s Default Tag Geometry (ahem) extension. Then tag the Fireplace (if I can find it).

Here’s another way to get rid of tags, without an (ahem) extension. You can see that if you select more than one tag, or tagged and untagged ‘stuff’, the Entity Info doesn’t show anything (meaning there is more than one tag). I ctrl+z’d this to undo the changes from the last video.

… not sure about post sizes. So, to be continued.

1 Like

Just from reading your frustrated post told me you are either not understanding or not using Tags correctly.
Tags are a visibility thing and do not separate geometry, Only assign tags to groups and components or other ‘objects’ but not faces and edges. Exploding a group/component will assign the raw geometry the Tag of the exploded group, not good, while still selected after exploding assign to untagged.
Always leave Untagged as the active Tag.

The issues you are having are mostly due to incorrect tagging, you are trying to edit geometry that is all jumbled together but strangely separated. This is evidenced by your comment

this happens when you delete things that are needed for geometry assigned to multiple tags.

Use groups and components to keep your geometry separate.
Assign appropriate groups with appropriate tags to help with working with your structure. These tags can be as simple as Outer walls, inner walls, roof, floor. Enough just to hide things so you can work on others. You can make and assign many many tags later if you need to for doors, entourage, windows, furniture etc but otherwise keep it simple.

Don’t get in the habit of exploding groups and components willy nilly, it’s rare that you should need to and it tends to make a mess. Get in the habit of a simple double click to edit and be aware of the changes to the bounding box, solid blue usually tight to the geometry for a closed group, much larger black dotted lines for the bounding box when open for edit.
If you select the geometry within a group and it shows anything but Untagged in the Entity info window, change it to untagged.

More speed less haste as they say, by spending the time to truly grasp the fundamentals of the software you will save many hours of frustration.

1 Like

Taking a look at the missing face.

Not sure here but setup-wise, let’s make some changes.

1/64 is too fine grained. A regular hammer can correct 1/8th and a good framing hammer can adjust a good 1/4. We don’t need to get into sledge hammer settings here. But that line snapping might be grabbing and snapping when you don’t want it to.

I copied your brick pattern and dragged it to the side. You can see that it’s not flat (That’s why the Rectangle Tool didn’t fill in the entire face).

I’m going to use the Drop Tool to drop the brick pattern onto a new flat surface.

False start… I deleted and redrew the bottom line and interior side of the fireplace. I’ll use the Move Tool to put the new pattern piece back on.

Thanks so much for your help. I’ll try working it out soon.

I outwitted the program, by downloading the SketchUp model and then loading it back up. The new model saves correctly.

1 Like

Here the Grid Lines are nested under Front Planter. Select and drag out.

Tagged geometry. Triple left click to select all connected. Untagged all. Deleted extra bits.

The survey image and Grid Lines are together. Add tag for Survey and apply to (survey) image.

I don’t use Grid Lines as you do here. I’m going to explode the Grid Lines because they are on the image.

Remove tag from Grid Lines. Your Grid Lines are “Guides” from the Tape Measure Tool. You don’t have to tag Guides… they won’t merge with geometry.

Thank you for the guidance. I wasn’t quite sure how to drag the grid out on top of the source plan.

1 Like

Somehow, I have put SketchUp into some kind of visually-impaired mode with oversized icons. Please, how do I put it back?

You have probably zoomed the browser window, depending on which browser there will be a zoom setting somewhere.
But you can generally just hold ctrl and scroll the mouse wheel to go in or out. Pretty much a standard windows thing.