Modelling Kreg pocket screw holes and screws

John, truly impressive work. Really appreciate the low poly count, insertion points, glue to any and cut opening features you added. Makes using the components much more user friendly. Allows me to focus on the project without having to worry about reengineering the components. Got myself in a mess recently with a 3DW sink model (with internal problems), trying to convert into a cut component. Dave came to my rescue. Bottom line, not all component creators are as conscientious and skilled as you.

Found the Kreg pocket holes and screwheads.skp especially useful. One addition that would help me immensely would be the addition of a 1 1/2" option. A lot of my woodworking uses 2 by material, (2x3, 2x4, 2x6 etc.).

By the way I emailed Kreg technical support and asked for clarification on the 1 9/16" (40mm) oval measurement which as you point out does not agree with the math for the geometry. I will keep you posted on any replies.

2 Likes

Thank you very much for the comments, Claire.

I think I’ve finished the DC version. Before I upload it, I’ll try to add a 1 1/2" thickness board.

And for good measure, a 1 3/4" one for UK 2x4 (50x100mm nominal, finished size approx 3 3/4" x 1 3/4"; or more accurately 95 x 44mm which is marginally less than the older imperial sizes).

From the measurements in your last post, can I deduce you are from the USA or Canada?

The UK sizes take only 1/8" (3mm) or 1/4" (5 or 6mm" off the nominal ‘sawn’ size - 1/8" for nominal thicknesses of 1" or under, and 1/4" above 1".

Not sure what they do in Australia, continental Europe, or other countries.

Unless I run into unexpected complications, I hope to finish adding the 1 1/2" and 1 3/4" board thicknesses later tonight, at least to the DC component, if not the separate non-DC set.

1 Like

You are correct. Kind of strange, but we have nominal sizes (2x4) and actual sizes (1 1/2 x 3 1/2).

Lumber Dimensions

Nominal Actual Actual - Metric
2" x 4" 1-1/2" x 3-1/2" 38 x 89 mm
2" x 6" 1-1/2" x 5-1/2" 38 x 140 mm
2" x 8" 1-1/2" x 7-1/4" 38 x 184 mm
2" x 10" 1-1/2" x 9-1/4" 38 x 235 mm

Thanks for adding the 1-1/2" thickness.

I did get a reply from Kreg concerning the oval length. Not sure, but this must be a company secret. So the 1-9/16" was derived using a form of math that is proprietary to Kreg. :rofl: So feel free to use whatever length makes your process the easiest. I did check some of the other 3DW models, most seem to use 1-7/16".

Thank you for contacting Kreg Tool Company. The image that you are seeing in the Kreg Micro Drill Guide Instructions will be the common sized pocket-hole measurements. This measurement can vary depending on the exact size of the drill bit, movement of the jig during cutting, and many other factors. Again, thank you for contacting Kreg Tool Company and feel free to contact us with any further questions.

As I half expected, I AM having trouble with the DC component.

I had to construct it in SU 2020, though I could have done in 2019 instead. Then I did a Save to 2014, after giving it an extra wrapping, so a File/Save As would in effect strip off the extra wrapper, and allow you to import it as a 2014 component into any later version.

It’s misbehaving.

It will only insert from the common origin point, which I set for the 44mm / 2" UK nominal size.

That, after a bit of fiddling and changing axis WILL Cut Opening, but only I think from the outer component.

I can’t get other sizes to do that. I’ll post about how Cut Opening should work in 2014. I thought it would work to cut opening for a subcomponent too, but it appears not to, or at least not reliably.

Can’t do any more on that tonight, I’m afraid, but will post it as a problem in a new topic.

Sometimes it won’t even let me pick the insertion guide point.

Maybe it’s a consequence of using SU202 to create it, since that I think uses a later version of the Dynamic Component plugin.

I’m getting over my head again, and not understanding how it SHOULD work. Or maybe, like quite a few DCs, the DC Extension just IS buggy.

Well, after a long detour in another topic (Problems with Cut Opening in a DC with subcomponents that I thought should cut, but don't) I’ve got something working, for SU v2014 or later.

There are eight dynamic components, one for each thickness of board (19, 25, 28, 32, 35, 38 and 44mm, or approx 3/4". 7/8", 1", 1 1/8", 1 1/4", 1 3/8", 1 1/2" and 1 3/4"). That covers the majority of finished thicknesses of planed softwood in UK and US/Canada.

Each component offers the same choice of four screw sizes (28, 32, 38, or 44mm, or approximately 1 1/4", 1 1/2", 2" and 2 1/2") or no screw, or screw head only. Each component is set by default to use the longest screw that can be used in the board the screw is going into if it is the same thickness as the board with the pocket hole. You can use longer screws in a thicker screwed-into board.

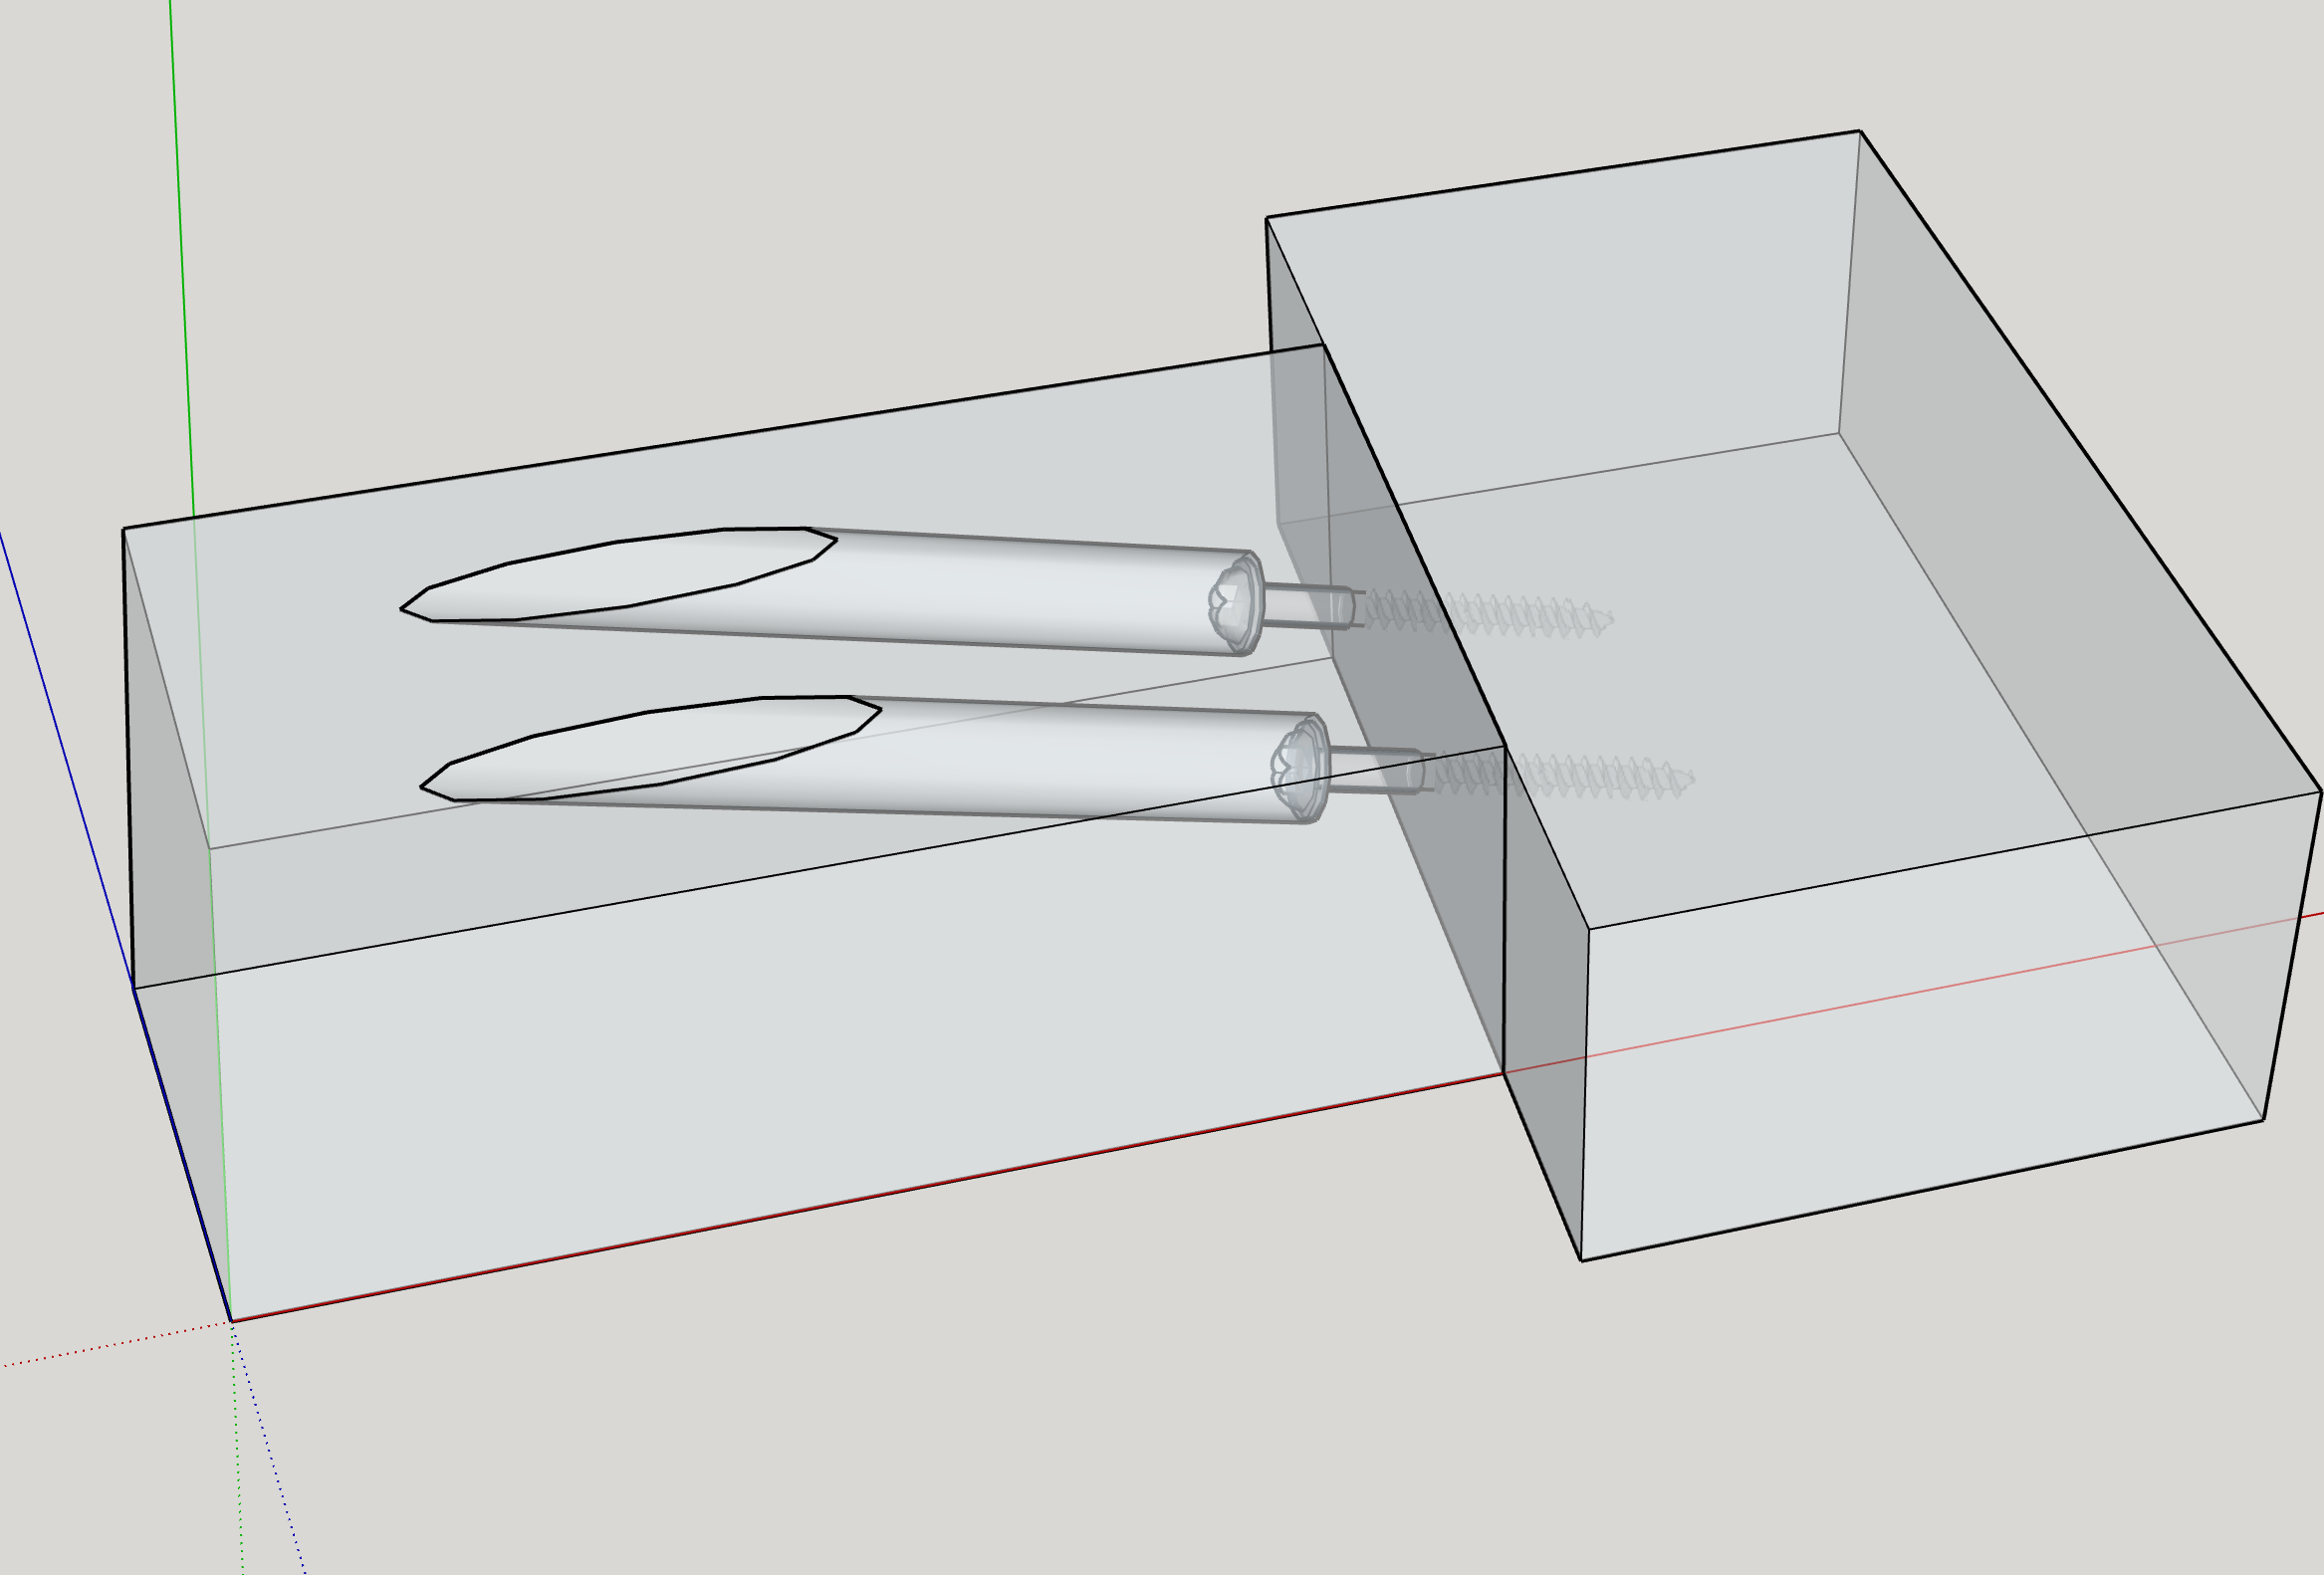
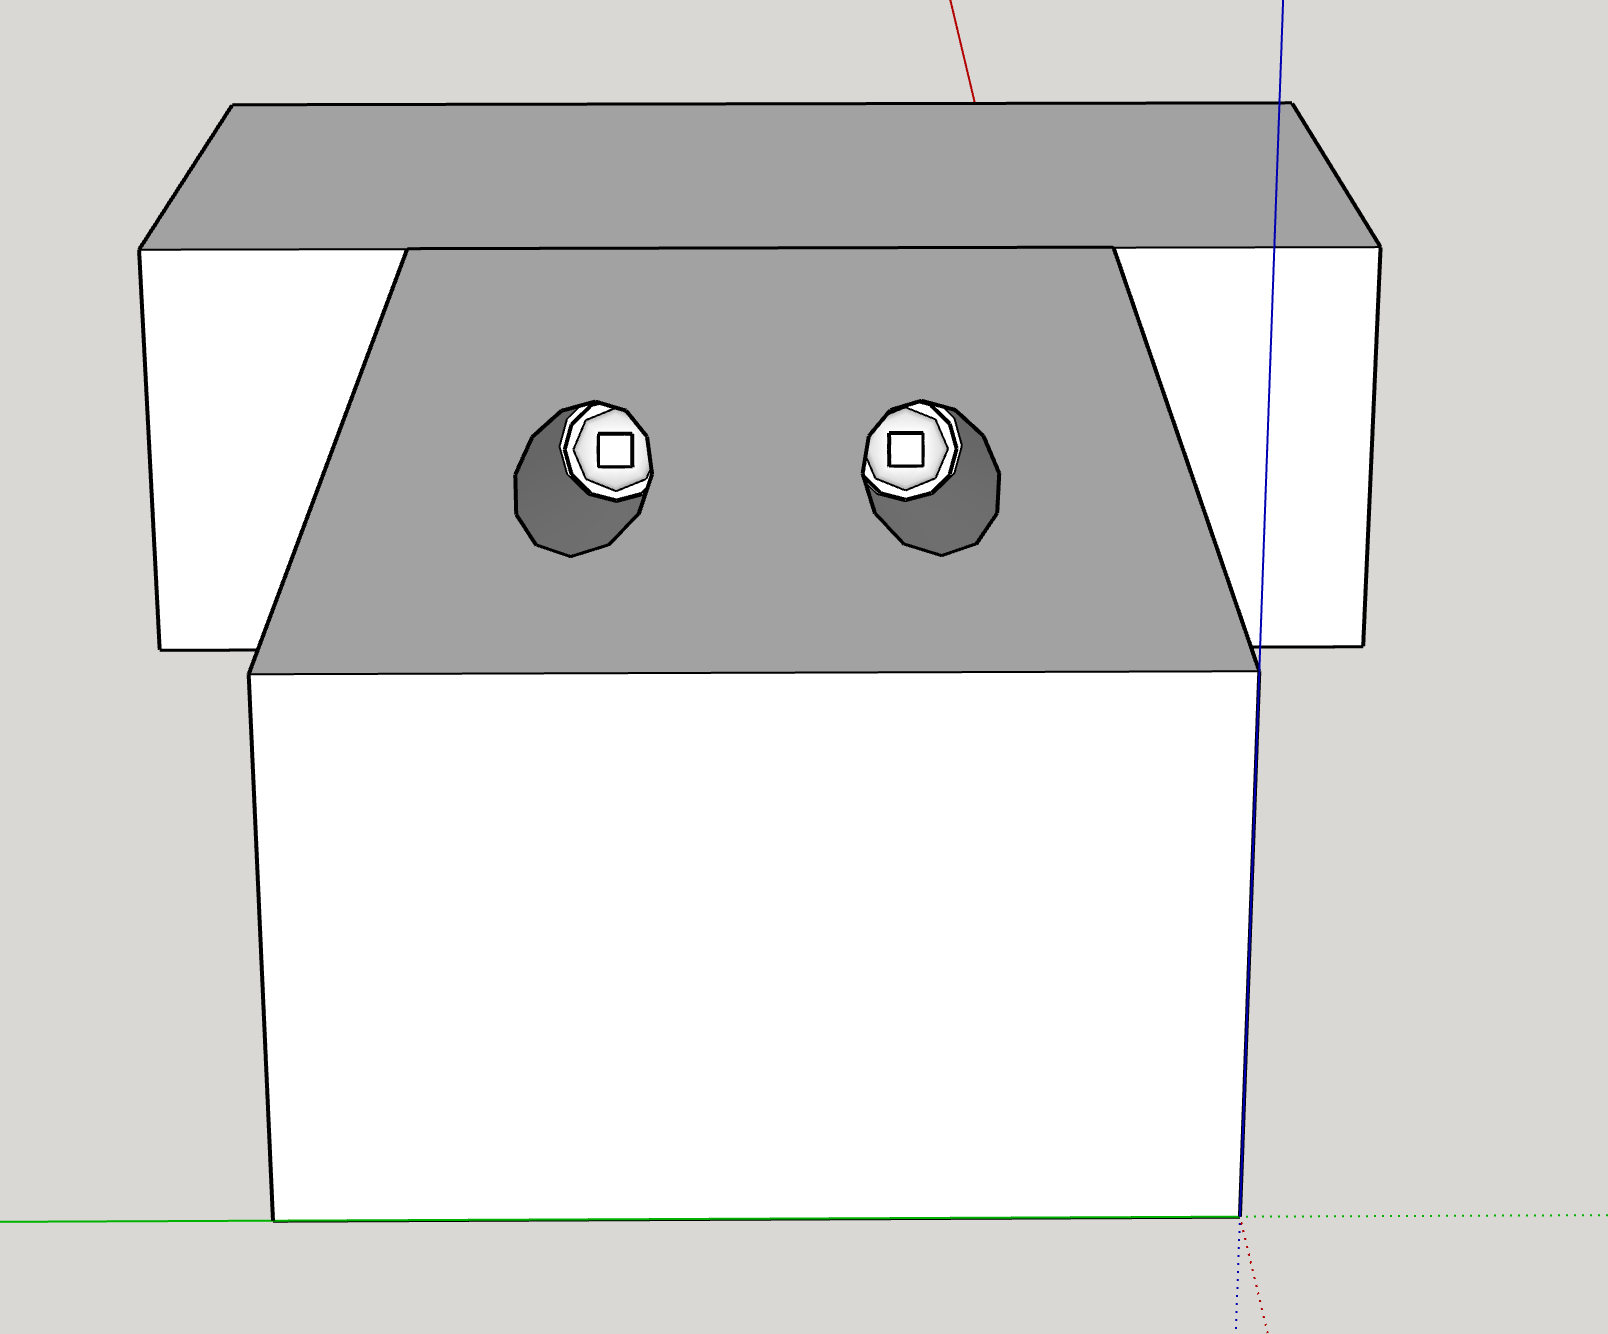
Here is the set, embedded in a board. Because the pocket holes are embedded in a component, you can just open the file, then either explode and delete the board, or delete the lot. (In this case, don’t import the file, just open it). The pocket holes and screws will appear in your component browser, and you drag them out from there into any board you have open for editing (that’s important - Cut Opening only works in the particular face into which the component origin and the hole opening are placed).

If you are just using one board thickness, use at least one of the right size of component, then Purge Unused from the Component Browser.

Kreg pocket holes and screws DC v2014.skp (244.8 KB)


I’ll put it on the 3D Warehouse shortly, but Claire (@EosDawn), try it first if you would, please.

I found that to use it in versions as old as 2014 one might need to update the Dynamic Component extension, and one may have to do it manually for 2014, since I found that even downloading the latest v1.7.rbz file I couldn’t install it from Extension Manager/Install extension. I needed to change the file extension to zip, extract a folder and file from that, and copy them into the Sketchup 2014 Plugins folder. Not for the faint hearted.

But it works in SU 2016 which has the DC Extension v1.4.2 without

If one doesn’t update the extension, on v2014 whenever you try to edit any component by double clicking on it, you get two error messages. It sort of works if you use R-click, Edit Component, but that’s not a pleasant way to work.

But it works without any bother in v2019 - or at least it did for me! Hope you have the same experience.

John, I’ll start off with an apology. Seems I started you on a journey that has had many ups and downs. My goal of greater detail in my pocket hole joinery projects, has cost enormous amounts of your valuable time and effort. I truly appreciate all the work you have put into this project.

The good news is that the components work as expected (an understatement to be sure, should say exceeds expectations). I have spot tested 4 variations and all behave as expected. I did successfully intersect the variations. I will continue to try out the whole set with all variations and keep you updated. But, for now I wanted to give you some early feedback. :grinning:

That’s very good to hear.

And absolutely no apologies needed. While it has been occasionally very frustrating, it’s not been time wasted. I learned a good deal on the way.

I’m retired, and find it good fun to respond when I have time (as fortunately, I did have this past week) to help others use SU.

Would love to see a model or two of your results. The images above look promising. What’s the end objective of your or your daughter’s project using Kreg screws? I see from another topic you started that you are modelling a sink. Part of a kitchen, or just an exercise?

Not quite sure, when I re-read this, quite what you mean?

Did you explode the pocket hole to intersect the board and create solid geometry of a hole in the board?

Or something else?

Kitchen remodel, actually. But it will be a long term project. But pocket hole joinery will be an important aspect.

Have some small projects in process with a goal of learning the SU basics. Will share these if/when I find time to complete them. And, whenever I design a joint, my inclination is to use pocket holes, although they are not a universal solution.

V glad I’ve been able to help on that. I’ll upload to the 3D Warehouse later - probably tomorrow, as it’s after 1230 am here in UK.

Now bear with me here, because I only partially understand the choices I am making. I did explode the components and intersect with the group (2x3). I am not sure why I did this. Maybe due to the fact that I have had such a difficult time in understanding the intersect process. Dave through many “hand holding sessions” got me to a point where I can repeat the process. My goal was to design my own components or download from the 3DW, and then intersect with the model. I got the feeling from reading so many posts that “intersection” of components was a necessary skill to be mastered. So, here I am with a new hammer and the world is filled with nails. :wink:

PS: Another goal was to generate “cut lists” for my projects, and am thinking that “intersect” components will play an important role, not sure though. More study required.

Maybe now, you can get some well deserved sleep !

Intersect faces with… does what it says on the tin. It takes the selected face(s) and works out where they intersect with the model anywhere, or just with any other selection (of objects and/or geometry), or just with what is in the same context as the face(s) you started with.

What it does with the intersecting geometry may be where your confusion arises - it certainly did for me for ages. SU puts the intersecting edges (and created faces, if any) in the context of the faces you selected originally.

This may or may not be where you want to use it later.

For example, if you select the flat face onto which a Kreg pocket hole has been inserted with the hole, the end opening will put the edges of the hole into the flat face. If you want to show that hole in the board, you can delete the face the edges (should) create and make a hole in the board.

On the other hand, as you found when you were trying to make the pocket hole yourself by intersecting a cylinder with the board, if you open the cylinder itself for editing and select the surface making the cylindrical part of the hole, then intersect that with the model, the oval hole edges will be in the cylinder, not the board.

Does that help at all?

And as before, if you want to use a CutList and have the boards the right size in the list, you need to use a component without the screws in it, whether they are hidden or not, since they enlarge the bounding box (the blue outline when the board is selected) which the CutList will use to calculate the size of the board.

I made a set of those components earlier, but it doesn’t have all the board thicknesses included in the most recent DC version. |'ll complete that set later today if possible, or at least by the end of Monday.

Now done. Uploaded into a revised first post in this topic.

Yes, thanks for the full explanation. And rewriting the opening section will save future readers the agony of watching my painful, sometimes embarrassing, journey of enlightenment.

I now realize the reason I became obsessed with “Intersect faces with”, it was knowing the final goal would be generating a “cut list”. One, still fuzzy area, is when the hole (a component) is intersected with the wood object (a group). Is the final result of this operation, a single group, no component? If I understand correctly, after the intersect operation, the component is broken down into raw geometry, right? So the original group (wood object) now has additional raw geometry only, no component, right? So, after the intersection will a cut list extension, ignore the additional raw geometry?

No, not right.

The Intersect operation creates new geometry if there are indeed intersections (sometimes you get a message that there aren’t any, but ignore that for the moment).

If, for example, you intersect the surface of a component cylinder (opened for editing) with a flat face in the rest of the model, outside the cylinder component, the intersecting pseudo ‘ellipse’ faces are inside the cylinder component. Nothing has been exploded, so the components stay as components with extra geometry in whichever one of them you started inside.

Then if you erase some of the geometry, for example the part of the cylinder ‘above’ the face, you still don’t destroy the component - you just change it from a full cylinder to an approximation of a Kreg pocket hole.

It’s only when (or if) you explode the component that you turn some or all of it into loose geometry. If that’s inside another object (e.g., your board) only the loose geometry will merge with it to become part of that object (component or group).

BTW, in general you will do better to make components rather than groups, especially but not only for any parts that are repeated, like the sides or frames of kitchen cabinets.

Plus points of components are that you are prompted to give them meaningful names, which becomes more and more useful as your model grows, and if you edit the geometry of one, all of the others are edited too. If you want to make just one or a few different from the others, select one or more of the existing ones, R-click and Make Unique, and change the name in Entity Info.

The only downside I think, of using Components rather than Groups, is that they may clutter the Component Browser, where Groups don’t appear.

Downside of Groups is that most users don’t give them a meaningful name (it’s not immediately obvious how to, and you aren’t prompted), and if you have multiple copies of a group, editing one will NOT edit the others but just create a different object. Your Outliner may show a collection like Group#1, Group#2, Group#3… and so on, and so on. Not helpful.

Of course, if you don’t explicitly name Components you’ll get the equivalent Component#1, Component#2, and so on. So DO name your components meaningfully as you create them. And (with very rare exceptions) don’t leave any ‘loose geometry’ in your model, except while you are in the middle of creating a new component.

There, rant over!

Thanks. Should have been more clear. My process for intersect faces is the following:

  1. Move component inside group
  2. With component selected, explode
  3. Cut
  4. Open group for edit, Paste in place
  5. Select group and component (and the face of wood)
  6. Intersect with faces>with selection

Am I right in assuming that after these steps, the component has been reduced to raw geometry?

Yes, but only because you exploded it.

You don’t normally need to do that, just open the component for editing, then Intersect faces with either selection or model.

Depends where you want the intersected geometry to end up. Though you can select it after the Intersect operation, Cut it to clipboard, change context, then Edit/Paste in place.

I find it’s worth setting up a shortcut for Paste in place - I use Ctrl-v on Mac, or would use Alt-v on Windows.

Sorry, have to go out now. TBC if necessary.

It sounds like you are working way to hard to get to the final result. I think you could make the process easier and much more efficient.

Absolutely. Don’t have any experience with the cut list extensions, so I am just guessing at this point. My goal was to generate a cut list that would show only the components (wood members) and not the holes or screws. Additionally, I would add an exploded illustration of the holes and screws. I thought using the intersect with faces technique would convert the hole/screw components into raw geometry, which would then be ignored by the cut list extension. But, at this point and level of understanding I am just guessing and quite possible making incorrect assumptions.