I am not sure how appropriate it is to ask for wide open criticism of a project versus a specific question about a method or approach. I am working on a design for a ‘library’ on our property. It is currently an old shed being held up by the new tin roof. I would like to get some feedback, at the Sketchup level, the design level and maybe some ideas on how I should proceed with my next model. Basically, I want my next ‘library’ model to be way better. What are some obvious things you all see that I should change (e.g. I don’t want you modeling it for me for free. I want to do it). I don’t know how to word that sentiment any better. Hopefully you get my meaning.
A load of incorrect tag usage.
All edges and faces should be untagged. Only groups and components should get tags.
A little bit of weird tagging of objects with the stair treads. Maybe that’s intentional?
Purging unused stuff reduced the file by about 28%.
You could use textures for things such as the metal roof which would lighten the model.
As for the design of the library, I think it’s pretty cool. I’d like to see how those gable end windows work. Probably wouldn’t here in Minnesota. If there’s any sort of a view toward the south I would be inclinded to do something with those windows to open up that view more. Would you insulate the walls and roof? If you leave the bare roofing tin exposed you might have condensation and then water raining out making your books a bit damp.
As an investment of your time and money, I am a bit worried, based on your PDF. Your design means building the library anew from the ground up, with, it looks to me, little gain of usable floor or shelf space. The library space is low and cellar-like, and the study in the loft has poor access to the books. As an alternative, you could consider checking what can be fitted into the existing shell when designed with efficiency. Shelves could go all the way up to the roof, with an integrated movable ladder for access to the books highest up. There would be no need for the stair that even in its “samba” design takes a lot of the available space.
Being an owner of roughly 5000 books distributed to three locations I am rather envious.
A famous bookshop in Paris:
Thank you tons for taking the time to comment. I appreciate your comments, and will take them into account with the next iteration in design.
Though I will say this looks rather dark and cellar like. That I why I have the bank of 3 windows that face south. The rest of the natural light, I hope, would be diffuse and warm.
That is OK. I plan on having a few small, short bookshelves on the loft for frequently needed references. The ground floor will be for more relaxed reading and research. I have not modeled all the shelves and stuff. The current entourage (per Aaron) are just placeholders. There will be a LOT more shelves. Our books are currently languishing in the cellar, ‘guest’ bedroom, our bathroom, etc. Plus I have to figure out where to store all the digital books I have! Woe is me.
BTW, anybody want a copy of Charles (1937) Microscopy for Parasitology?
Again, thank you so much for your help. I will hopefully post a revision.
The cathedral windows were an exercise, and I think they would be cool looking, but totally impractical and beyond budget. So a simpler solution will be found.
I plan on using components with lighter geometry in my next version. It is fun to have a bookshelf with all the cool details, but dang…
Just because I am amazed I ended up here, another drone photo:
Here is the start of version 2 of the Small Library. A few things first:
[Exegesis: I am thinking of posting my design evolution in this thread. Perhaps it will be a place newbies like me can find some answers to uncommon questions. If this is a bad idea or there is a better place to post, let me know.]
The site is on a NS-ish slope. The footprint has already been largely dug out. We will have to go down 18" for the footer, and extend the footprint 36" to finish it.
The current building is being held up by the roof. It has no foundation, just fake rock siding attached to very old, rough hewn, vertical timbers. The building can’t be saved. A few more carpenter bees and the thing collapses.
The goal of the project is a place for: books, hanging out and thinking deep thoughts, deep thought chatting with the spouse and close friends, and my office. The loft is a potential office solution.
This is a dream project. I have a site and ideas. I also have lots of other projects that need attention and money first.
For my current model, I plan on making several models or versions: a ‘framing’ model, a ‘walls, floors, roof, doors and window’ model, an ‘exterior detail’ model, etc. Library v2.skp (764.1 KB)
Any comments or criticisms are very welcome. I am particularly interested in knowing about model organization and best practices, but any and all comments are welcome.
It seems you may need to keep an eye on your measurement precision settings. I notice a couple of places where you have 16ths that seem unintentional - for example your door opening height.
Your Loft Floor Framing joist is off of your Wall West 1st by a 16th. The problem cascades across to the East Wall 1st, …maybe because your loft end joist is short a 16th? Take a look at the length snapping setting. It may be best to turn it off.
The joist hangers may be problematic for the ‘clear’ panels that will sit in the Lof Ref. Even if those are just mock-ups for the time being, a normal hanger will come fairly close to the loft sheathing. That will be in the way of whatever actually supports the ‘clear’ floor panels.
Venting or drainage from the ‘crawl’ space?
It looks like you ‘ripped’ your Ground Plane. You could make a ‘mini-topo’, with 1" increments (using Push-Pull) and then use the Create Terrain function from the Sandbox tools to recreate the damaged section of the Ground Plane.
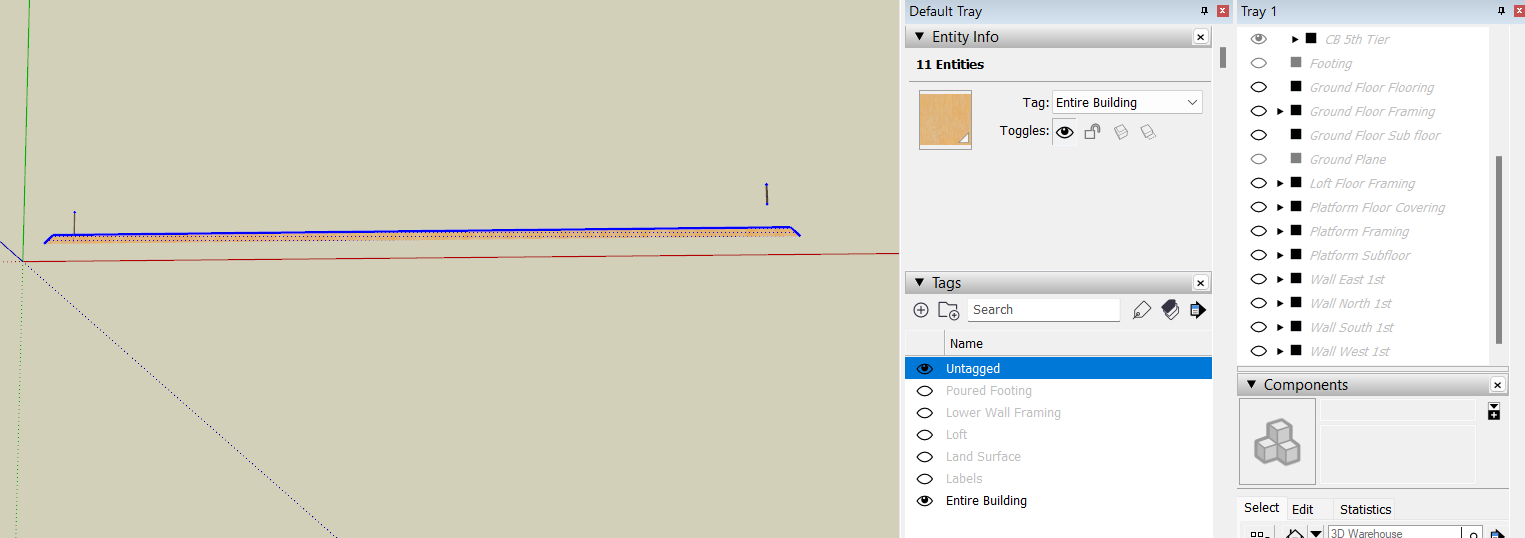
Check your tagging. Maybe use an ‘Entire Building’ folder to switch the whole thing off and then ‘Lower Wall’, etc. inside of that. Whatever scheme you like… keep going with it. When all of your tags are off, nothing should be visible. That gives you a second way to check your Groups and Components… which you’ve done a good job with except this little bit of (tagged) loose geometry:
Thank you so much for your comments. I address them below.
I have turned of length snapping. I fixed the 1/16" Loft floor joist problem and the door height. I guess I was in a hurry or having brain gas. Thanks tons for noticing!
Good idea, particularly in Eastern Tennessee! I was definitely going to use a vapor barrier, but some venting would also be smart. I will check to see what folks do around here.
Fixed. I just replaced the section. The ‘ground plane’ is just to show roughly where the top of the landscape is relative to the foundation. I will eventually rent a transit and make a higher poly topo for a more detailed model. Mainly I want to play with a transit.
Thank you for the advice. I have tried to ‘normalize’ my tagging and labelling. I also found the weird bit of loose geometry. I think the sub left it behind when they cleared the site.
At the very least you need to provide some sort of opening for snakes and rodents.
Playing seems like a reasonable approach.
It looked like you were staying pretty-well organized. Gotta keep an eye out for ne’er-do-well subs messin’ about in your geometry. If they can they’ll substitute good geometry for the cheap stuff.
Here is the next version of the Small Library. I ran into a mis-tagging situation in which somehow I tagged the faces of the loft subfloor as loft walls, so I could turn the walls off and it would also make the floor disappear. Very confusing until I remembered one of Aaron’s videos where he discussed that very problem and why faces and edges should remain untagged.
You’ll need some 1/16 furring or a slightly longer board.
I’m guessing that this is carry-over from the precision setting or length snapping.
I’d turn materials off to reduce visual noise. If you want some differentiation, you could try turning color by tag on or use a (fast) style you like. Add materials once the ‘building’ is done.
Turn on Component Axes (Window->Model Info->Components->Show Component Axes). The reason for this would be to see how your components are fitting together (and to snap them together at corners).
For example, if you Push-Pull the 2x6 the 16th it’s off, it will jut into the opposite side Loft Wall East by a 16th (all over really). It seems like you created components and have a ‘building perspective’ as if you are looking at the front of the structure. So, when you created the back wall, you copied the front and moved it back (the Component axis is now on the inside of the building because you did not rotate it). This could be fine (if your ‘building perspective’ is constant). But when you then start looking the back of the building, you’re sort of building from left to right again but your Component Axes are now in a different place relative to your front ‘building perspective’. Meaning your Component Axes are on the outside of your building when you look at the front of the building and your axis are on the inside when you look at the back of the building.
That may not have been a good explanation and you’re not ‘doing it wrong’. But try taking a look at the component axes. Knowing how they are oriented relative to each other may help you get this 16th issue settled and understand why the corners are sneaking around.
I can totally believe that I missed that after trying to fix that very problem. I have taken your advise to heart. Here is the model that I hope is fixed. I had added a roof (this time with 4x6 timbers because it might look cool). I have also added a potential change to my loft to give me another 40 sq ft of space. I will need to move the loft windows if I go that route. Library v2.skp (1.3 MB)
Thanks again for your help.
Tom
ps. I originally uploaded the file before doing a SAVE
Thanks for the idea. I think I will merge your idea with my current thinking and see what happens. I am going to wait until 3Dx confirms that I fixed my 1/16" error.
It looks like you sorted it out. Now you can just rely on material inconsistency, imprecise measurements, and wonky cuts to make sure the lumber is either too long or too short at build time ;^)!
Hmm. Another approach could be to create components that match available materials (which it appears you are doing - partially). For example, your Wall West East (and other lower walls) have 2x6 studs that are 7’ 8 5/8" (92 5/8"). Looks like you are going to cut those in half to use as studs in the Loft Walls. But what about those 21’ 4" wall plates? Instead of getting a semi to haul those in and a team of mules to lug them around the job site, you could use 3 of your 2x6s with a leave of 1’ 9 7/8ths. That’s not much waste and those could be cripples or whatever. 2 on your short walls with a leave of 2’ 1 1/4.
I’m not a framer but your wall corners seem backwards to me. I’d rotate the 2x6s so that the outside corners are 90s. The way you have them you’d have to put backing in to attach sheathing both inside and outside of the building. Thinking about building: are you going to tip those walls up? If so, the wall plates should not be in the way of each other (tie your walls together with the very top piece).
You’ve got a sort of Double Shazami floor system going on. If you want the lower-level ceiling height to be higher, you could set your beams across the top of the walls (not a builder alert). The way your 2x8 beams sit now they are cutting into the end short walls anyway (so the second interior 2x8 of the short wall isn’t a beam anyway… so the top and bottom ‘plates’ of your walls don’t have a 2x8 running the entire interior short span). You’re sort of between using hangers (like a deck) and setting beams on the wall. Prwly made this sound confusing ;).
Your loft sheathing is jutting into the wall plates. Otherwise, your sheathing is ‘up on the wall’. Not sure I’m recalling correctly but sometimes walls are built on top of the floor (sheathing). In your case there are some large areas that you want open so building on the floor may not make sense.