@DaveR, I’m not falling for this. This time I would rather count the hours of sleep I have ahead of me than counting “your” teeth. Not making the same mistake again at (for me) such a late hour.
Very nice models by the way.
1 Like
@Wo3Dan thank you.
I guess I’ll sleep when I’m dead. ![]()
Another thing, very simple this time, from about 1895.

Conveniently a screw from one of my shaft hangers is the right size for this handle. I just need to cut it to length.
3 Likes
Hand for a steam-operated clock…
1 Like
Actually it’s a handle for a lathe but I expect it’s generic enough it could be used on a steam powered clock. ![]()
Joking, of course. I like the overly sturdy machinery of the “steampunk” era. I once went to a bookbinding course that was arranged in the hand work department of a local printing press where everything else was automatized. They had a nice collection of apparently very old iron binding presses and tools that were fun to use. It is all finished now, and I wonder where the equipment went - it would probably last a couple of hundred years more.
3 Likes
@DaveR , these (the two handles) look pretty similar to the hardware on my old Shopsmith. I don’t suppose these are, in fact, Shopsmith parts?
No. They are from before Shopsmith was a thing.
Going through some old models. These were done for a client a couple of years ago.


6 Likes
Terrific thread!
Dave, what is your process to remove hidden edges? Regardless of what I’m building, I inevitably have hidden edges that are the result of combining parts that are grouped, leftovers from mergers, and especially from editing shapes. I do get successful 3D prints most of the time, but sometimes the hidden edges create discontinuities in the print and I get odd delaminations in the finished parts.
Is there some easy workflow to apply to identify and get rid of them? I do use Solid Inspector 3 to identify any solid problems, but still am not sure about how to remove the hidden edges without destroying the part’s integrity.
In the case of all of the models shown here, every part is a single component and most edges are either softened or hidden. If I did want to make it appear that two separate components were one object I would hide the mating faces and the seam lines.
Example: In the center I’ve hidden only the seam line. The faces end up bleeding through a little, especially when shadows are displayed. On the right the end faces and the seam lines are hidden. The components are still solids with the faces hidden.
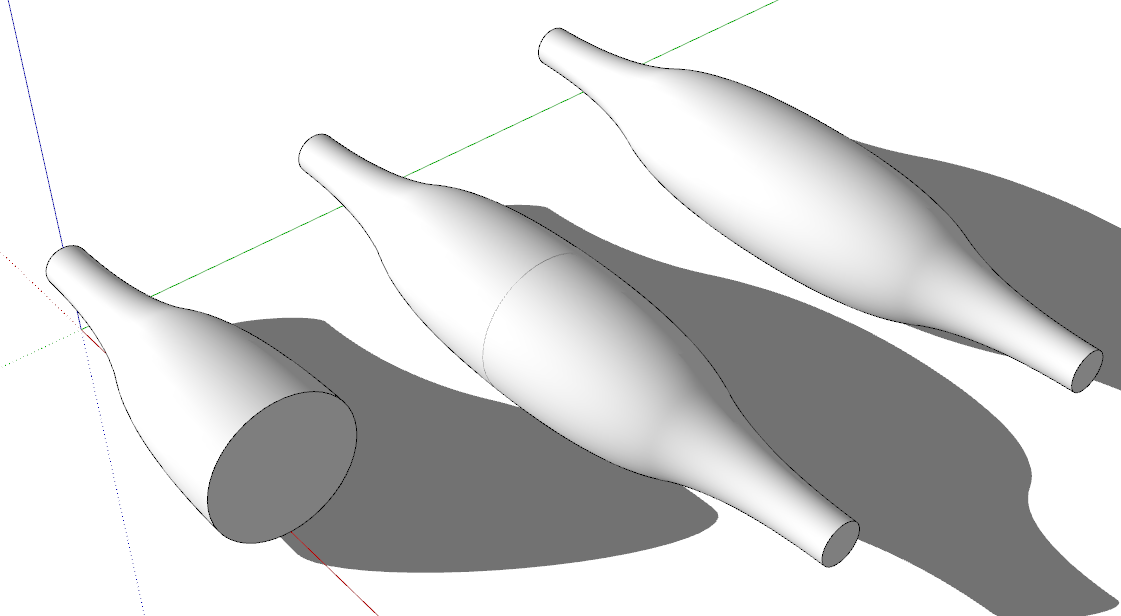
As for identifying discontinuities, I guess it just requires close inspection. If you are having difficulty, maybe it’s better to make them parts one.
3 Likes
A handwheel for a machine. 8 in. diameter. c.1900.

As usual, both components (wheel and handle) are solids
7 Likes
1905 … didn’t think you were that old.
I guess I age pretty well. ![]()
2 Likes
Revisiting some older models.

Clock designed by Isamu Noguchi, 1932.

Claro walnut live edge slab bench.
6 Likes
Another old one. A pump drill based on one from ancient Greece.

11 Likes
Half of a front axle beam for something from around 1910.

8 Likes
I decided I didn’t like the previous version of this thing. It’s too clunky looking.


9 Likes


I decided to switch it up a little bit since it’s raining.

10 Likes

A few screw threads yet to do
11 Likes