I am designing a model of a V12 engine and gearbox combo for a model car. I have created most of the engine internals without a problem but I am constructing a crankcase around said internals and SketchUp won’t consider the crankcase component as a solid. Because I am running through a free school account, and because of my platform, I only have limited native tools and no solid inspector. I have read about other people’s problems before on these forums in order to solve my own problems but at this point, I am out of ideas. Disclaimer: This is only half the crankcase I was planning on using the flip along ____ axis, function to create the other half. Also, the actual model itself does not include any of the internals portrayed in the pictures and is just the raw component.
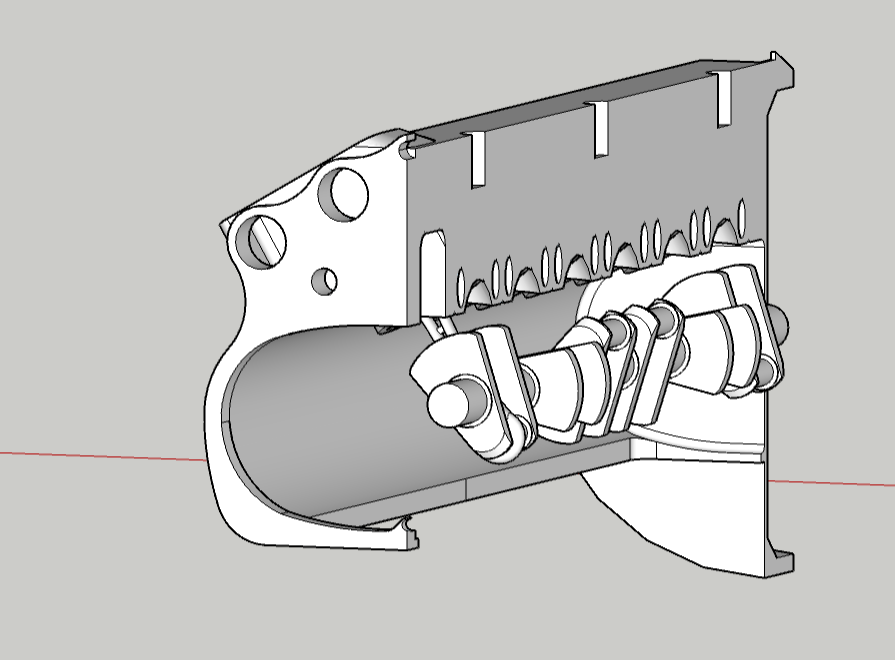
I have been checking the entity info tab religiously throughout the creation of the component so I have a relatively good idea of when the problem would have occurred. After creating the part that houses the cylinders (most visible in picture one) the component was solid. Then I added the clutch housing (circular hub on the front of the model visible in picture three) intersected it with the part that houses the cylinders and that was solid too. Then I added the flat plate on the backside of the model (visible in pictures one and two) and intersected it with the first two parts and these three formed a solid component. The problem occurred most likely in the next 2 steps because after these two it would no longer register as a solid. In step four I added the interior of the crankcase (Most visible in picture two) and intersected it with the rest of the model. I was not able to check step four in the entity info tab because it only formed one face, however, I highly doubt that the problem occurred here because the intersect faces tool did its job flawlessly. In step five, where I believe the problem occurred, I added the outer ribbing (visible in picture one) this also should have created the faces that made the model solid again however I had some trouble with the interest faces function where the faces created in this step meet step one. At the end of steps four and five, the model no longer registered as a solid even though I could have sworn it should be. Even though it wasn’t solid I decided to do some final touches (like the hole in the bottom of the crankcase) before I came and asked you guys.
I know this is a mouth full and a half, but I would appreciate all of the help I can get to make this a solid component for 3D printing. Also, it would be great to know: Other than using the entity info function, what can I do with native tools and no solid inspector to try and prevent or fix future non-solid components and turn them into a solid?
You can spot the errors if you know how to look.
Use the ‘profile’ to spot hole where they shouldn’t be. A profile should show only when there is an edge with nothing next to it, so the perimeter of a shape, but if it is showing down an edge that should have a face either side there must be a hole there.
See this gif, the strong profile show a problem with this area, a redraw fixes it, you’ll find similar at the other end, you can just trace the edges in that case.
Smoothed faces not continuous show there are double faces, find them and delete them as in the gif, you’ll also find some very small triangles down at the bottom of this area on the depression.
Fix those and it shows as a solid.
As suggestions to avoid such issues in the future:
work at a larger size so that you minimize chances of issues with vertices too close together. You can scale the model down to real size when it is complete.
set the projection to perspective instead of parallel. Parallel is more likely to cause issues with clipping.
I finished the changes you guys advised and I appreciate the work however even after all of this it still won’t consider it solid. Here is a picture after all of the updates I can’t see any other profiles where there shouldn’t be or faces that are out of whack. Here is the updated version of the model as well. Any other ideas, maybe run it through solid inspector?
Sorry, I am just getting to this now, but thank you so much! The model now shows as solid, and this helps a lot. Credit where credit is due, Box you are a genius, sorry I didn’t pick up on the smaller triangles at first. I have to ask, how were you able to find that smallest triangle?
Also thanks for the tips on how to pick up on / avoid such issues in the future, I have heard about sizing up models before to get faces to intersect better but have never really used it, I will definitely try it out.
Experience. I knew to look for it as the hidden geometry was showing some very small edges in that area.
But that comes for spending a lot of time finding errors before extensions like solid inspector and fix it existed.
I figured that experience would be the answer. I just hope that I can get as good as you at spotting errors given my limited tools. Thank you guys again, this has been a very big help!
You could download 2017 Make, the last free version for desktop, it is still available and would give you access to many extensions, including Solid Inspector. Not for commercial use.
I’ve thought about finding a way to use a different version of SketchUp but I’m pretty happy with the way things work right now. Besides I personally think that while more difficult it is way more fulfilling to use native tools when you actually get it right especially when it comes to really complex shapes. Anyway, thank you again!
I know I should probably make a new topic for this, but it is easier to put it here for explanation purposes. I finished adding a few extra details to the engine block half and I made a copy of that half so I could fiddle with some geometry that needed to be moved around. All of this went great but when I went to try to merge the two halves my Sketchup tab freezes up. The rest of my computer is completely fine and runs all of the normal functions the problem is only within the Sketchup tab. Eventually, after about five minutes a chrome info window pops up and says page unresponsive and I have tried to press the wait option only to have the info window process repeat after another five minutes I simply stopped trying to press the wait button after about 10 minutes and refreshed the page. I have tried everything I can think of: pasting just the geometry inside a component, using the scale tool, flip along an axis function, outer shell tool, I even tried pasting the two components that need to be merged in a model without anything else in it to make the file smaller. Lastly and finally I tried using the family desktop which should have a much higher processing capability than this Chromebook and it still supplied me with the same message. What should I do to get these two pieces to merge into one component?
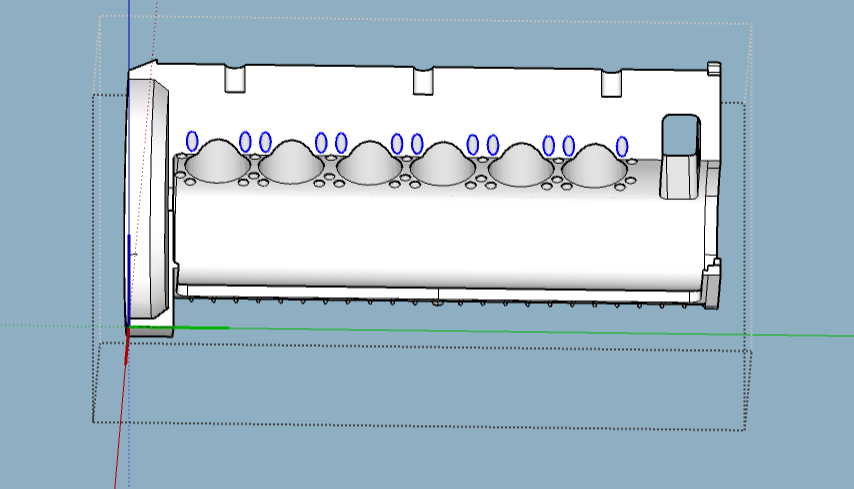
On my top-end MacBook Pro with desktop SketchUp 2021, I tried outer shell on the two parts of your model. i killed it after it ran long enough to convince me there is difficulty. I think the source of the slowness is that the two halves don’t meet cleanly along the bottom (see screenshot below). In particular, the various drill holes don’t line up with anything on the other half. I think this is resulting in a very large amount of very small edges along that join, and processing them is putting a large strain on SketchUp. In addition, those conflicts aren’t how the drillings would actually penetrate if they went through a single casting.
One way to try fixing this might be to create a cylindrical component for the drill, place it in a hole, sticking out at the bottom, and use Intersect Faces with to generate the part the drill would have removed from the other half. Then delete that part. It will be tedious to repeat this for every drill hole that crosses at the middle of the bottom, but because it involves a lesser amount of geometry, each such operation should go faster than the outer shell.
Edit: this begs a question: on the real engine block, do those holes really misalign the way they currently do in your model? The overlap between the cylinder bores for the two halves looks strange to me.
Edit 2: I let it run for a long time (not sure exactly what it took because I started doing other things) and it finally created a single solid! Of course, the questions about the weird join still remain.
So I just got out of school and a couple of things should probably be said. First things first, I am not a Lamborghini Engine Technician or something crazy like that (no matter how cool I think that would be), I am a 15-year-old in high school just trying to screw around and have some fun with modeling software, because of this from the very beggining I knew there might be some wacky mechanical things or imperfections that I couldn’t fix (more on that later on). Secondly, I am designing this for two reasons:
Reason A: As I said earlier it is supposed to be a reference engine for a car I am designing around it (I need to know an engine can fit in the engine bay). My Dad and I have always loved the way a Countach sounds so that’s what I went with when it came to the engine choices.
Reason B: It would be pretty cool to say that I designed it, especially if it 3d prints right albeit in a smaller scale, and it gives me something to do during this stay at home thing.
Back to the mechanical issues. To start with I wasn’t able to find a whole ton of refrences because suprise suprise Lamborghini is still pretty secretive 30 years after the Countach left production. At the end of the day the only useful things I could find included a picture from a parts manual, a one view blueprint, and some basic specs: bore, stroke, angle between cylinder banks.
Truthfully, you are totally right, no the holes probably aren’t that way in real life and the drill would not work that way. Originally, I was fine with it but I am actually really happy you gave me the criticism because now I am going to change it. My only problem is I really need it to be one big component because other wise it makes doing this way more difficult. However, I have fixed the cooling holes that only show through on the half line (thats what all the small diameter holes are) and connected them so that they could at least be 3d printed and the coolant would flow smoothly. They got moved up and sideways so that they would clear the cylinder holes and still merge.
So I guess my point is: I am happy that you gave me criticsm and I want to respond to and fix the problems you displayed my only question is how can I make it one whole solid so that I can fix the merge issues? I know that I could just import your component but I also want to find a way to do it on my own for future models. How long did you have to let it run approximately 30 mins, 1 hour, 1.5 hours, 2 hours?!
Edit: The half line looks wacky because the cylinders are slightly offset in the longitudinal direction this is visible in the blueprint.
I have no experience with chromebooks so I can’t say for sure how much longer it would take there or whether it might hit some limit of its capacity and crash. I’d make a copy of the model to protect against the latter and then launch the process and leave it for however long you can afford to see what happens.