Today I returned to a project that I had down some years back. I wanted to print it out but when I did it lopped off the left side dimensions. I tried upgrading to SketchUpPro-2021-0-1 and got the same result and then again with SketchUpPro-2021-1-299-99 with no success.
What happens if you export to PDF and print that?
Can you share the LayOut file so we can take a look?
Oddly when I print to a PDF it looks like it will print correctly but yet when I print the PDF it is no different than printing directly to the printer from Layout!
This picture is the 2 versions of the printout. 1 is the PDF and the other is the direct print there’s absolutely no difference between them.
I’ve attached the original file. When I load it, post the 2 updates to he program, I get a prompt to update the file from the original which has been changed significantly so I just cancel that update. I don’t suspect you’ll get that prompt know since you only have the .layout part. But I wanted to alert you.
Garage Door.layout (1.2 MB)
What I see in you LO file is that you have content outside the page borders and very close to the edges of the paper. I don’t see any difference in the positioning on the paper between printing to PDF and exporting to PDF from LayOut. It could be the way your printer is handling content that is in the page border region.
I would suggest that you set up a scene in the SketchUp model with the camera set to Parallel Porjection and the standard Top view. then use that scene for the viewport in LayOut. You can set the scale to something reasonable for the paper size such as1:24. That will allow you to keep the content wihin the page borders.
I’ve done that here.
See if this one prints out better for you.
Garage Door.layout (1.3 MB)
I see there are paper gutter marks on what you sent back but I can hardly see them. Your version printed properly.
Even when I printed the image on legal paper it still printed up against the left edge. I’m certainly not an expert at using SketchUp. Most applications I use automatically center and scale to the paper they are being printed on. From what you wrote I need to create a scene? How did you do that. I know how to change the camera and I was able to “save a scene”. But I don’t know how to set a paper size to 1:24 or even what that means. I usually select paper by size. After you create this scene how do you then “apply it” to the original layout file?
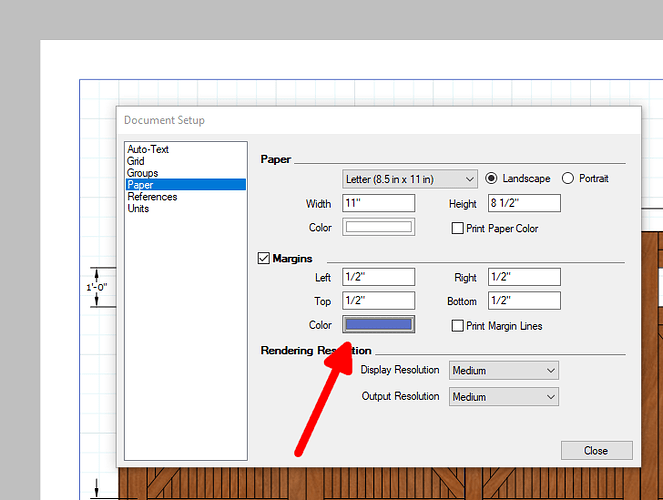
If you find the margin color difficult to see you can edit it in the Paper section of Document Setup.
Printing on longer paper doesn’t change things because the printer starts at the first edge and prints until it runs out of stuff to print.
LayOut sizes the inserted viewport with its height proportional to the height of the page. That can result in the model being cropped at the sides unless you size the SketchUp viewport to match the aspect ratio of the paper. this is common enough because computer displays these days tend to have an aspect ration that is longer than most paper sizes. You could make the Sketchup window narrower so it matches the aspect of the paper you plan to use but it’s a simple enough procedure to resize the viewport by dragging its edges that it’s probably not worth it.
As for centering, that would happen if the model is centered in the model space in SketchUp. Using Zoom Extents makes sure that happens.
Scenes are a fundamental thing in SketchUp. In the case of the view you wanted to create do I what I described in my previous post. Set the camera to Parallel Projection and choose the Top view from the Standard Views. Click Zoom Extents to make the model fill the model window. All three of these are settings in the Camera menu or via tool palettes. Then in the Scenes panel click on the + in the circle to create a new scene.
Creating scenes in SketchUp gives you fixed views of the model. If you orbit or zoom away from that you can always click on the scene tabs to get back to those views.
It’s not the paper size that I set to 1:24. I set the scale for the viewport to 1:24 to make it a suitable size to fit on the paper. With the camera set to Parallel Projection and the standard view selected for the scene in SU and that scene selected in LayOut, it’s possible to set the viewport’s scale in the SketchUp Model panel in LayOut. If there was more than one scene in the SketchUp model, you would select that scene near the top of the SketchUp Model panel in LO and then choose the scale. Don’t touch the Standard View in the SketchUp Model panel. That’ll take care of itself when you choose the scene.
Normally you would create the scenes before you send to LayOut but you can go back and make edits to the SketchUp model including adding scenes, save the changes and then in LayOut right click on a viewport and choose Update Model References or select the viewport and click on the Update button in the SketchUp Model panel.


