About 5 AM this morning I couldn’t sleep as I pondered how to use walls to determine the perimeter of the flooring. After a few hours of thought and intermittent sleeping I think I may have an algorithm concocted that might actually work. I will see if I can put something together that actually works as I envisioned it, no guarantees on this one though.
5 Likes
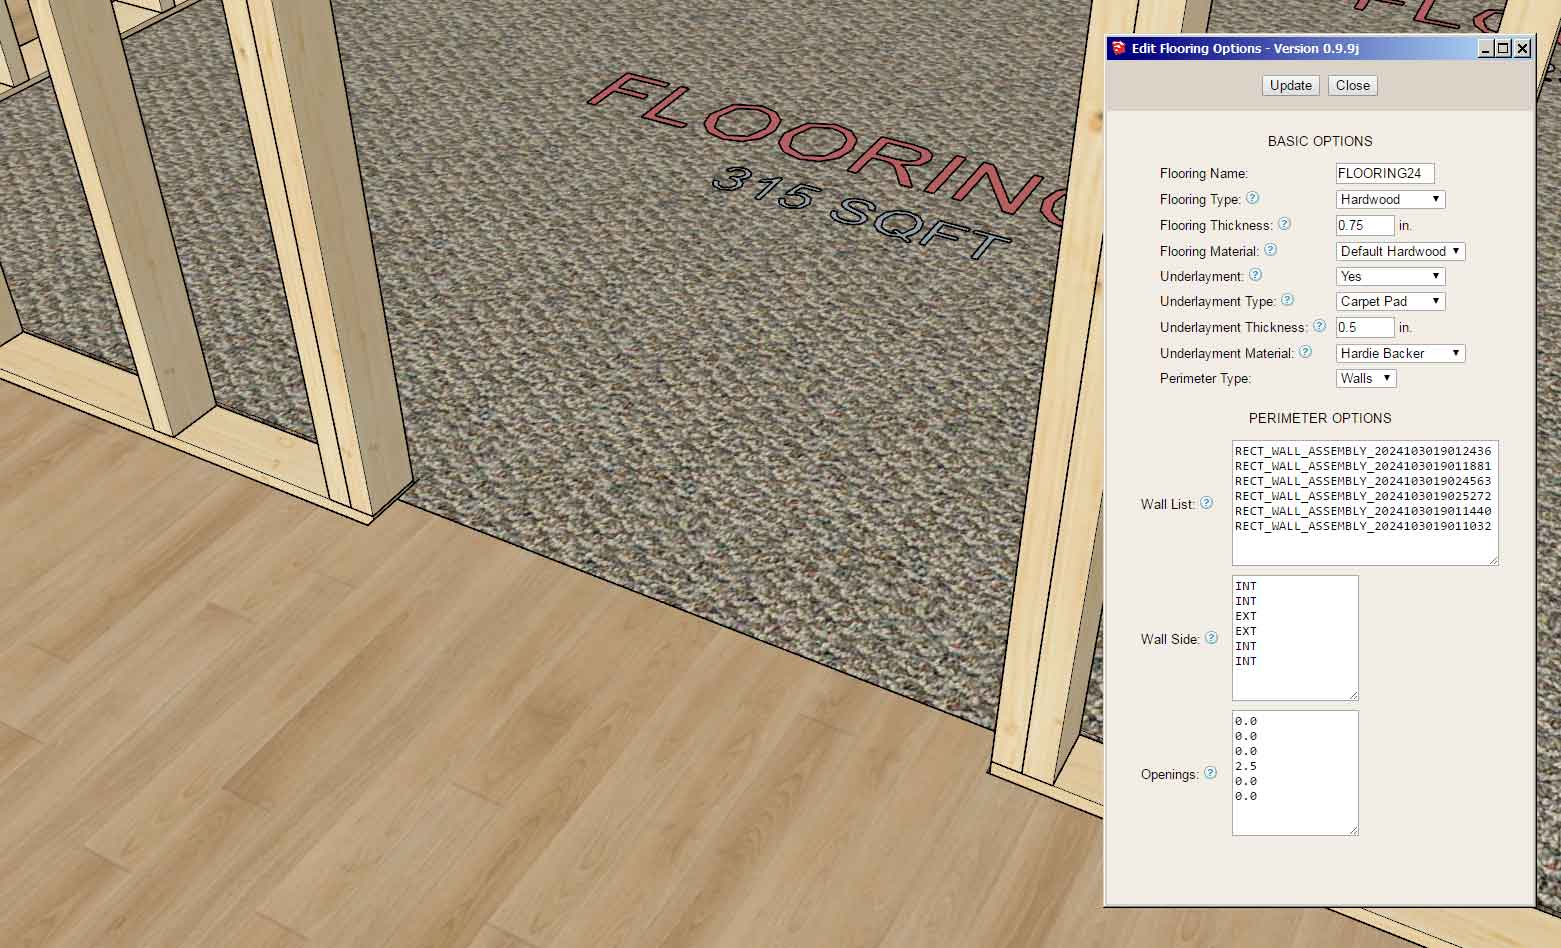
Still working on this algorithm but at least I have the tool setup now so one can switch it into Wall mode and then select the specific walls that will eventually determine the perimeter of the floor covering:

1 Like
One detail to not overlook: There will be cases where the choice of floor material requires that the baseboards of the defining walls will need to be offset upwards.
I’m thinking specifically of manufactured hard surface “floating” flooring - where the finish floor isn’t actually attached to the subfloor. The floor is laid with a small gap to the wall finish, then the baseboards are added that hides the gap. The gab allows the entire floor to expand and contract horizontally - expanding and contracting the gap as the environment demands. I installed 10mm think finish flooring over 2mm underlayment for a total of 12mm that I had to hide. Conveniently, offsetting my basboard up by 1/2" gave me perfect results!
I understand that with actual hardwood floors, this also needs to be done - but have no personal experience with that.
1 Like
I can probably achieve this with an offset parameter.
1 Like
Version 0.9.9m - 11.04.2024
- Added a “Wall” draw mode to the floor covering draw tool.
- Enabled “Perimeter Options” within the edit menu of the floor covering tool.

When drawing floor coverings you can now toggle between polyline, face or wall mode. Wall mode will allow you to select any number of Medeek walls (in logical order) which will define the boundary or perimeter of the floor covering. At first I was going to make this a fire-and-forget type of draw mode but instead it makes sense to retain the association even after the initial floor covering is created.
If any of the walls are deleted or somehow the “link” is broken the floor covering assembly will resort back to its “point” mode and the save points generated by the walls. So it will or should fail gracefully in these cases. Also note that there is a wall side associated with each wall assembly, this can easily be changed from EXT to INT or vice versa as needed.
I will make a new tutorial video showing this increased functionality and it should further help explain how this new system works and how to use it. I’ve been testing this feature for almost five days now so I think it is fairly robust but I am sure there may be specific cases that may defeat my algorithms. Bottom line, this is brand new so proceed with some caution.
2 Likes
Tutorial 15 - Floor Coverings with Walls (11:47 min.)

Oh, This is great!
I have 1 question because I don’t technically know. For the interior door, would/does the door get lifted to clear the bottom of the door so it’s door swing clears the floor itself of whichever room it opens into?
i.e. Right now, we see the door in/under the floor itself. Should we raise that door? Or, how does/should it get managed both in the real world and in medeek?
1 Like
I just set my carpet thickness too high/deep. Currently there is not a way to adjust the height of the bottom of the door, however I may add that into the Wall plugin at some point if more requests are made.
In this situation the floor covering is linked to the wall assemblies and is using their locations and parameters to determine where the perimeter should be drawn. However, the walls and the Wall plugin know nothing of the floor assembly or its sub-assemblies. So in this case the dependency is only in one direction.
Now that I’ve set this up for flooring I realized I can do a similar sort of thing for the floor assembly itself, so that when you move the walls the floor can be regenerated and automatically adjust to the walls as well as the associated floor coverings.
The other limitation as described in the video is the door openings and how to handle them (in wall mode). I will give this issue some more thought and probably come up with a solution while subconsciously thinking about it. Strangely I find that many of my best algorithm solutions come to me this way, when I am taking some down time after hours of programming and then suddenly an idea just seems to pop up and present itself.
In real architecture, would the door simply be lifted To adjust for the top of the actual floor (not subfloor)? Does something like a 2x4 get put under it to lift it?
If so, i can simply manually lift the door using SKP controls in whatever meantime. I just want to know how it would be managed in real life more so than the tool and I can simply create/manage geometry to address it.
The reason I’m asking is I generally try to make my models as close to how things actually get built and I don’t know how to manage that condition. I should reference my old arch books I guess (ching or building construction illustration are generally my go to’s)
From watching your vid and not actually applying it myself, I currently much prefer the wall selecting method.
I often found my code solutions came better after a night of sleep. I could chase some dragon all day/s and suddenly after waking up a random morning, I knew what I needed to do.
I haven’t hung that many doors but in some cases I’ve needed to trim the bottom of the door to account for a thick shag carpet and pad. Here is a good discussion on how this is handled in the field:
1 Like
Okay, here is the proposed solution to the door opening issue in wall mode:
Have a numeric parameter assigned to each wall in the list of perimeter walls. The number can be any float zero or larger. Therefore each wall can be controlled separately and the amount the flooring is extended into the openings is completely controllable. If a wall has multiple openings then the user can enter in multiple values for the wall deliminated by commas.
In the edit menu it will be similar to the wall side text area but numeric values instead. When first drawing the flooring all of the values will be zero, then one can edit the flooring and make adjustments for each wall or even door opening.
The idea came to me after reading a comment on the latest video I just posted. This will allow one to split the extension midway within the opening if so desired.
Version 0.9.9n - 11.06.2024
- Enabled “Openings Options” within the edit menu of the floor covering tool.
Tutorial 16 - Floor Coverings with Openings in Walls (7:59 min.)

2 Likes
Version 0.9.9o - 11.07.2024
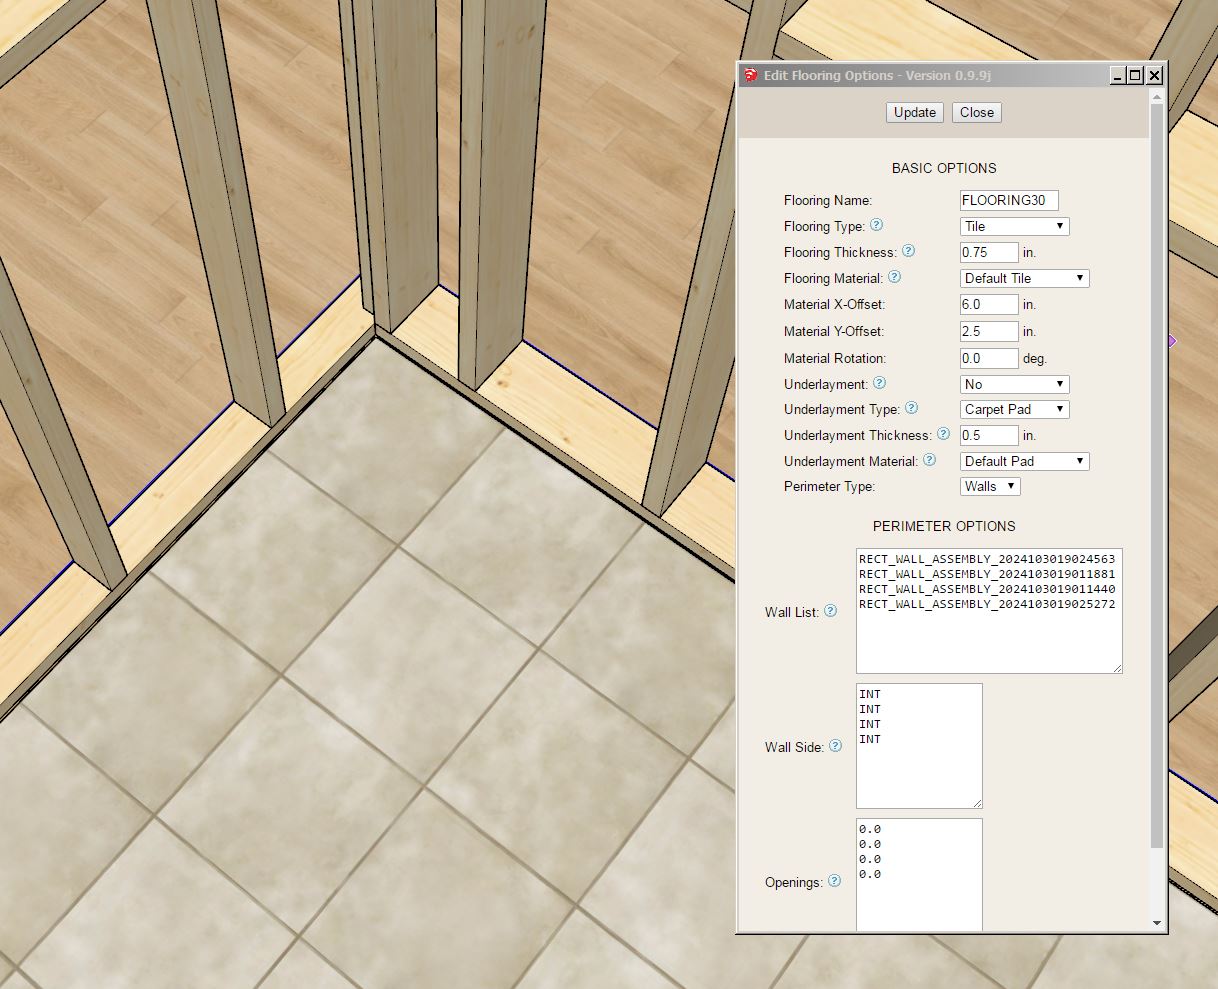
- Added a Material X-Offset parameter for the floor covering material.
- Added a Material Y-Offset parameter for the floor covering material.
- Added a Material Rotation parameter for the floor covering material.

I will probably add in the same offsets and rotation parameters for the underlayment as well, but I will hold off for now until it is requested. I really want to get back onto the floor opening tool.
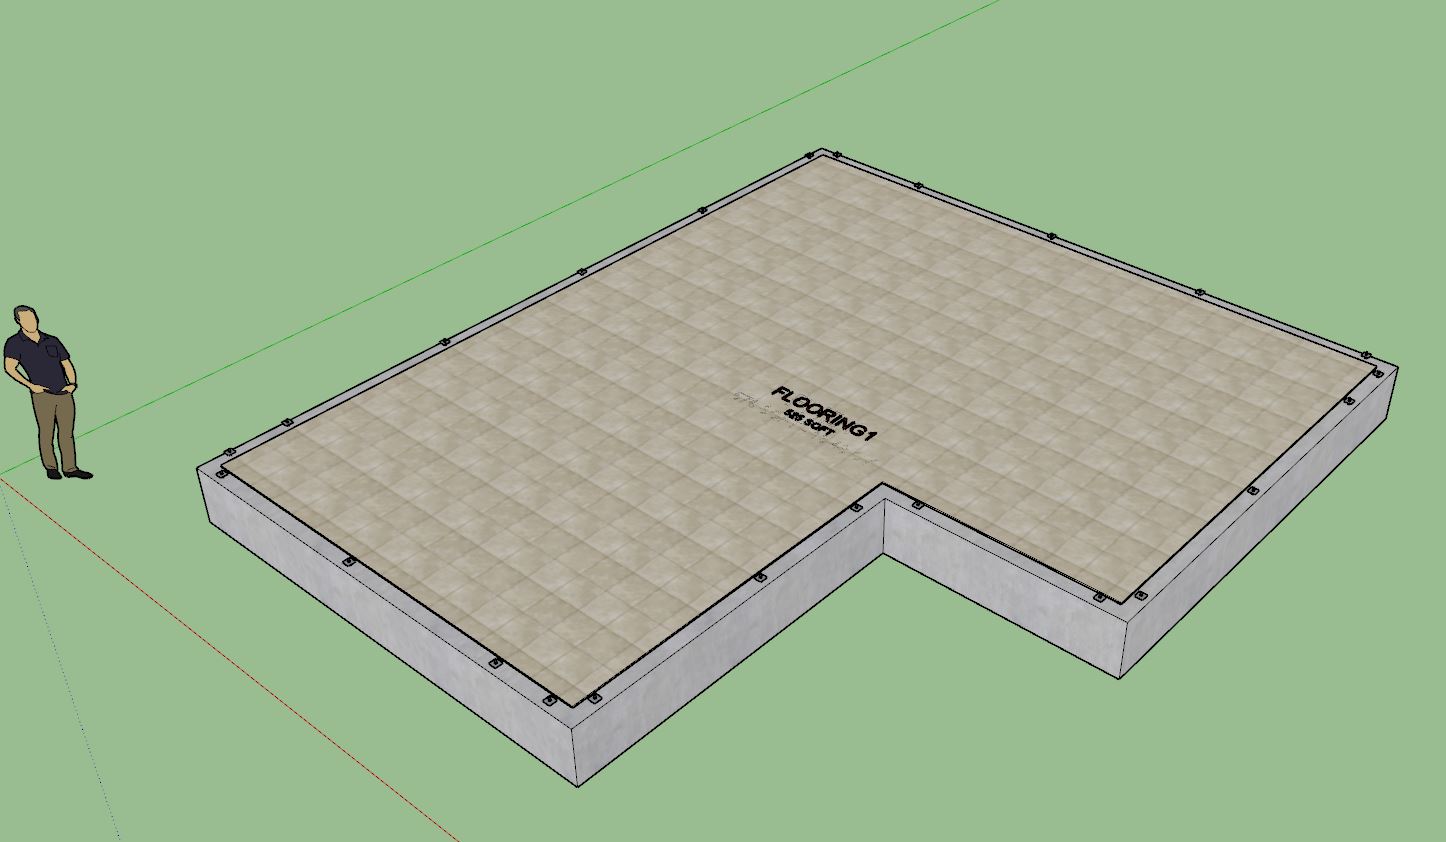
I’m going to update the Truss and Foundation plugins so that you can also use the floor covering tool with slabs, SOGS and floor truss assemblies:
Similar to the blocking module with the Wall plugin the Floor Covering module is really a plugin within a plugin. I just need to update the other assemblies so that when they regenerate they recognize the floor covering groups and retain them.
Whether you use the floor covering tool on slabs, polygon floors, or floor trusses the same functionality is there. You can use wall mode as I did in the above example to create a tile floor within this slab on grade structure.
Thank-you @LinearGraphs for asking about this and leading me to yet another solution.
1 Like
The wall mode is really the first time I’ve set up an interaction or relationship between the Wall plugin and any other plugin. Technically I can setup this same sort of system for roof assemblies, floor assemblies and for foundations. So that if you move your exterior wall(s) the roof, floor and foundation update accordingly. This would be a one way dependency, the same as the flooring is calculated in wall mode, thoughts?
If it were a two-way street, that would be cooler, but the idea of only needing to change the space instead of having to think about all the other movements that need to be made, that would be a game changer. In essence it would almost be like all the four different assembly types would be combined into one. Just imagine generating either a slab or a joist floor, the exterior walls and a roof on top of it just from a single shape drawn on a plane. You could pop up all the settings in the menus incrementally, then boom a whole house… Then tidy everything up.
These may be just the rantings of a lunatic, but your tools are becoming more and more amazing
1 Like
In most cases I feel like the plan layout of a building will drive the final exterior dimensions. In other words the walls will probably dictate where everything else should go. I will need to give this some more thought but I do see a direction I can take with this.
1 Like
Version 0.9.9p - 11.08.2024
- Added a “Wall” draw mode to the floor draw tool.
- Enabled “Perimeter Options” within the edit menu of the floor tool.
Tutorial 17 - Linking Floors and Walls (11:09 min.)

I apologize I got so interested and focused on the wall draw mode for floors that I completely forgot about the updates I made to allow for drawing floor coverings on slab etc… I will drop those updates into the very next release which will probably be this weekend.
To get the wall linking to work correctly I had to do quite a bit of updating with the nuts and bolts of the plugin. I think everything got updated correctly but if you notice anything out of place please let me know. I think I updated about 15 of the .rb files, pretty much every advanced option.
P.S.
Well it took me way too long to get this plugin put together but it is finally here and it mostly works. I hope it is meeting everyone’s expectations. If it is not, please let me know what feature to add or what to change to make it better. I can’t guarantee I will add everything everyone requests but I am will to take everything into consideration.
The opening tool is still the elephant in the room but as I’m looking at the code tonight it appears that the floor covering tool should give me a major head start on this next piece. That will certainly save me some time especially on some of the more tedious stuff. Under the hood the openings will be like windows in walls so it is slightly different in some aspects.
I’m still not sure what I’m going to do about the beam tool. I’m honestly not sure if it is even needed given that one can just create beams with the beam tool in the Wall plugin. I will need to give this some more thought. I also need to go back through and revamp my todo list, a good weekend project (and maybe some BYU football.)
1 Like
As requested here is the edit menu with an offset parameter added to the Perimeter Options:

1 Like