I am working on a house model that is in it’s 75th iteration. I’ve been working on it two years and have rebuilt it numerous times as the design has evolved and I have advanced my SU skills (better grouping, use of tags, cleaning up, solving coplanar issues, etc). But I can’t seem to fix this current problem. All I did was change one wall in a model that has been stable for over 6 months. I’m having problems not getting all the faces to fill in. If I got the top and bottom plate faces coplanar, the walls might not fill in–or vice versa. Many times I’d get the new wall done, all faces filled in except for maybe one small top plate. Try as I might, I could not get a final face to fill in. I’d cut it up into triangles until I reached the limit of my resolution and never get it. So I deleted the entire wall and all the guides and start over. I’ve now burned it down and rebuilt it 7-8 times and it always falls apart when trying to get the last couple faces. When laying out guides, I took extra care to make sure every guide was coplanar by verifying that every intersection with the existing model showed up with an X using the tape tool, as well as every intersection of the guides. I’d slowly and methodically start drawing in edges, and I’d get 5 faces to fill in but the sixth face would remain blank. I tried different construction techniques from drawing every edge to laying out a continuous bottom plate and using the pull tool to raise it up. I’d inference everything and when I thought I had it, I’d delete a line at the seem with the existing model, and one or more faces would disappear. What’s worse, is that while undo would get the faces back, trying to repair or isolate the problem has always failed–even if I redraw the the line that caused the collapse. I’ve also noticed that despite extreme care at the corners where two or three edges meet–usually with guides in place, SU seems to not be mating some corners together. I could not zoom in enough to see (image fracture) but sometimes I could get a different result when redrawing the line and “wiggling around” the intersection point. This would sometimes change the X to a dot depending if a guide was involved. I’ve never experienced this tweaky behavior before. I learned a long time ago that these issues were usually the result of my sloppy line drawing, guides out of plane, or other errors of construction, but i can’t figure this one out. Some of the things I’ve tried:
Construction using guides and line drawing–careful to always be drawing on an axis vector and the guides are true.
Carefully rely on snapping and inferencing
Deliberately not relying on snapping and inferencing and draw lines past the intersection points in order to make sure I’m connecting to an intersection rather than the end of only one out of two lines.
Construction using plate layouts and push-pull tool
Rebuilding the adjacent portions of the existing model to make sure everything is coplanar and true.
Completing smaller sections of wall successfully before moving to next section–only to have it fail when I go back to delete the seems.
Some might want me to upload the model, but it’s 141 MB. Below are shots from above the wall with zoom ins showing where I can’t close the face–despite trying to “triangle” the face (which occasionally works). BTW, fixing faces is something I’ve become fairly adept at, but have yet to understand whether I’m causing the failures or SU. Often I can get them back by simply drawing a line along an edge, drawing a diagonal then deleting, or splitting a missing face in two parts and dragging the dividing line to an edge using the move tool (if a face is not coplanar, this method fails as you move and edge towards a boundary).
Is it possible my model is corrupt or I’ve filled it with a bunch of invisible garbage? If so, how might I clean it up? I have Clean-up 3, but it scares me because it is sometimes destructive and my model is so large that I’m always fearful of not finding the damage until it’s too late. I’m always wary of these clean and purge tools when I can’t really see what they’ve done only to find later on that I blew away some important elements of a component or my model. I appreciate any suggestions!
Yeah, I know. Might do that if I can’t figure this out. Just curious if others have had similar problems and if SU has any known issues or quirks with faces, inferencing, or edge connecting that might apply here? I recall seeing comments in the past about little tricks people have had to use to restore faces or other odd behavior–which leads me to believe that even though I may be the cause of these problems, SU (or an app failure) might also be to blame.
You could also just upload a model with just the one or two or whatever parts that are the problem. Make a new document, copy and past the handful of troublesome part into the new document, and upload that.
It can drive you crazy trying to figure out what’s not quite parallel or co-planer or whatever. Most of my troubles in that regard have involved imported DWG files, and that in part has led me to use them as tracing guides, not for filling in the faces. Did you draw all this from scratch, or is anything imported?
What I’m looking at shouldn’t be all that hard, so it’s hard to tell what went wrong.
Do you have Length snapping enabled in Model Info/Units?
If so turn it off and leave it off.
Guides can also cause errors, if the guide isn’t exactly on a face you can be snapping just off where you want to be.
Sorry I didn’t read your whole post before writing that.
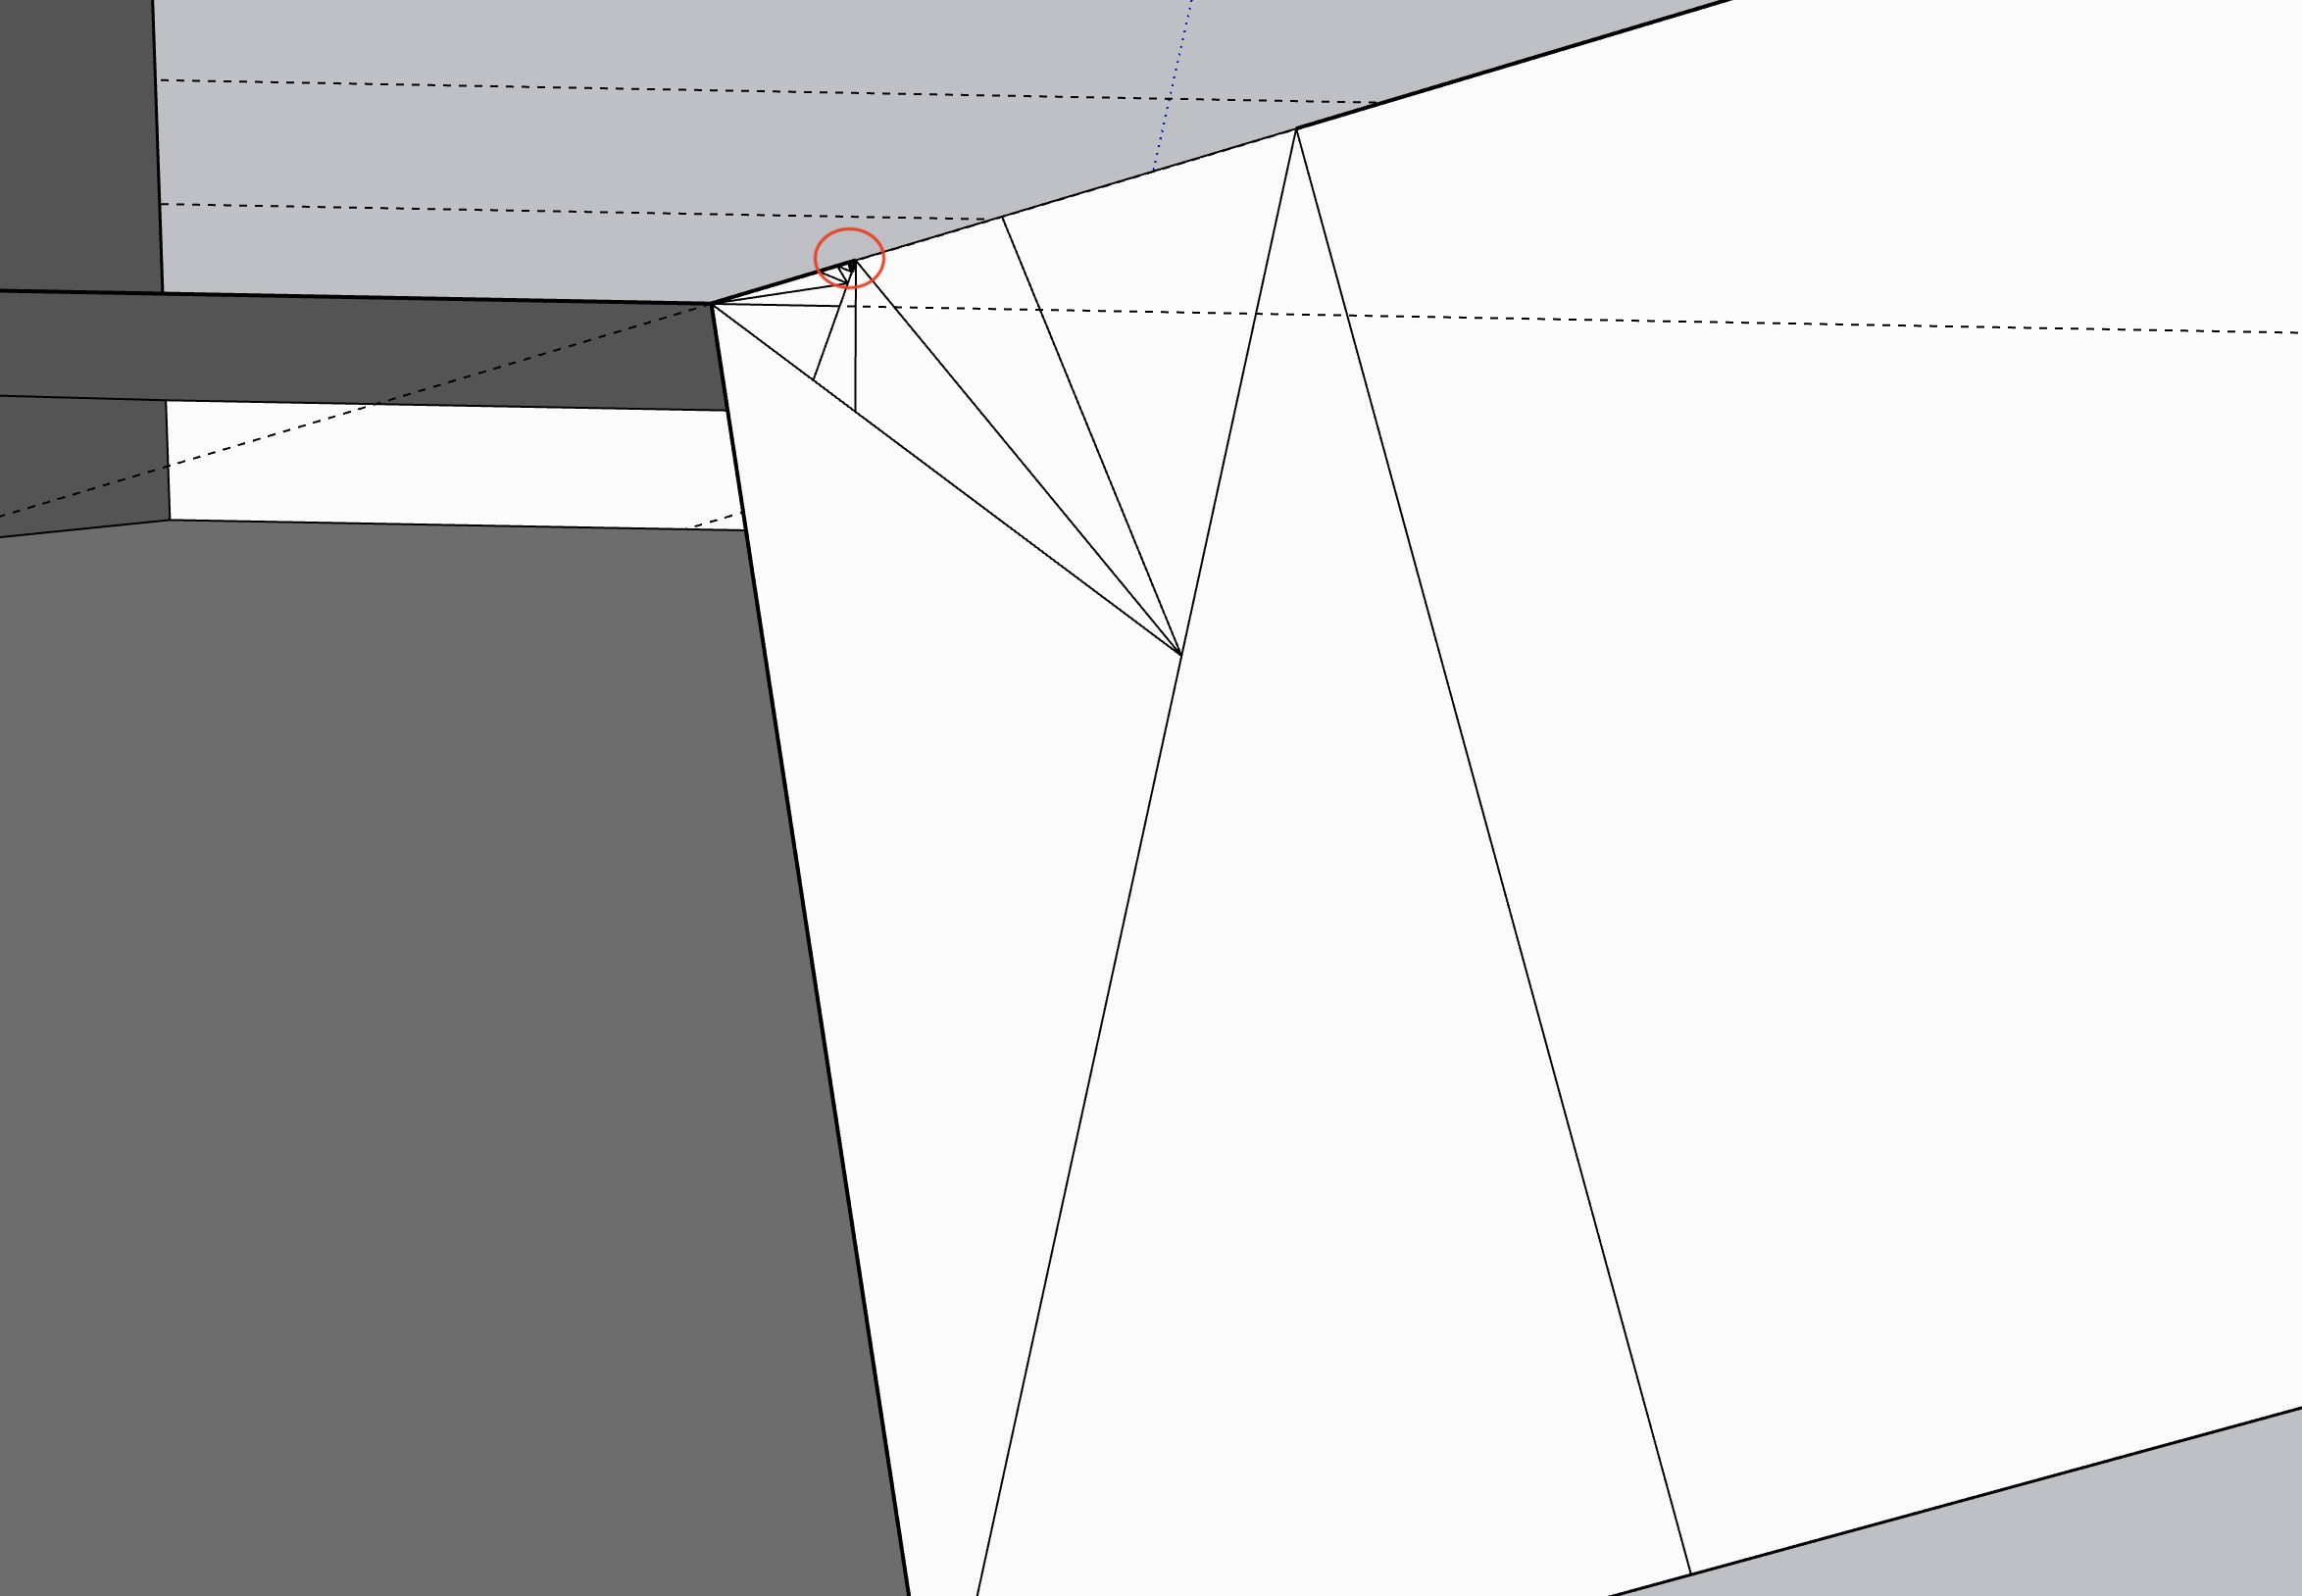
OK. I’m ready to get humbled. I selected everything i have open on screen and copied it into a new file. For some reason, some of the faces reversed in the process, but I’m ignoring that for now. I removed all the tags. The newly constructed wall is the one with the two angled jogs in it. Heres’ what I’m trying to do:
delete the line in the top plate between two of the angled wall sections.
restore the bottom plates on the bottom.
get back the bottom face that is the floor (as a separate group from the bottom plates).
restore the interior face of the adjacent outside wall (I seem to have to replace these and re-cut the windows on a regular basis).
I’ve been thinking about the length snapping and will try turning it off. Perhaps I’ve been trusting SU too much with the guides. Although i haven’t been beat up this badly before, this could explain a lot.
Yes, You have enable length snapping turned on which is known to cause potential errors. Best to leave it off. While you are at it you could turn display precision up, it has nothing to do with the precision of the model, it just affects the displayed measurements and allows you to see smaller errors. You are also modeling with the camera set to parallel projection which is know to induce clipping.
You actually have two wall sections that are completely different sets of geometry, several planes do not meet here. This is why you cannot erase this line, it’s actually two lines and two separate surfaces. I think best to erase the right had side with the reversed face and redraw it. I would delete the guides and rely on inferencing to keep things square.
This worries me, you say you have removed the tags but this is all raw geometry and Tags should only be assigned to groups, components, dimensions etc, Not raw geometry.
When I copied what I had open to a new file, it reopened with only 2 tags plus the default. I just deleted the two tags and moved their contents to default. Was trying to keep it simple.
I have about 30 tags in the full model. Over the past year I’ve become quite diligent about the correct way to assign tags. I’m not aware of any raw geometry that isn’t on the default layer, but I’ll check it out.
Thanks for this! I do work in perspective–not sure why it opened otherwise. The clipping problem has made parallel almost unusable when zooming. I thought the last update was supposed to fix that?
How do I turn up display precision? I used to be able to zoom in as close as you did, but now it clips out–even in perspective mode.
Interestingly, even though that are two separate lines (which makes sense since it looks fatter), I was still able to delete it when clicking on it, but SU is evidently selecting both lines, which caused the adjacent faces to disappear.
What’s the best way to get my floors back on a room by room basis? I’m guessing I would save the finished walls as a group, close the group, then redraw the floor perimeter by tracing the walls.
My takeaway on this is turn off length snapping and try to get better resolution for zooming.
I just got notice of a new update–perhaps that will help. I’m currently on 20.1.228
Your model is a tiny bit out of plane. It is within the sketch tolerance but you can see the spiderweb of hidden geometry that forms. This can be removed without losing the faces but it is the reason the faces are making problems when you try to make them.
You may have accidentally moved something at some point or using length snapping and guides has caused the issue from the start.
This often happens when you don’t use groups and components effectively. A group can be fixed but a whole load of joined raw geometry is a rats-nest to repair.
I also think there may be something funky going on in SU. Evidently, copying to a new file exploded the wall group, but it still shows in outliner. But when I turn it off, it’s still there. If i turn off everything in outliner, my screen should be blank, right?
Ah. And of course everything else is ungrouped so would not be in outliner. Duh.
I’m not familiar with the intersect faces command and will have to read up on that. I always thought that viewing hidden geometry was supposed to reveal the spiderwebbing (why doesn’t it?) How does deleting the webs fix the problem? I understand why the webs are there, but am not exactly sure what is happening when you delete them. Those outside walls date back to my earliest modeling. I’ve gotten much more diligent about grouping, but sometimes break my own rules when I get tired of opening nested groups. Also, I find it tedious to combine groups (at least in outliner) since it’s easy to get lost. I try to balance the time I spend doing work (I have a deadline for this house) with improving my SU skills. Obviously learning the correct way to do things is ultimately a time saver–which is why I decided to invest the time into this thread. But once I solve a problem I have to get back to work. This is my personal house, so this is in that DIY realm.
You should consider ignoring the outliner for now and focus on clean modeling and grouping always. Once you get more confident modeling and orienting accurate components of your hike, then you might consider outliner if you find it necessary.
It’s not really necessary to nest groups, and I would avoid it unless it’s totally necessary for now. You’re adding a lot of unnecessary work. Focus on clean modeling and grouping correctly. Each section of wall can be a group. Each piece you should group the moment you start drawing it.
Work smarter not harder. If you find things not lining up and it is driving you crazy, then stop. Note the measurements you want and draw it again. Group it and plop it in place. Keep going like that and you will get there. I’m afraid but it seems you will be best off with a redraw. And it will be good for you.