I’m working on a model (using typical black edge color) with large file size so to avoid clipping etc. work on new items in an independent model. Doing this I’ve drawn a small 4"x4" solar panel which overall is black but has thread size wires (edges) in a silver color (I modified Styles and provided new name > Edges > Colors > by material). When I paste this smaller model into larger model it appears to revert back to the larger model style. I tried to load this second “Style” but don’t know how to find, load or if I can use 2 different styles in one model.
After pasting the smaller model you’ll need to check if the larger model is also set to “by material”.
It’sprobably not reverting to black but the setting is different from what you expected.
You can only display one style at a time. If you paste a component from one file to another, it will be displayed in the current style you have applied. If you’ve made your modified style available to the larger model file, you can select that style.
Unfortunately DaveR’s reply probably answers my question - I did have a workaround if this was the case but not sure how clean it will appear. In response to g.h.hubers reply when verifying the “by material” setting it was “All same”. When I set to “By Material” I got mixed results - some black edges of the main model now appear “gold” in color but pasted in model (lower left corner)  is as desired as shown in attachment. If set to “All same” the pasted model is all black (including edges) and larger model is edged in black correctly. BTW I have View > Edge styles > Profiles unchecked or my fine threads are much too wide. Thanks guys!
If you remove the materials from all the edges you want to display as black, only those edges that are painted will show with color when you set By Material.
Ah, another possible solution. Thanks Dave, I’ll have to check that out. Should be much better than what I had in mind.

My smaller (“imported”) model is composed of 2 components, the object itself (all black) and the other component is all the wires (composed only of edges which are silver). If I go with By Material the main model edge color gets messed up (see original attachment) but the smaller model is correct. Using All Same the main model edges are correct (black) but the smaller model goes entirely all black (there is no material as you suggest to remove). Neither option displays as desired. I may be having trouble grasping this concept. Did I miss something? TIA
I think you are missing something. Edges can be painted with colors or materials like faces can. If you have painted the group or component containers, you will have problems, though. You should be opening the components and groups for editing before painting. You also need to paint the containers with the default material.
I had painted the objects directly prior to grouping (I learned that lesson the hard way using layers).
Just to be clear, as I originally mentioned the smaller model was done on a new page and settings (styles) were adjusted to allowed edges to be displayed in silver. Its when I pasted this into an ongoing model that the new model settings appeared to have been re-set to the ongoing main model settings which seems to agree with your initial post of not being able to use more than one style. So maybe we’re back to square one?
I could draw a surface in the color I require and then scale it down to the width of an edge (a pixel?) and then hide the edges . . . . or for that matter just leave the edges showing as they will be black anyway as is the object. Was this what you were getting at with your post about the yellow item and edges? But weren’t the yellow edges in that case set using Styles?
I’m on my phone right now so I can’t make a thing to show you but you can apply colors or materials to the edges. No need to fake a line with a narrow face.
LOL seems like I’ve just been texted a message warning I’m being put on hold for a post.
I appreciate the help and can wait. I’m going to grab a bite myself and won’t be checking for new posts for at least an hour.
I hadn’t thought of it that way but I guess you could think of it as being put on hold. Sorry there was no elevator music.
When you have the group or component opened for editing or you are working with loose geometry, you can paint the edges and faces separately or all the same. If you triple click on the geometry to select all connected and then apply the material, you’ll wind up painting the edges and faces. You can paint the edges a different color if you want, too, although that may not be useful for you at the moment.
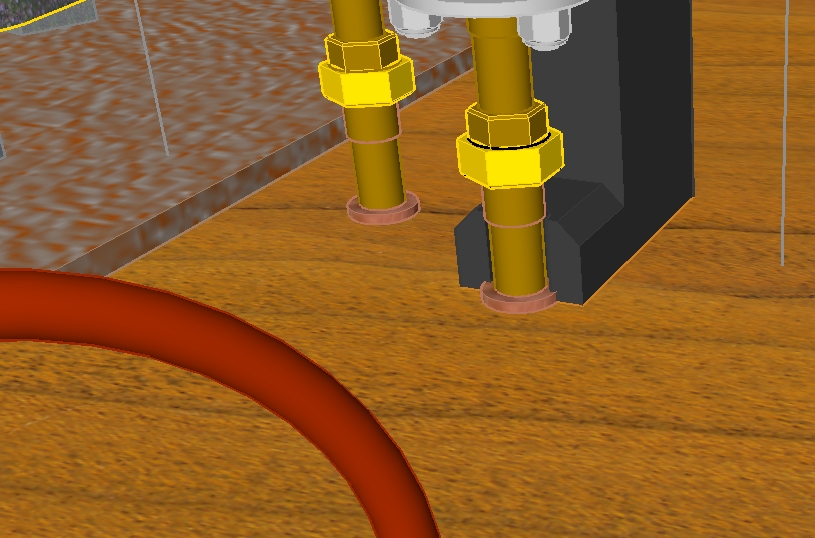
Here, for example, The default material is applied to everything in the model except the edges in the bolts. I painted them with a blue.

If the default material is applied, the edges should be black.
To put all of Dave’s excellent advise into one small package,
set your large model Style to By ‘Material’ and paint all the edges black.
Then insert your small model and it will retain its coloured edges.
Glad you’re back. Wasn’t so much really as being on hold, as I called it, but I guess more like your taking the time to say you couldn’t “talk” at that moment when you could have just gotten back to me at a time it was more convenient. I wouldn’t have known the difference. I really didn’t expect to get this nice attention but is much appreciated.
Box Thanks, I can see how your approach could work. Problem though is there are 120 lines I want of a different color and a gazillion lines I’d have to paint black.
Dave I thought your first reply answered the question but it now seems I may not have been clear enough and things have gotten cloudy. This is what I’m working with

Upper right corner shows component highlighted with background surface hidden (it will be black). Lower left is the comp I’m working on and un-grouped open for edit. I changed the four corner lines to red to help delineate the area. What’s shown is all edges only - no faces. Edges are silver in a modified Style for this workspace only. The model I’m pasting into uses a default woodworking Style. To get the silver lines to show (in the woodworking Style) I have to go into Styles and change Color to By Material and then I get this - every item has a different colored edge
I got to shut down for the evening so will have to wait till the morrow but any comments are welcome.
I think you are missing the fundamental issue you have.
When you added materials to the large file you did it in such a way that it painted the edges, even though they are only displayed as black.
To have the dual colour model that you want you either have to remove the materials from those edges or paint them all black.

It’s actually a pretty versatile feature, once you color edges. Haven’t used it much but just recently I found it very useful, to import an updated floor plan --color the plan edges white and work on updating the rest of the model. I can set one scene that way and move in and out of the plan mode with colored edges.
. Since the imported plan is just edges, I could color all the edges by simply coloring the component.