I’m doing mostly architectural drawings using Make 2017. After laying out sills for the walls in a room, They don’t form a face, apparently. But if I insert an arbitrarily-placed perpendicular line anywhere along the sills, between the two sides, the two now-divided faces are, in fact faces. If I then erase the line, the two faces remain – one face. What’s going on?
Most likely the edges aren’t all on the same plane. Without seeing the model, though, we can only guess why.
1 Like
If they weren’t coplanar, why would drawing a random line fix that? This has continued to happen in several of my drawings (all 2D in the XY plane), but now I know how to fix it. If this happens again, I’ll upload the model.
Speaking of faces, if I draw a box within a box, the face remains the entire outer box. How can I eliminate the inner box from the face?
If you’re doing architectural drawings for commercial purposes you should upgrade to Pro to ensure no conflicts with terms of use.
I wouldn’t consider this described remedy a fix if you don’t know what happened for sure.
Remember that even four not coplanar edges can support a face without a hidden diagonal edge. All with the 4th vertex within tolerance. So when a face is missing you might have “fixed” the missing issue by that perpendicular new edge, who knows for sure. Best if you upload the model.
Wish I were, but I’m a retired guy trying to construct architectural drawings for my home to aid in major remodeling plans.
Unfortunately, after I made my temporary fixes, they turned out to be permanent (as I said), so uploading those models wouldn’t be any help. I’m doing this one room at a time (hoping to be able to stitch them all together some day), so if the problem pops up again, I’ll save the “before” model to upload.
Maqybe they (or just one) will actually do help. To check if vertices are coplanar, contrary to what I wrote and assume.
OK. Here’s one that failed. The sills are now all a face, apparently, but when I first closed the edges, the face didn’t pop up. I then tried to narrow down the “leak” (as I called it) by dividing the whole face in half with a line across the two edges on the right side (to the right of the shower space). After drawing that line, the entire space became a face, as desired. I then erased the line, but the entire face remained.
I’ve since added some dimensions and other details to the drawing, but thought that maybe I could undo enough additions to get back to the failure point, but the undo list is empty. Does it go away when a drawing is saved?
Guest bath.skp (33.7 KB)
Alas, yes. I took a look at your model and couldn’t find any cause in its current condition. Whatever led to the misbehavior is now gone…
Well, thanks anyway. If it happens again, I’ll upload it asap.
You’ve got one tiny edge that is causing the problem, once removed the faces form correctly.

1 Like
Wow. How did you find that? It doesn’t really explain (to me, anyway) all the symptoms, but I’ll be more careful with my edges.
I found it by locating the point that would fill the faces both sides of an edge. This told me there must be some issue at that point.

2 Likes
That’s kind of what I was setting out to do… I connected the 2 edges of the right-hand sill, and the entire border became a face. Hmmm. I then just deleted that line and the whole face stayed put, so I declared a victory and moved on. In future, I’ll now know to keep looking for an anomaly. Thanks again.
When you are laying out lines like that for walls, it is easy to create little overruns or leave gaps, especially if you have Length Snapping enabled in Model Info>Units. One way to make it easier to detect problems is to start with a rectangle larger than your floor plan. Draw your floor plan on that. When you close a loop of coplanar edges, you’ll see the edges change from thick Profile edges to thin non-profile edges. If there is a short overrun, it’ll still show as a thick profile edge. If you think you’ve closed the loop but the edges won’t go thin, look first for gaps. Use Box’s method of drawing across to see where faces form.
The other reason you might not get a face is because edges aren’t coplanar. Drawing on the large rectangle makes that much less likely to happen.
Once you have the walls completed, delete the perimeter of the rectangle and the face(s) inside the walls leaving only the bottom of the walls for extruding with Push/Pull.
I can see I’m looking up a steep learning curve, but thanks. I was wondering today why some of my edges were thin lines and some were thick lines. I’ve been trying to learn Sketchup largely by experimenting and inference; I’m sure that the fact I’m using Make instead of Pro isn’t helping, but I’m not going to invest in Pro until I’m comfortable with the training-wheels model.
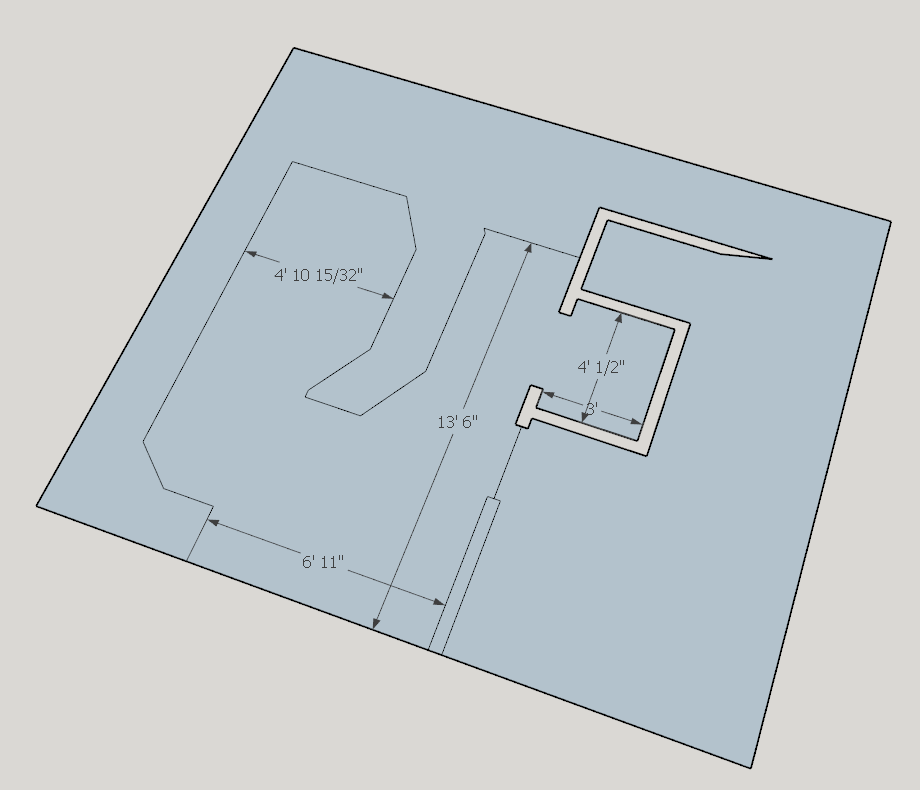
But the problem happened again, so I’ve uploaded the “before” .skp. In the upper right of the drawing, there’s a funny-shaped set of walls that look like they should be a face, but they aren’t. If I draw a line across the two edges of the non-face, it becomes a face. If I then erase the line, it stays a face, but if I instead delete the line via Edit->Undo Draw Line, the face goes away. Before drawing the line, all the edges appear thick, but after drawing the line and the face pops up, the interior lines become thin. Very confusing. I have an anniversary dinner to go to tonight, but I’ll try to allocate some learning time tomorrow.
Thanks again.
Kitchen-2.skp (18.7 KB)
For what you are drawing, Pro doesn’t have anything over Make. It’s just your process.
So opening up the file, it looks like you tried using my advice to draw on a large rectangle. I see a gap in the edge of the rectangle along the green axis and two missing edges.

Completing the perimeter of the large rectangle shows closed loops.
And drawing a line across the opening where the wall is, fills in the hole. You could trace one of the existing edges and get the same result, too.
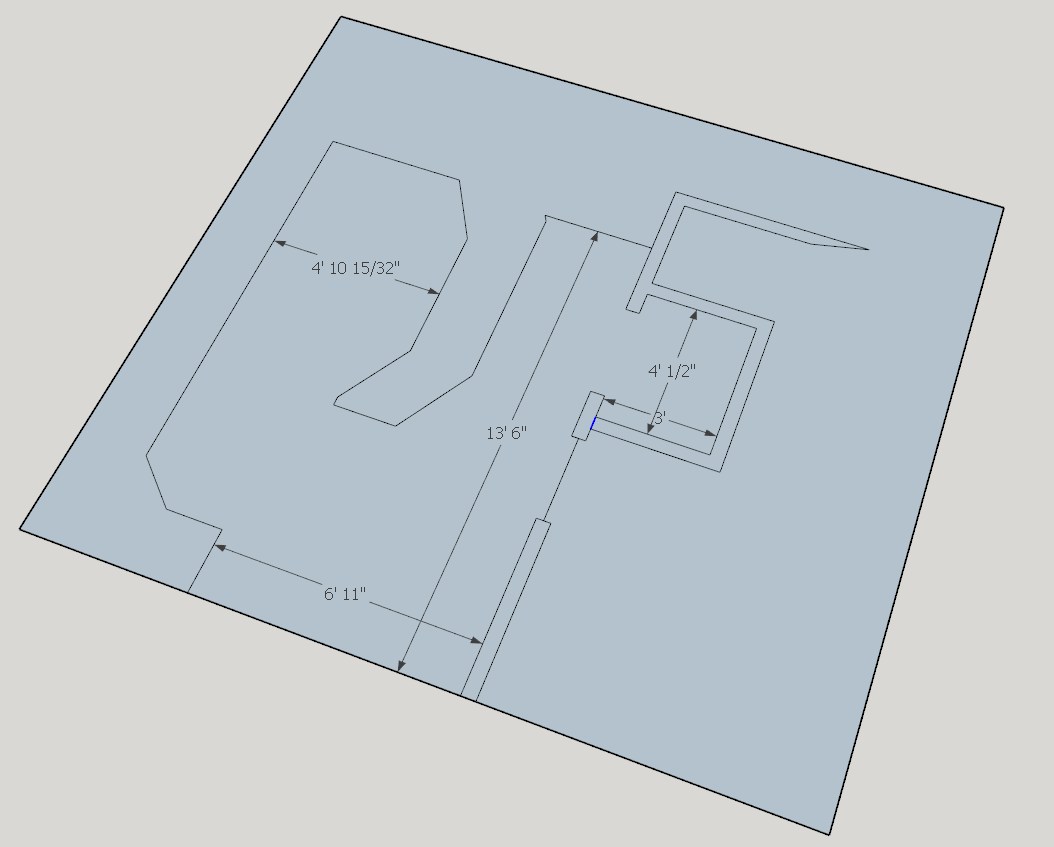
Not sure what your plan is from here. You aren’t planning on a knife edge for that wall like you show, are you?
No, I’m drawing each room individually, then hoping I can stitch them all together later. The knife edge just terminates that wall for this room, and will match the same wall in the next room.
I still don’t see what drawing that line does, or why erasing it leaves the faces intact, or why Undoing it acts differently than erase, but I’ll get there.
Thanks yet again…
1 Like
I think you would find it easier in the long haul, and less prone to errors, if you would model the entire floor in a single model.