Dynamic Components in Large Buildings 1000+ components - Performance Problem - Ways to tackle this?

Long winded I know but I just feel as if there is a solution I’m missing.

I’ve perused and posted for a bit now here and I’m still being asked in my profession to create rough sketches of buildings to show as concept and also to evaluate re-modeling options. These buildings will always be warehouses. The nature of the warehouse business means thousands of orders a day which means a lot of repeatable things, like walls, workstations, and pallet racking!

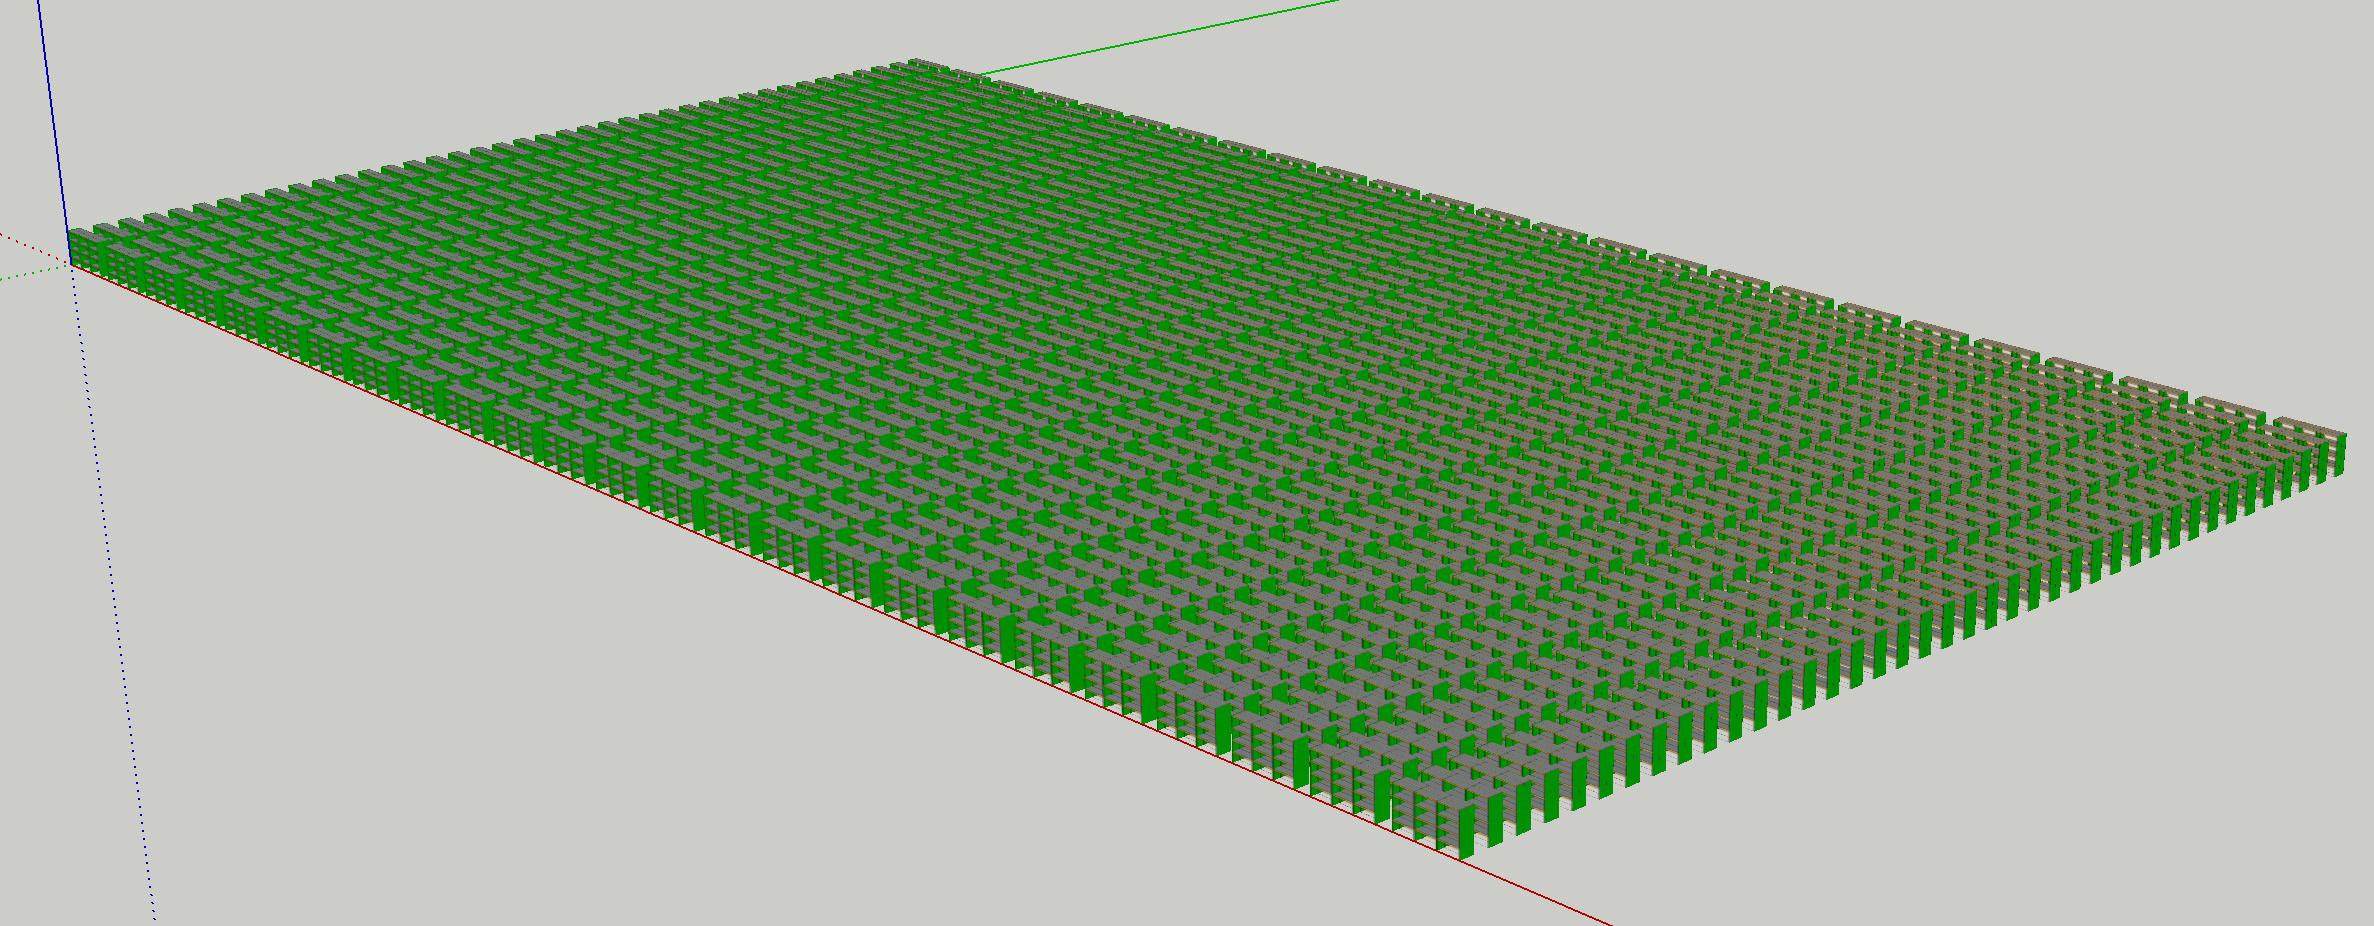
In the beginning I would make one bay of racking, and group or component it, then copy, move array it to make my full aisle. This immediately killed my PC, and I couldn’t do much in the model like moving the racking or just orbiting if I even got past it crashing. Company bought a new PC and it now won’t crash but is still very slow.

I know rendering all the rack at the same time isn’t the best idea, but if I ever had to move an aisle it is very slow. Below I just try to show operating before DC’s.

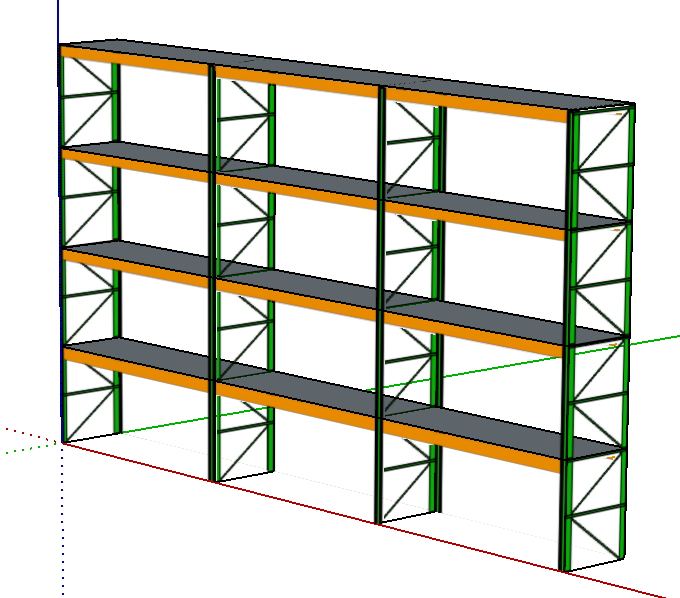
After this I asked a question to the forums and a great user sjdorst helped me and recommended DC’s. He even spent a lot of effort on a component for my use. RackAisleWithBeamDetail.skp (678.8 KB)

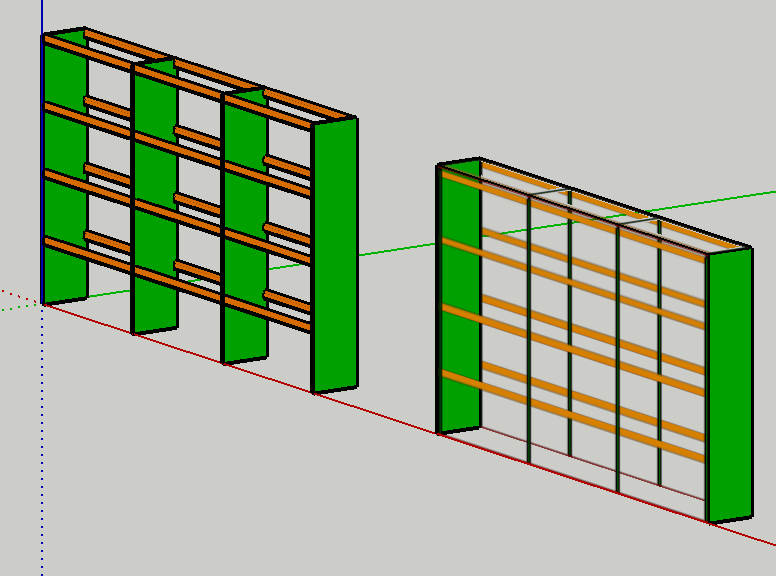
This introduced me to DC’s and how effective they can be. Also recommended was a outline box which would help reduce the poly count so I could create all these boxes over/instead the racking and then later at a render time or with more completeness, I swap it over to the detail look. This component has that functionality.

Also learned how “Copies” and “Copy” work within DC’s. Which leads me to my problem. Warehouses always have at least 10-20 aisles of racking that can be 20 bays long, 2 beams/bay. Already getting into the 800-1000+ beam count.

Like I said earlier sjdorst recommended a box outline that will help with processing. This works well as a feature.

However, when I try to change the number of bays within the options. It still takes a very long time. Like I said earlier, it was only 30 - 60 seconds / aisle on the first couple. And has progressively gotten to 5-10 minutes / aisle or just crashing. If I have to do this on the remaining 25+ aisles, it’ll be 2-3 hours which just won’t be feasible to sit her doing nothing else.

I thought that as a box, it would only have to create the box, but it seems to be creating all sub-components of the more detailed state. My In Model components list has all the detailed beams within.

My question is, is there a best practice to way to continue making a lot of components and not make my computer freeze? Why if it only is visibly boxes does it take so long? Calculations, attributes, subcomponents?

Also, why would Beam Detailed####### show up in the components if it as actually just boxes to my eyes?

Thanks for reading!

1 Like

I realized this post was somewhat all over the place as well. Just trying to explain where I am at.

But basically just need to create 20 more aisles of 20 bays and if it takes 5 minutes or crashes every aisle that just won’t work!

I’d suggest a few things that could help considerably.

1 Make two levels of DC - one just to draw boxes, the other to draw detailed racks. Do all your top level planning layout using only the simple box DCs.

Then at the end, select only the simple ones that you need to see close up in any renders that you make, and use Component Browser to Replace Selected. The latter will still take ages to render, though, if you replace too many of rhe simple boxes, as you could easily create millions of edges, especially if you use too much detail in the shelving racks.

2 As well as the DC just to draw boxes, consider adding texture on the box faces to represent the racking. Don’t make it overly high resolution, and just have the texture repeat for each bay of racking, on a single face for the whole aisle.

You could either do this in a low and hi-res version for planning, then rendering (with separate DCs), or even mix and match with the detailed racking modelling depending on how closely you want other people to be able to view what you are drawing.

I’ve just been helping another user on the this forum wrestling with a similar issue of over-detailed imported 3d warehouse models. See this thread for some further suggestions:

The first DC should be a simple repeating cubic with all the required data on its option dialog. This DC is at least double wrapped with exposed attributes that will update with “current”. Creating a large array of cubes is then simple and quick. Then once layout okay. enter the first component to the required level and replace with detailed one. This is quick and stops the unnecessary #…numbers. I have PM you for a file. After if require modification, then a swap back to the simple form before changes, otherwise you going to have to wait a long time.

Thanks for the help, I’ll look into this.

I understand that I need to create a box only DC, and a detailed DC (If I choose to go that way), correct?

Drop in all the box DC’s, then simply component swap detail for box?

Yes. That’s the gist. Try textures instead of fully modelled detail, except perhaps for a few used only in close up.

Could you upload a sample of your current DC(s)?

It’s actually in the original post!

My apologies, I didn’t notice the link. When back at my computer will have look at it.

Here’s a part-way solution.

On the left is your original DC with the parameters you specified when saving it.

On the right is a simple box, with transparent images on both sides of front and back faces, and on the top face (if you will be viewing from below, duplicate the image on the underside of the top too). And your solid green colour on both inside and outside faces of the ends of the box.

The images came from screenshots of just one bay of the DC using the most detailed version, in Camera/Two point projection mode, stretched to fit the height.

What I haven’t done, and am probably not skilled enough to do, is to work out how to get the image the right size and proportions depending on the chosen parameters in the DC.

When I copy them into an array of 25 x 50 racks, the file size is only 355KB, and the edge count only 15,000-odd.

Looks like this:

And in close up near one end:

Here’s the skp file too:
Racking 25 x 50 aisles.skp (346.7 KB)

Would that help get you going for larger arrays of bays?

If you want to have shelves showing, you could use just one face per shelf, with a non-transparent image.

PS. The lines at the bottom of each rack are part of the image and could be edited out if they are not relevant.

PPS. Here’s what it could look like with shelves showing.

Racking 25 x 50 aisles with shelves.skp (326.1 KB)

The file size has barely changed (gone down a little - must have missed purging something in the earlier version!) but the edge and face count have both gone up significantly - by about 2.5x for edges, from 15,000-odd to around 37,000.

But still very manageable, and it still orbits, pans and zooms extremely fast.

And if you want to show the middle uprights (I’ve just shown images of the edges) make a new sub-component with vertical faces, transparent or solid colour images on each side, and insert it as a sub-component inside the main ‘box’ component.

Keep the shelves, and the verticals, in independent geometrically separate subcomponents, otherwise they will intersect with each other and the external box to create new faces and edges, which you definitely don’t want to do!

Another thought.

The number of different sized components in your DC options seems not too many. The file size of a single image of side, end, or top is also quite manageable - 3KB for the side, and 0.6KB for the top.

So it might well be practical to create manually from screen shots (using your existing DC) not too many images to fit all the bay span, no of shelves and beam height combinations, then get the DC to apply the right one as a texture to the chosen bay sizes.

I don’t think you’d notice the difference in beam depth in the side images, and might or might not choose to take it into account for the top and shelf images.

Once you have manually created the relevant images from the separate combinations of Upright sizes, and no of shelves, and beam width. it shouldn’t be too difficult to generate a new DC which draws the aisle with the right size textures on the faces - uprights, front and back aisle faces, and top and shelves.

Use that DC for planning purposes. You could even extend it to do the row and column arrays of aisles for you., with separate choices for row and column spacing (though this isn’t very time consuming to do manually, so might not be worth it).

I’ve done a little more on this.

Here’s a slightly cleaned up model of your default size of shelving aisle.


Racking with shelves and middle uprights - cleaned up~.skp (217.4 KB)

If you scale it on green to size, it can make any depth.

If you push pull the end face, you can see any number of bays - pushpull a defined distance, and you will get an exact number of bays (multiples of 9’4" in this example where the overall length is 28’ - but maybe that includes the width of the uprights?)

If you scale it on Blue, you can adjust the height of the bay with a constant number of shelves, adjusting the shelf spacing

If you push-pull the top, you get any number of horizontal racks. In combination with scaling on Blue, you can get any combination that makes sense of number of shelves, and bay height.

If you make the shelves into a dynamic sub-component like a picket fence stood on end, when you change the height by pushpulling the top, it can create more shelves as needed, and can scale it to match the image spacing between horizontal racking. Or more simply, just manually edit one of the shelf sub-components to add a shelf, or scale it to length for a longer aisle.

If you make the middle uprights (or perhaps better, all the uprights) into a dynamic sub-component, the number of uprights will automatically increase or decrease as you change the overall length of the external box by pushpull or scaling. Again, more simply, you could just edit the uprights sub-component to add one or more, or change the overall height of the whole set. If you change the image of the end from a plain slab to a framework image, just move the top edge to add multiples of the unit-frame image, or scale it to approximate a shelf spacing change.

I know how to create the ‘picket fence’ type of DC in principle (and there is one of mine - ‘improved picked fence’ - on the 3Dwarehouse), but haven’t time to do it here.

Of course, these methods are only approximating the depths of the beams, but for a reasonably distant view, that hardly matters, and for close-ups, just use a few of your current DC aisles. And once you have decided on a set of parameters, you could re-create the images to match.

Anyway, whether or not you use this particular approach, I hope this gives you some new ideas to keep your model manageable while editing.

2000 of these components in an array of double units, 40 x25 (2,000 aisle racks) still behaves quickly when zooming, orbiting and panning.

And changing the size, scale, or otherwise editing one component, propagates virtually instantaneously to all the others. No hanging about!

Here’s the mass racking, with edges and profiles turned off so it doesn’t just look all black.

Here’s a close up

Or with edges on

Here’s the model with 2000 copies in it - still only 72,000 edges and 22,000 faces - I made one row of 40 x 2 aisles into a component arrayed along green, before making 25 copies of that along red.

Racking with shelves and middle uprights - cleaned up.skp (242.6 KB)

And it is smaller in total file size than twice that of a single rack - 248KB vs 155KB for one.

And my parting shot for tonight:

Here’s a variant with a zig-zag frame for the uprights (again, just a transparent image applied on both sides of a rectangular face, for the ends of the outer box, and the middle upright faces).


And the model:
Racking with shelves and middle uprights - single unit with frame ends~.skp (202.8 KB)

The images aren’t exactly right i see on close inspection in the original model, zoomed in - there’s a little white fringing round the frame edges for example, and the shelves and top could do with an orange edging to represent the top faces of the horizontal beams - but I haven’t time tonight to fix that. Maybe tomorrow, if you like the idea at all.

1 Like

I modified your DC to remove sub_components (which really drag the process if not purged after changes) and replace them with groups. So #numbers should not be a problem, added some extra features. So if you are happy with this and you may incorporate what john recommends (very good advice) for further modifications, However it must be noted that with materials stretch with the change in lenx,leny…
most likely this DC will suffice

simple rack.skp (185.5 KB)

edit, beam groups were copies, used parent! to fix the circular reference

What I will do in your situation is to explode the first DC once the configuration is done, and then group the components again. With this “exploded” first bay of racking, all the formula will be gone. These formulas are the ones causing the slowness in the PC.

With the first bay setup completed, you can then duplicate to multiple copies.

Below is a sample of a similar project I have done before.

Another solution is to have different zones of the racking placed in different layers. If these racking are not in use, hide that particular layer. This will be useful during the modeling process.

For rendering purpose, components that are not showing up in the screen should be hidden as well. This should speed up the rending process.

rather than exploding the outer component, with all its data (useful for quantities) set it so you explode, outershell or whatever one level down, then you can always reinstate with a swap back to the original if further amendments are required. If the component uses LenX,LenY &/or LenZ as a current scale, not assigned to an attribute, then add a attribute that drives these values in the lower level, so then the object sizes to the current value in a swap

Just my two cents worth of opinion…

Agreed with pcmoor that exploding the component will eliminate all the data and will make changes to the racking impossible. If ever changes need to be done after the modeling, we will need to delete the racking and remodel those rows again.

The work flow I normally do for warehouse modeling is to analyze the inventory data, decide on the suitable pallet racking configuration as well as the overall warehouse layout, draw on AutoCAD (clients still prefer this method most of the time), then create the 3D warehouse model.

By the time I reach the 3D modeling stage, I should have a good idea on how the warehouse looks like. To me, the most painful part is to model the pallet racking (example, a 6 level high or 7 level high bay with different bay width). Previously, it took me a long time just to complete this task before duplicating the bay to the rest of the warehouse. But with Dynamic Component, this step becomes easy.

The next pain point I encountered is what GameOfBoxes is experiencing now. Duplicating DC across the entire warehouse causes the PC to hang. There’s where I decided to separate the pallet racking to different layers and hiding them when not required. Also, the chance to changing the racking configuration at this stage is low (occasionally it does happen though). That’s why my approach is to setup 1 bay configuration correctly, then duplicate it across the warehouse. Should a need arise to change the pallet racking, I just delete those layers containing the racking and re-create the new configuration again. Copying the racking should not take too long.

As for the rendering part, agreed with John as well. For those parts of the warehouse which will not appear in the rendered image, I will either replace them with simple objects, or even delete them… This will need to be saved as a different SKP file just for rendering purposes. Texture and resolution will also impact the rendering time. We need to account for this as well.

There is another option. Which is too model with minimal groups or depth of groups, and use the NEW 3SKENG list tool. Which allows you to manipulate groups/components easily in arrays. It will also help in reporting. If you would like to discuss feel free to call me

3SKENG tools are subscription based if I recall correctly? Also the pricing was not so friendly.

List Tool is NOT subscription based.