klem dril q.a…skp (195.1 KB)
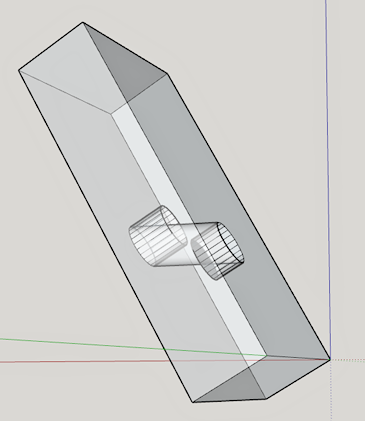
Create a stepped cylinder representing the two diameters of the counterbore. Position the stepped cylinder in the board where the counterbore goes, then right click the selected cylinder > Intersect
Faces with Model. Then remove excess geometry.
-Gully
Hi Gully-
Ever thought of collecting all of these how-to images in a book? They’re fantastic!
Marc
Thanks, @Marc. We’ve had a few suggestions (requests) to make the hundreds of images, animations, videos, and tutorials from this forum and its predesessors accessible using some kind of data mining engine. I think that would be a terrific project. I’d be willing to help tag the data with keywords, if that’s what it would take.
-Gully
Hi Gully
Thanks for your instruction. my result is a little difference only the surface- many stripes.
pls reply if necces.
regards
Albert
hole under angle.skp (68.7 KB)
It looks as though you did the counterbore in addition to your previous bore. Try with a fresh block and less segments in your circles if you can. You may be creating some edges smaller than SU’s tolerance.
Shep
Thanks.
Another question related to this technique.
Two year ago I uploaded a several items to the 3D warehouse.
1/ A wheelbarrow (by Appie) with a lot holes under an angle, .
Some downloads has been done but no comments received for update the drawing technique.
It would be nice to have some one review this subject and give some constructive commnents.
Is that possible with this forum?
regards Albert. Sorry for bad Engels.
wheelbarrowa190213.skp (2.1 MB)
Just seen this and this may help you. I had been doing some cabinets with “pocket screws”, they are recessed and angled. Though they are not supposed to go completely through the idea is the same as yours. The dowel is the cutter to produce the whole in both boards that were solid components in model before I used the Solid Tools: subtract tool. ( It changes them to a group after being proceeded. ) I started with two copies of the dowel, one for each board to cut the whole. They get subtracted from model. If you made your dowel end from your handle a separate copy and use it to punch your holes. Then you can just go back with the complete handle and insert it into the whole. If you don’t have the Pro version you need to use the Intersect Tool. That is a beast to explain and I wont even try, there are many tutorials to see how it completes the opening:
AaSUforum.skp (50.4 KB)
There is a copy to look at… make another copy of the dowel and see what you can do with it
wheelbarrowa1902131.skp (426.7 KB)ok sketchup users the use of this topic subject is no problem any more thanks for all advice. But related to this i need advice about drilling a hole in to round material (cotterpin hole) and if possible also under a angle.
thanks grt. Albert
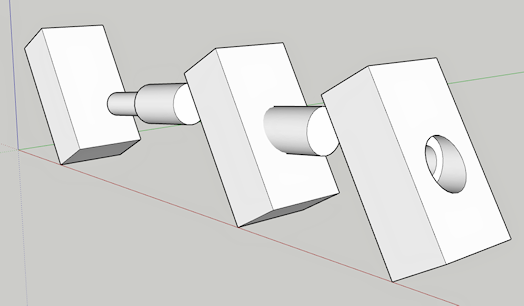
It’s really the same procedure as the previous example. Create a cylinder representing the cotter pin hole, then incline it to the required angle using the Rotate tool. Insert the small cylinder into (through) the large cylinder where the hole goes. Intersect Faces of small cylinder with large cylinder and remove excess geometry.
-Gully
Gully thanks for your advice. After some training working perfect!
This does not working any more. After all steps the push out gives a half
under an angle but the other half perpendicular on the surface.
I used this technik many times but now its not working any more.
QA hole under angle.skp (32.4 KB)
pls. advice.
Looking at your model with X-Ray turned on, we see the following:
 .
.
Exactly what are you trying to do, and how do you account for this?
-Gully
Gully
I don’t how did this happened. Normally, after all the steps as in the examples, with push I get a nice smooth hole under an angle.
Program fault?
Albert
Most likely operator error. I can reproduce what you show if I drill the hole through and then push-pull the elliptical faces on the two faces of the block into it before deleting them inside the block.
It works as shown in your examples and mine experience. Move a piece trough the block, intercept faces with model, delete the lines until the elips, push elips trough the block. Never seen this “fault”.
If we’re still talking about making a counterbored hole at an angle to a surface, there are no pushes involved, other than to make the “drill” element. You just insert the “drill” into the block, intersect faces, and delete excess. No Push/Pulling.
(Incidentally, why is the block cranked up to such an odd angle?)
-Gully
Great I idea.
I would purchase this book for sure. It would be great to have a notebook full of quick diagrams like this. Sometimes I print out guides like it and put them in my own notebook. But this is slow and unorganized.
Gully
You are right push not necessary. I mixed up with other instructions.
I should more practice SU.
Your Q about why? See drawing. I made this wooden wheelbarrow, from 1930,
3 years ago as a novice with SU used simple technics. As you can see there
are a lot holes and pins under an angle. I want to make a new one
with all technics available in SU like layers, compoment, groeps, etc.
Maybe I need some sdvice lateron.
QAwheelbarrow.skp (2.9 MB)
In real life, you wouldn’t necessarily manufacture a part for a wheelbarrow (or anything else) propped up in the same orientation in which it will eventually be used. It’s generally a lot easier to work on an object that is placed flat on the work surface on which it is being made. Same thing in SU. It’s generally easier to work on an object that is aligned with the axis system. You can give it its final orientation when you assemble it.
-Gully