In order to scale my table, I grouped what I have. But after I cannot push/pull on the individual parts. Then I ungroup them. It is the same. I cannot create an opening on the tabletop. how can I really ungroup them but keep the scale?
Please share your .skp file so we can see what you are working with and trying to do. From your description it sounds like your workflow is unnecessarily complicated.
1 Like
ChickenCoop.skp (42.5 KB)
Now I am trying to create a 1’x1’ opening on the top. But the push/pull tool is not allowed.
You need to open the group for editing before you draw the square for the hole and use Push/Pull on it.
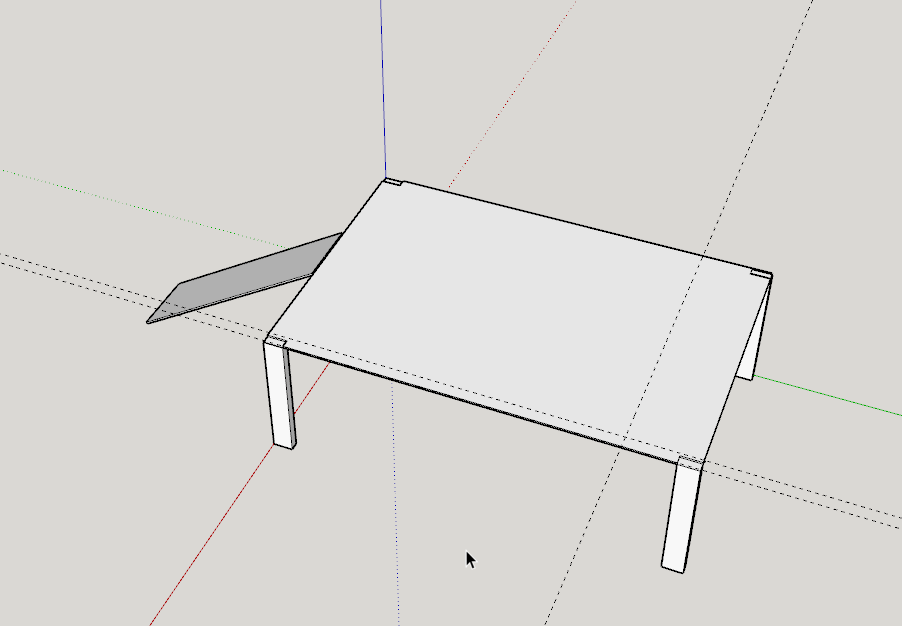
What is your goal for this model? Currently you have all of the geometry contained in a single group. This means that the legs and the ramp are all stuck to the platform. If you are hoping to get a cutlist or create a plan from this, you’ll find it difficult.
1 Like
I redrawn your model using components for the parts. Some of your dimensions seem to be a bit odd–certainly would be difficult to cut in the shop intentionally–so I guessed at what the should be. The floor of your coop seems to be a bit on the thin side so I went a little thicker. Clearly it wants more structure to make it stable but I expect you have that planned.
ChickenCoop.skp (48.6 KB)
Edit to add:
Regarding my comment about a cutlist, here is the cutlist from the file I’ve uploaded. Your version shows as Group#1.

1 Like
Thank you very much. I was able to cut the opening now. I will use yours. It is what I want. Mine was like yours. But after I group them and scale them, all pieces are tied together. I don’t like that. Is there a way to really ungroup them?
Either you didn’t make individual groups or the parts or you selected all them and exploded them back to the raw geometry. I suspect you did the former because of the way the legs and the floor geometry is modeled.
The right way to do the modeling would be to model one piece and make it a group or component. My preference would be to use components and give them useful names as I go. Then go on to the next part.
As for fixing your model, it could be done however it would be faster, more efficient, and less prone to errors if you start over with the right workflow.
Keep in mind that once you’ve created a group or component rarely should you need to ungroup (explode) it. You can open the group/component to make edits to the geometry inside.
Why are you scaling the group? There should be no need at least at the point to use Scale at all.
1 Like
Initially the coop was too high, so I group them and scale them to make it lower. I should explode the group after that. I like your cutlist. I will go to find it.
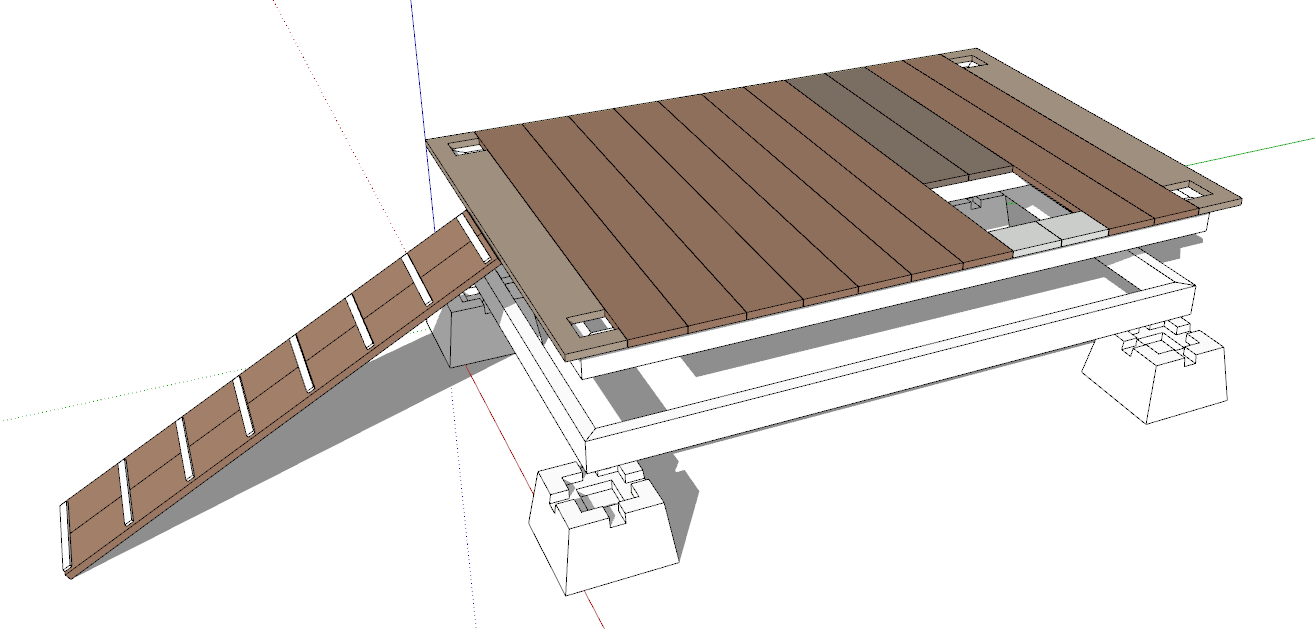
Sorry. I had a play with your model and I have the start of the brick outhouse of chicken coops. Note how each part that would be made of wood is a component. I copied the components where that makes sense. I also used the same floor plank component for the ramp planks. Makes the ramp a little longer for the chooks but fewer unique pieces to make.

BO of ChickenCoops.skp (85.9 KB)
That would explain why the floor is so thin in your model. Scale isn’t the right tool for that job. It winds up scaling everything proportionately.
Instead, you could move the floor down to the right height and use Push/Pull on the bottoms of the legs . Or there are other ways.
No. Generally after you create a group or component you only need to open it for editing if you need to make a change to the geometry. Exploding is normally not necessary nor is it desirable. If you exploded groups or components that are touching each other they will become welded together.
The Cutlist extension that I like is just called CutList. It’s in the Extension Warehouse. There are other cutlist extensions but this one works perfectly for me with no screwing around.
2 Likes
If I am careful enough, only scale vertically, it should not affect other dimension. I like you way. The problem was I did start with components/group.
You have saved me lots of time. Thank you very much.
1 Like
It depends on what you are scaling. Again, because of the vertical scaling, the floor ended up too thin. I find that scaling is rarely the right way to change the dimensions for things I model. For example, in the BO of CC model, notice what happens to the features on the left when I scale it vertically.

If I want to change the height of the leg, either Push/Pull on the bottom or slecting some of the geometry and moving it would allow the length change without distorting the features.
Here I’m making the leg taller with Move. The notch at the top is still the same size as it was and I’ve not made any change to the lower notch.

Although the legs are components I’ve made the one I’m editing unique so the other legs aren’t affected.
1 Like
Hello Dave,
Based on your model from your #5 post, what is the correct way to make these legs go through the floor? I want to continue to make the second floor and add the roof.
I used Push/Pull to pull the tops of the legs up and then added some lines across the two outside faces so I could pull them out above the frame back to the full dimension. I notched the floor plank to fit around the leg.
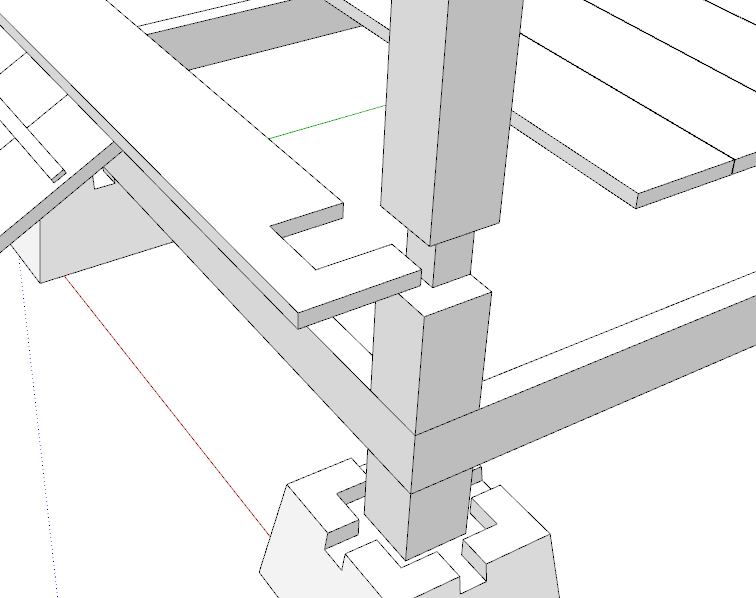
The notch does result in some short grain that makes the end of the plank a bit delicate. A cleat could be added underneath to add some strength.
1 Like
FWIW, the floor planks all started out as instances (copies) of the same component. The two over the hole in the floor (that isn’t a foxhole is it? ![]() ) were made unique so they could be edited without affecting the others. When it came time to extend the legs up through the floor, I selected both of the end planks and made them unique. The far one was flipped in the green direction to create a mirrored copy of the front one. That resulted in the notches being located in the correct positions. Here I’ve colored the floor planks so you can see the related components. the ramp planks are the same as the floor planks. Makes for a slightly longer ramp than you had but it makes construction a little easier. If you choose to make a cutlist they’ll end up in the same line as the floor planks, too, so they won’t be an afterthought.
) were made unique so they could be edited without affecting the others. When it came time to extend the legs up through the floor, I selected both of the end planks and made them unique. The far one was flipped in the green direction to create a mirrored copy of the front one. That resulted in the notches being located in the correct positions. Here I’ve colored the floor planks so you can see the related components. the ramp planks are the same as the floor planks. Makes for a slightly longer ramp than you had but it makes construction a little easier. If you choose to make a cutlist they’ll end up in the same line as the floor planks, too, so they won’t be an afterthought.

1 Like
Hello Dave,
I found there are some issues on my module, the roof cannot be put properly. It seems somehow somewhere the sizes may not be set properly. Could you please correct it for me? I am trying to build a chicken coop for my daughter.
Thank you for all your helps. ChickenCoop-v2.skp (156.6 KB)
I don’t have time to go through and fix your model at the moment but the two shorter legs are different lengths.

I don’t know which one is right but I would delete the wrong one and make a copy of the right one to replace it.
2 Likes
Thank you, Dave,
I fixed that issue. I am almost done. It is a fun to use Sketchup, particularly with prompt help from experts like you. ChickenCoop-v2.skp (179.8 KB)
Good enough. For what it’s worth you should be keeping an eye on correct face orientation. All of the blue faces shown are reversed. They can be corrected by editing the components, selected the geometry, right clicking and choose Reverse Faces.

1 Like
Ok, I will try to correct them.
By looking at the component list. I know I should not include the length in the name of the lumber cases.
But why there are several 2x4#1, 2x4#2, … and their size seem not right. How to avoid these things?
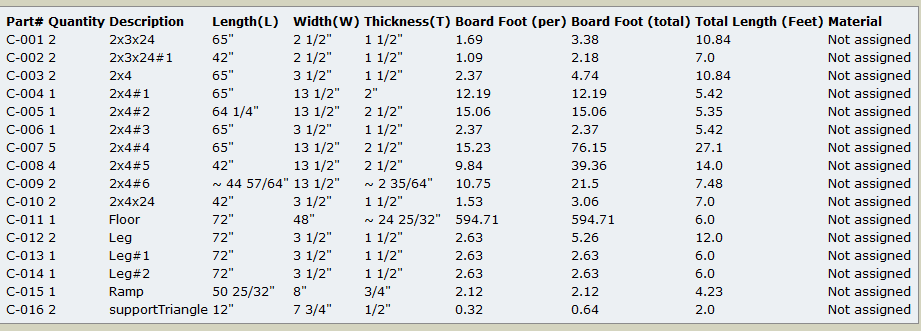
The #1, #2, #3 indicate times you made a component unique but didn’t rename it. SketchUp takes the component’s name and appends a number to it. It would probably make more sense to give the components names that reflect what they are in the project rather than naming them by their dimensions. You’ll get the dimensions in the cut list anyway. In some cases your component name and the actual dimensions aren’t even close. For example, 2x4#2 is listed as 2 in. thick and 13 in. wide. Other “2x4’s” are 2-1/2 in. thick. And the floor is about 24-25/32 in. thick. What are you making the floor out of?
One thing you should give consideration to is the dimensions that you are getting for the components. Also look at the dimension in the model. The cut list is an easy way to check for potential errors in the overall dimensions of the parts. Do you really want to cut pieces of 2x4 to the nearest 64th or 32nd of an inch? There are some other 64ths shown in your model’s dimensions. Are they what you really want? If they aren’t, it would be a good idea to go through the model and get things squared away. Less likely to have errors when it comes time to make sawdust.
2 Likes