I am a rookie in this program. Therefore, I was wondering if someone could explain why the issue mentioned below occurs and how to fix it.
I placed a rectangle on a surface such as a square on a floor or wall. However, I always get a white patch on the area of the shape. I have posted a two pictures for reference below.
That’s referred to as Z-fighting. You have two faces sharing the same place in space and your graphics card can’t decide which one is in front.
This tends to happen when you create geometry on top of other grouped geometry. In your second screen shot your “window” wouldn’t cut through the wall if you were to extrude it.
This can also appear when there’s a very tiny gap between faces if viewed from a great distance.
Thank you for the quick response. I really appreciate it. You are correct about the wall. Only that particular wall, I am unable to push-pull to create an opening.
How can I fix both the issues? i.e. z-fighting and wall extruding issues.
If the wall geometry is grouped, you need to open the group for editing (right click on it and choose Edit Group) and then draw the rectangle and push through.
Another common problem for newbies is that they don’t get things drawn on plane. This could also cause the problem but without seeing your model, it’s hard to tell if that’s an issue.
As for getting rid of the Z-fighting, you have to do things that don’t make it occur. Why did you draw the rectangle on the floor? If it is to become a cabinet, using Push/Pull to make it 3D will prevent that from showing. If you are trying to divide the floor into smaller sections, again, you need to open the group for editing before drawing the rectangle.
FWIW, I know that it can be exciting to see your model with textures applied but I would suggest you avoid adding textures early on. They can mask geometry problems like reversed faces and they can cause a performance hit as you are modeling. Save your texturing for after the geometry is pretty well complete.
If you share the .skp file we can probably give you more ideas.
For the Wall,
I did try to double click to enter edit mode, and draw the shape for extruding. It still did not work.
For the Floor, I was trying to place different floors in the house for different rooms.(example: wood for living room, tiles for bedroom etc.) Also, trying to add a small carpet under the bed.
Thank you for the tip regarding adding materials at the early stage.
Click on my name and then Message. You can send the file to me in a private message that way. If it’s too large to upload here, upload it to Drop Box and send me the link.
Maybe multiple levels of nesting or off axis wall face.
You would need to divide the larger floor face into smaller sections by editing the group and drawing in lines.
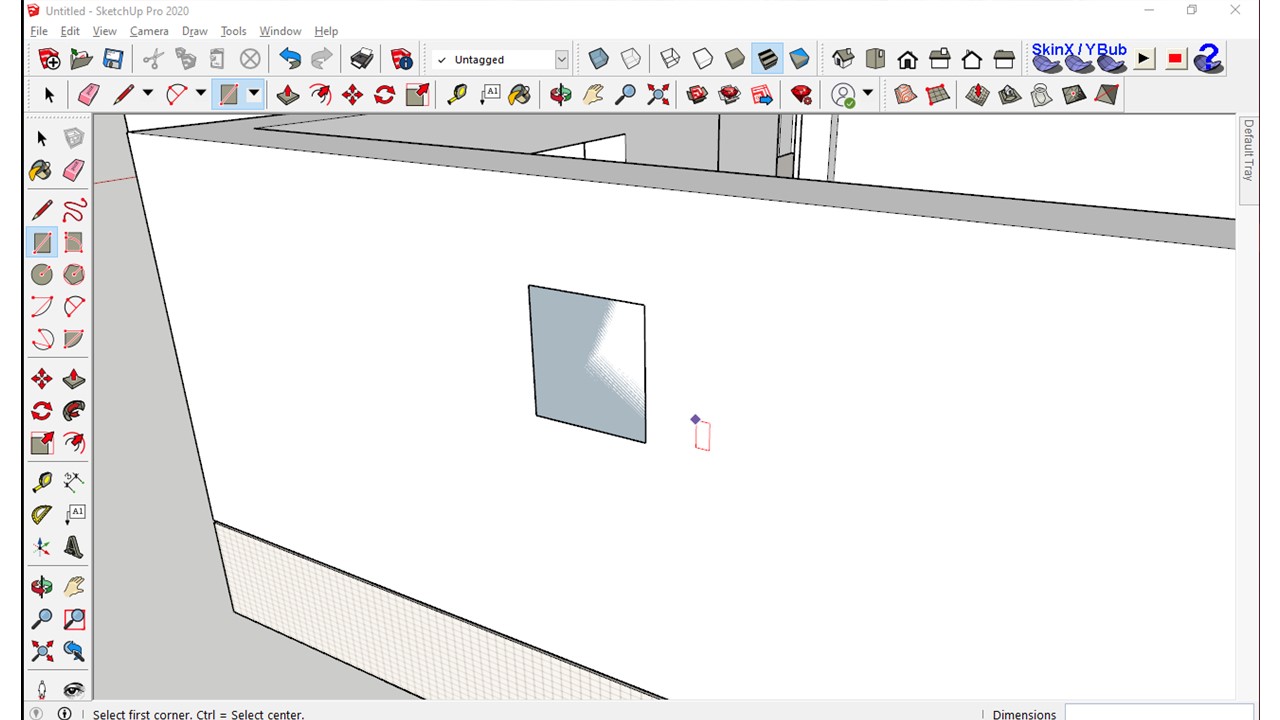
So I opened the wall group for editing, drew a rectangle on the face and pushed it through with no trouble. Compare the rectangle you drew on the wall to the one I drew. Yours has the heavy profile edges and reversed (blue) face which are clues that the rectangle is not in the context of the wall geometry. In mine the face inside the rectangle is white and the edges are not thick profile edges.
The same sort of thing needs to be done with the floors. Or you can do as you’ve done and float one floor above the other or in the case of your rug under the bed, give it some thickness.
Further poking around. This wall was not drawn parallel to the green axis. If it was, the X coordinates for the corners of the wall would be the same and you can see they aren’t. They are close to being right but close only counts in horseshoes and hand grenades. It doesn’t count in SketchUp.
So the problem on that face is the rectangle isn’t laying on the face of the wall when you draw it. This is what I was referring to when I wrote:
You could use the Line tool to draw a rectangle on the face but it would be better to correct the geometry and get that face along with the inside face on axis. That could be done with the Move tool but it might be better to erase the geometry and redraw it correctly.
Still poking around. I found another issue. You have multiple edges along the bottom of that wall face. There should only be one edge, not three. I would suggest deleting the edges and redrawing that end of the wall making sure you have the edges on axis.