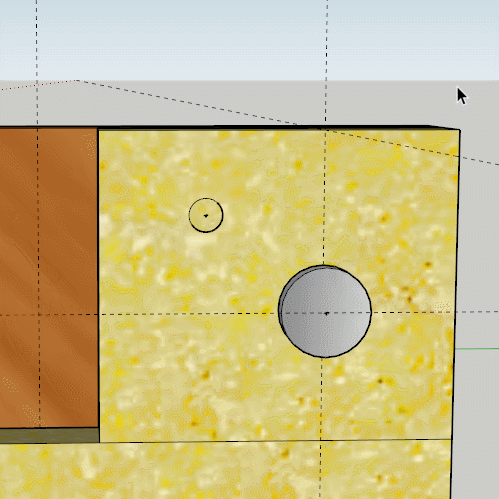
I’m trying to make a hole that will hole, that will represent a location for a bolt, and would like to place it on just the yellow piece of wood, then later go all the way through to the brown, when that piece is lifted to a different angle (15,30,45).
I was advised that it is possible create a circular hole, without having to explode the group that the object is a part of, and then go through the hassle again of re-grouping it.
I double clicked on the grouped opponent (or right click → edit group), but the circle disappears.
Context context context, you need to be in the correct context.
You have two separate groups, the circle needs to be within the context of the yellow group for it to cut the geometry.
Your other one disappeared because you PP’d it to 0.
Something else you need to be aware of.
You are not drawing your circles on axis. Always draw them so the cursor id on either the red, green or blue axis. this way you can always make them align.
See here how your circle is showing the line from the top vertex to the center is at an angle, while mine is vertical.
I tried to follow the step displayed in image, and it hollows out, when I use the push/pull tool.
Please note I decided to erase previous circle and start all over
Steps taken:
Right click on current group and select edit group
Draw circle
Click on drawn circle once (outline does not turn blue)
Select push/pull tool, click on center of circle once, then drag mouse to edge of yellow structure
This is where things don’t go as planned. It hollows out.
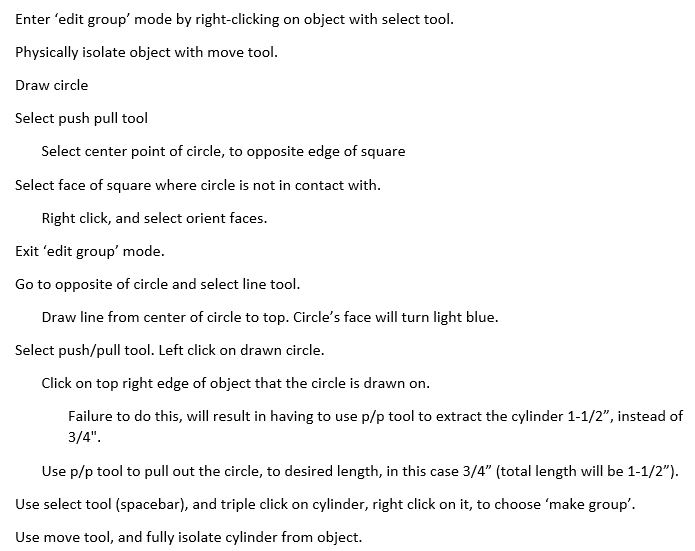
For the cylinder you moved out, at the end of the video, when did you make it its own group?
Before he started recording. The point he’s making is that when you’re editing a group, it doesn’t affect the geometry (edges and faces) outside of it, such as that cylinder.
What’s great is that you now know how to edit a group without exploding it. You simply have to “edit” it — either by selecting “edit group” from the context menu, or double clicking on it — make your changes, and then back out. Cheers!
Looking at the GIF demonstration you posted, I thought you clicked the circled red x to ‘un group’ it.
Updated steps:
Create circle
Double click on circle, select find center, and make group
Right click on yellow object circle rests on and select edit group
Draw circle again on the outlier of the ‘first’ circle
Click on drawn circle once (outline does not turn blue)
Select push/pull tool, click on center of circle once, then drag mouse to edge of yellow structure
Exit ‘edit group’ mode The face of the circle is blue, instead of yellow as seen in Box’s gif*
Only the face of the circle is moved out with the move tool.
I’d like the end result to look just like your cylinder, because I can view the brown wooden structure at the end of the hole fully, without the ‘artifact’/‘glitchy’ effects, and also the cylinder object removed, may serve as a baseline for creating a bolt/screw fastener model.