
Yeah I understand.
Im just not sure how HAHA.
I doing mind doing it individually, but Im not really sure how to get to them?
How do you make it transparent?
Ok; I made it transparent; still cant get to those inside surfaces without deleting something first lol
Now I’m trying layers, but it dosnt work. I can only select one layer; so cant add selection to the active layer
Got it; moving the selection to a different layer is cumbersome and not intuitive. But you can do it from Entity Info
I think I got it.
What do you guys think?Blind incert (4).skp (213.4 KB)
In this stage, with a simple object like this, there’s no need to use layers. They’ll most likely only be confusing you. Layers are for controling visibility of the model on screen.
It’s also worth mentioning that you can check your modeled object inside for internal edges and faces (that’ll prevent it from being a SketchUp Solid) by applying a section plane. (lets you look inside).
Thanks for that!
I actually seen the selection pane in another post, but couldn’t find it on the web version. So I think I got what I needed in the end with the layer.
Using layers on raw geometry in the way you have done will lead to madness. Keep all edges and faces on layer 0 and only assign layer tags to groups and components, ‘and dimensions and such’.
Layers do not separate geometry.
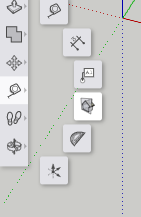
You would be better off deleting the face so you can see inside and then redraw an edge to get it back. Or as mentioned use a section pane, third icon from the bottom on the toolbar.
You may think so. But since a SketchUp Solid has all its edges and faces wrapped in just one drawing context (the group or component), you had to assign some basic face in that context to a layer other than Layer0. That’s playing with fire in SketchUp. Leave all raw (basic) entities assigned to Layer0!.
What you could do is to temporarily hide a face to look inside.
The ‘Section Plane’ tool can be found here:
@Box, oops, telepathy?
I just hid the face. As in the picture: “hidden geometry” is on for illustration-so you can see it’s there. But with hidden geometry" off , you can work behind where the face is.
You need to delete that extra layer and when asked: Move all entities to the default layer. Then reverse the blue faces so that on the outside only white faces are visible. Blue (back) faces are for the inside.
Thanks so much guys!!!
I really appreciate all the help.
I think I might have it now. all back on one layer as suggested and am getting a volume in the entity info. Thats pretty much what I need to look for right to make sure it gives a proper STL file?
Im trying to print a test… So far so good

Ok; I did a test print before I got it to be a proper solid. So im not sure if the following artifacts are that. Or something else that Im not doing right.
As you can see its kinda skewed and has a lot of flat edges when it should be round.
What do you think it is, please keep in mind this came from a test where it still had the layer. BUT, those sides still seem very flat (looking at the above shot)???


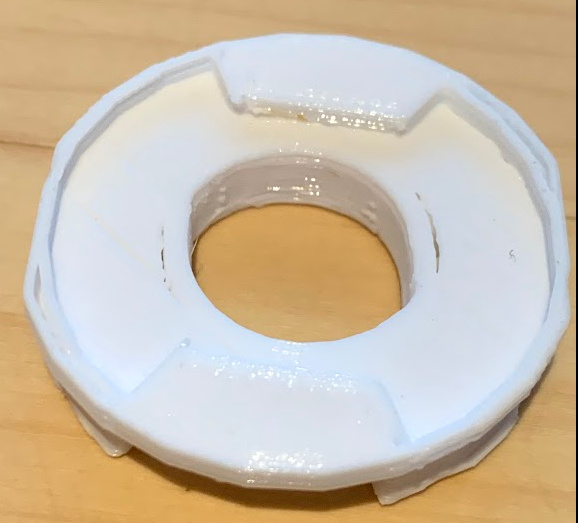

The issues you are seeing now is more likely to be related to the tuning of the 3D-printer itself.
Oh it prints pretty good… Just as long as I didnt make the STL HAHA
So I found how to make it more circular… But now I cant seem to get it to create 3d shapes! it just kinda pulls out like this.
No Idea why this is so hard HAHA
Push/ pull was working before… No idea why its doing something different now ![]()

Ok, I think Im making this too hard on myself.

I have this object with the right pattern on it. Now; how can I mirror that pattern on the other side of the solid?
thanks all!
So I can copy the lines to the other side, but it wont snap to the middle of the face

Is there any easy way to do that?
Why would it? The blue selected edges have no marked center, nor has the larger white circular face. SketchUp doesn’t know what you want.
- make the selected blue edges a group ( it includes the smaller circle)
- enter this group for editing > right click on the inner circle > select ‘Find Center’ to get the group’s center marked > close the group
- right click on the larger circle and select ‘Find Center’
- now position the group on the larger circle’s center, using its own center
- explode the group to have all geometry in the same context again.
Since the geometry you want to copy is currently centered on the blue axis, as is the face to which you want to copy it, do this:
- Select the move tool while your geometry is selected
- Click anywhere on your geometry (starts move)
- press Ctrl (Command on the Mac - I think!) – converts move to copy
- press UP arrow – confines copy to along the blue axis
- hover mouse on opposite face you want to receive the copy - wait until you see “on face” inference
- click to complete copy