Sketch rendering styles: can't render spheres

With sketch rendering styles, such as “Brush Strokes” in the example here, can’t seem to correctly render a sphere.

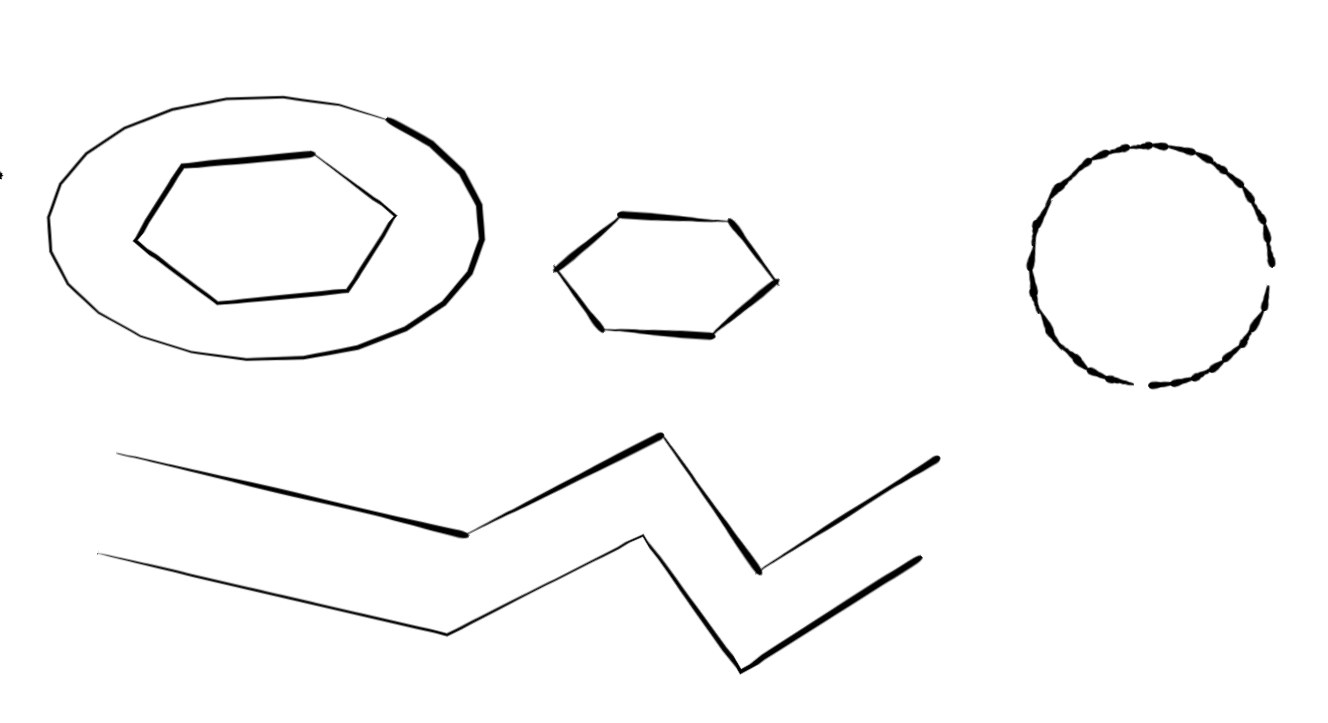
If you zoom in very close, it does outline a sphere with lots of little dabs, as seen here:

If you zoom out just a little, spheres disappear entirely:

Or rather, the strokes disappear - as you can see, the shape of the sphere still occludes the shapes in the background, only the outline of the shape fails to render.

Notice how circles render without problems - this issue only affects spheres.

I’ve tried most of the sketch-looking styles, and they all have this problem.

I have some idea of how these sketch-style shaders probably work. Most likely, you’re drawing little dabs between the connected vertices - and for spheres, the vertices get too close for these dabs to get long enough to actually render? What I would think is, you probably need to change this approach, so that, instead of rendering these dabs directly based on the 3D geometry, instead you need to implement a 2D projection of the outline of the vectors first. Since it handles circles just fine, a 2D projection would essentially would convert 3D spheres into 2D circles before passing that through the shader. (The shaders don’t appear to use the depth information in the first place.)

Just guessing here - and I’m sure it’s not a quick fix either way.

The point is it’s not very useful right now for complex shapes with volume. Which is kind of a shame. It’s a very cool feature otherwise. I love being able to present an idea as a sketch. It helps people abstract from details and think about the idea.

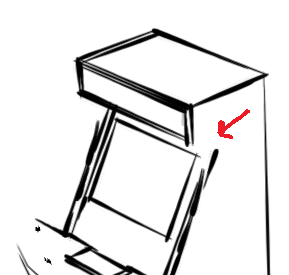
In my case, it’s difficult to present the idea of an arcade cabinet with no joysticks. :smile:

Another example of complex shapes vanishing when zoomed out:

image

Here’s a side-by-side showing how the geometry affects the strokes:

This shape is made of connected arcs:

The arcs form a single connected shape, as demonstrated by the ability to extrude (push/pull) and form a volume - this is one shape, but it appears to render as individual shapes. In a sphere, those individual shapes get so small, you don’t just get gaps in the strokes, but they disappear entirely.

profiles, but it's not the issue here

what’s the deal with spheres and cylinders ?
By default, these styles applies to lines. not profiles. A sphere, or the sides of a cylinder, are smoothed surfaces, so no lines, just profiles.
You can see it in your second photo, you don’t have the profile of the sphere, but you also miss the verticals of the cylinders in the back.

Solution ?
Select your style, then click edit, and activate the profiles.


EDIT : yeah I misspoke, the reason your sphere disappear between photo 1 and 2 is the size of the lines alone, no profile stuff. You can disregard my comment about profiles, they don’t apply here.


also, such styles have a minimum length. Still in the edit part of the styles panel, you can play with the slider to show more or fewer details. in effect, you can adjust how long (in pixels) the lines have to be to show up.

BUT you’ll still get these tiny segments
Solution there would be to select the lines and arcs, right click on it, and weld them.

panel

Here is my (french) tray, on the thick brush stroke style. As you see, you can, in addition of the lines, activate profiles, add more details on the slider (make smaller lines appear) and have a quick look at the standard design of the line used.


Here are examples. in order, a circle and a polygon. You see their welded contour is one stretched brush stroke.
Then, a polygon that I exploded. every line is independent.
a sphere, but without any face shadow, doesn’t show much
two sets of lines, one is raw, the second one is welded and acts as one long line.

The other problem with spheres and complex volumes is that the styles you’re using is flat. It has no shadows on the faces, it doesn’t gives an understanding of the 3d volume. The faces parameters are now “hidden lines”, and if I switch them to “shaded”, then I suddenly get an idea of the volume.
That’s how it works in real life too, a sphere with no information on light and shadow is just a circle.


Here is the same sphere, shaded. Keep in mind though that you can’t weld the tiny lines you see here


So, try to weld lines so they appear as one and not tiny chains, change the level of detail in the style’s options, maybe bring back shaded faces (style options too), should help a bit

2 Likes

@ateliernab makes some good observations.

Not exactly. A sketchy style is made up of a series strokes; .png images. When you enable a sketchy style SketchUp lays these stroke images over the normal edges in the model. As @ateliernab indicates, there is a limit to how short these strokes can be. That can vary from style to style depending on what choices the author of the style made. It may be that the style can be edited to show shorter strokes than are normally visible. Your profile says you are using the free web version of SketchUp so you don’t have that option.

The Brush Strokes style you are using has only 5 different stroke lengths with the shortest being 32 px long.


If you were using SketchUp Pro you would have Style Builder which would allow you to edit the style and add lengts to it. Or you could create your own styles if you want. When I create my own sketchy styles I usually create strokes for all available lengths. Usually I also create 10 different strokes of each length to get more variability in appearance.

Welding curves can help although I’m not sure if the free web version has that capability. SketchUp Go does have Weld. When you use Follow Me to make a knob for your joystick, the resulting curves are exploded into their short segments. They would need to be welded together. If SketchUp Free does offer Weld Edges you can turn on the hidden geometry, select a loop of edges, right click on them, and choose Weld Edges from the Context menu. Rinse and repeat for the other loops of edges.
Screenshot - 1_8_2023 , 6_33_33 AM
In SketchUp Pro this can be made much easier with the Auto Weld extension. It does the welding automatically after Follow Me.

Here’s an example showing that complex shapes can be represented with sketchy styles.

On the right in this screenshot the curves in some of the parts on the far right have been exploded while the parts on the left have welded curves.

Export size affects the appearance of sketchy edges, too. The above would be the same as a screen size export. Below is the result of exporting at 8000 px wide using the same style. It was then resized in an image editor. Click on it to see it full size.

4 Likes

FWIW, here’s another model; this one with a couple of spheres, that uses a sketchy style. Click on it to see the full size image.

3 Likes

This lines are really beautiful. Clean and very nice.

1 Like

Thank you.

Welding the edges of every individual loop is not a great workaround - I don’t want to mangle my model.

These styles should “just work” - you shouldn’t need to tailor your model to satisfy the renderer.

If that’s the limitation of this feature, it seems really half-baked and I’m sure this could be improved.

If all it takes is to weld all edges before rendering, that’s probably what it should do internally? But non-destructively, of course - without affect your working model.

Welding edges will not mangle the model. I don’t know where you got the idea it would.

Once you’ve welded it, you lose the ability to edit it, don’t you?

You are basically expecting SketchUp to read your mind. I don’t think that it is possible for the application to guess which separate edges should be treated as a continuous line and which not. You see a sphere in what for SketchUp is a bunch of edges and faces.

No. Welding just adds metadata that identifies a sequence of edges as forming a single curve. It has no effect on your ability to edit those edges individually, though some edits may cause SketchUp to abandon the metadata.

2 Likes

No! Where the heck did you get that?

You are basically expecting SketchUp to read your mind. I don’t think that it is possible for the application to guess which separate edges should be treated as a continuous line and which not. You see a sphere in what for SketchUp is a bunch of edges and faces.

The default renderer does not need to read minds to render spheres as circles:

image

A sphere rendered in 2D is a circle.

The sketch style renderer isn’t rendering spheres as circles.

There is no other meaningful way to render a sphere in 2D.

Bottom line, however it’s implemented, it doesn’t work well.

I’m not sure why we need to debate whether that’s a problem? It’s obviously a problem.

When you look closer you see that it is in fact a polygon. Every facet has its own “stroke”. When the stroke is uniform your eye sees it as continuous.
I am only trying to explain why it works like it does. Of course it looks ugly. I myself have no need to make computer models look hand-drawn so I never use Sketchy Edges styles.

It can render spheres and other round shapes to read as circles.

You’ve chosen a sketchy style that is very limited in stroke options. If you were using a style with more stroke options you would be able to get a different result. You also seem to expect vector line type display from the sketchy style you’ve selected. That’s not the point of sketchy styles.They are supposed to look sketchy.

Maybe the sketchy styles should just be removed from SketchUp Free. Then hobbyists such as yourself won’t use them.

For the record, I did try every single style available in the “sketchy edges” and “straight lines” categories in Sketchup Free - the one I picked was the least bad, but none of them properly render spheres.

Stop thinking “spheres” and “curves”… SketchUp is a polygonal modeler and not a CSG or Nurbs modeler, so there are no spheres and there are no true curves. As the gurus have already discussed, there can be metadata associated with some sequences of edges that make them behave as curves in some ways, but they are really nothing more than edges that are treated as a connected sequence. The longer the sequence, the greater the chance that the sequence will be visible at a given zoom level. If you create a cube and choose a sketchy style, even it will disappear at some zoom level because its edges become too small to render. So think “how small are the edges” when your edges disappear using a sketchy style, and adjust the style settings accordingly for the resolution that you’re outputting.

You’re completely missing the point: this feature doesn’t work well. Explaining why is moot.

Correction: it doesn’t work well for the way you are using it. The sketchy styles work well with spherical and other round shapes for others, as I’ve shown repeatedly in this thread.