Well, here we are almost ten hours later, still stuck on Starting...
So I’m not of any help on that front. But @colin has managed it for you, so I’ll abandon my attempt here.
Yes. Your model looks great, but as you found, you will have problems using it because it isn’t well structured.
You have a huge number of edges (almost 13 million) and faces (approx 4 1/2 million) in your model. It’s largely due to your use of large amounts of foliage with realistically modelled leaves, most of which is NOT on your leaves layer (or tag in SU2020) so is still visible in the model you were trying to export.
I’m guessing that you have imported much of your ‘entourage’ - plants, furniture, etc - from the 3D Warehouse, It looks gorgeous, but it is severely bloating your model, and like @colin I question why you would want to export all of that foliage and entourage detail to a CAD file. It’s unusably big for any purpose I can think of.
That’s one big problem in your model.
A second (for me) is your use of anonymous Groups and numbered rather than named Components. That means that in Outliner one has no idea what each identically named Group contains. That makes it virtually impossible to understand the hierarchical structure of your model, or to find anything to check it, change it, or understand where it fits in the overall model.
For myself, I would (like @DaveR) always use components in preference to groups, and give each a meaningful name when I either finish drawing it, or if I had imported one from the 3D Warehouse that isn’t named, give it a name then and there.
And before you import a 3D Warehouse model, inspect it first in a new model window. Check that it isn’t overly detailed for use as entourage (most are), that you remove all its layer tags, and make sure that all edges and faces are assigned Layer0 or the Untagged tag in SU2020.
Also look at it in Monochrome (menu View/Face style/Monochrome) to check for Reversed Faces. These will not show properly in any rendering you later do of the model. Quite a lot of the faces in your model are reversed - showing blue in this image.

and here

You CAN name a group, but you have to highlight it, R-click and look at Entity Info to find the text box to name the instance. It’s much easier to name a Component - you are prompted to do so when you create it, and you can also name or rename it in Entity Info - either in the Definition name (which will apply to all copies) or the Instance name, which can specify a different name for each instance of that component.
You haven’t used Layers properly. For example, when I turn off the 3D-I-Furniture layer, the floors disappear, and I find when I turn it back on again, that you have applied this Layer tag to individual faces and edges in the floors (or more likely, drawn them when this layer was active), which is why they vanish when you turn off this layer. ALWAYS leave the default layer or tag as Layer0 or Untagged (with very rare exceptions when you know what you are doing).
There’s a plugin which will reassign Layer0 to all edges and geometry, and I suggest you use it. Otherwise you will get unexpected results when you turn off some layers - geometry you expect to see will vanish, and if you are drawing on some layer other than Layer0, it may get tangled up with other geometry in very confusing ways.
Please watch the Learning Sketchup fundamentals at learn.sketchup.com to see how to use components, groups, and layers properly.
Depending what you want to do with your model, you will probably find it worth while to go through it systematically and fix these problems.
-
Use Outliner to check each Group in turn, and give it a name - I’d suggest making it into a component first. Then open it for editing and if it has sub-groups or components, see if they make sense. If not, explode some or all of them, Select All and check that all edges and faces are assigned Layer0. Be aware that if you explode a group that has a layer assigned, all its edges and faces will have that layer assigned to them - so reassign Layer0 to them afterwards).
-
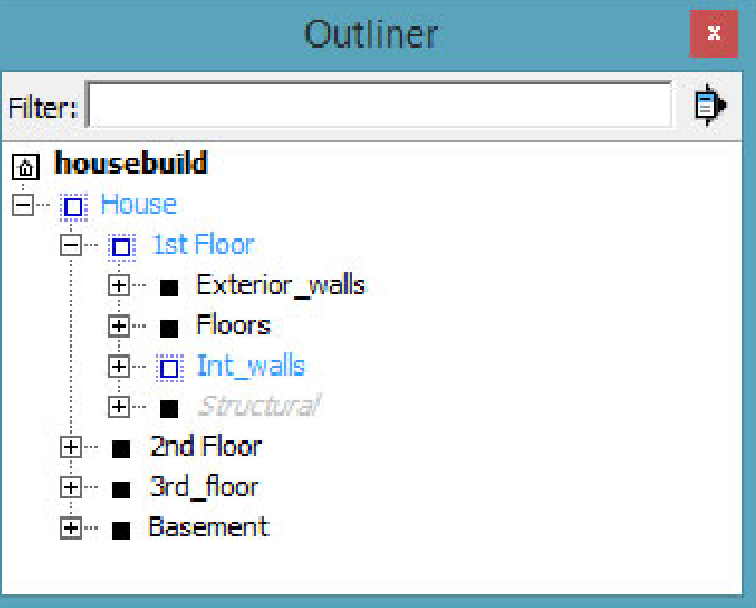
Matt Donley’s book From Sketchup to Layout has excellent advice on how to name and structure hierarchies of components or groups to manage your model. In his example House model, he organises them in this hierarchy (see image below). It’s not the only way to do it, but it is a good starting point. The eBook version is $US29 and well worth getting.
-
He also talks about three types of Layers - OBject, LOcation, and SPecial, and starts each layer name with one of the pairs of capitalised letters to keep them together in the Layers panel.
OBject layers govern the visibility of things like floors, cabinets, furniture, pot plants, etc.
LOcation (or sometimes Phase) layers govern the visibility of objects in different locations - for example, like basement, ground, first or attic floors - or different phases of construction, like Existing, Demolish, New. So you can turn on or off selected parts of the model to show different aspects of it. You can combine LOcation layers assigned to a top level of the component hierarchy with OBject layers applied to lower level objects to turn on or off some types of objects - for example, Furniture and Plants on the first floor.
- Then set up Scenes to allow you to switch between different views of your model from different directions - for example, the four standard views of plan, front and side elevations, and 3D views - and with different parts of the model showing for different purposes.
Doing some or all of this will make your model hugely more usable.