Can anyone help me understand why my model looks so small compared to HDRI’s?
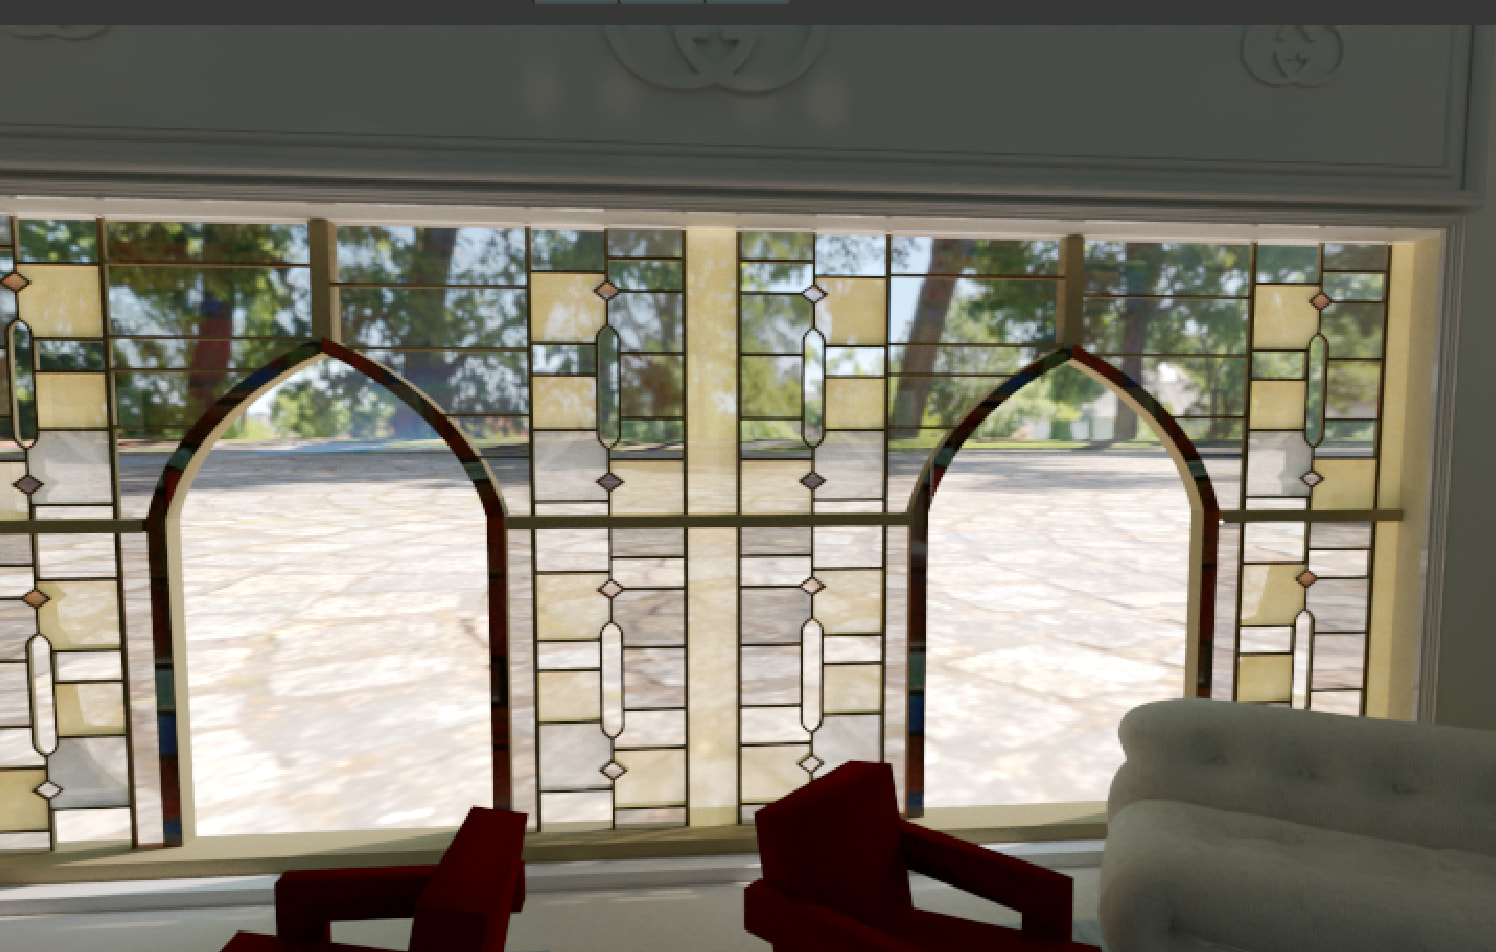
What did you use to render that HDRI?
HI! Thanks for your reply - I downloaded it from I downloaded it from Chaos Cosmos.
You can download HDRIs from many sources/sites, but considering you said Cosmos, you most likely used V-Ray for rendering, right?
Learn about Finit Dome

Yes, using V-Ray, I haven’t played around with Finite dome settings much - thanks for the video - I’ll try that! Thank you!

 You’ve only heard about Finite Dome for 10 minutes, you’ll need to put in a greater and longer-term effort to learn how to use it and see what limitations there are.
It’s probably easier for what you want to do to use a background (a rectangle or curved surface) with what you want to see and how you want it to look, and use the Dome Light only for reflections and light.
OK thanks. Will keep trying 
Dome lighting using an HDRI is primarily intended for lighting rather than acting as a physically accurate background.
With the standard (infinite) dome, the HDRI is treated as infinitely far away, so it doesn’t have any real scale which is why it can sometimes appear visually “off” or the wrong size, especially depending on the camera. Things will also become weird looking if you are using very wide angle views in SketchUp (very common!)
If you need the background to feel more grounded, you can try using a Finite Dome in V-Ray, which gives the HDRI a physical size. However, on its own this often still isn’t enough to produce a convincing result.
For more control and realism, it’s usually better to add some actual context:
-
Place simple geometry or assets outside windows to establish scale
-
Add a ground plane so shadows and light bounce behave naturally
-
Use a backplate image aligned to the camera if you need a specific view
This approach gives you proper depth, parallax, and light interaction, which an HDRI alone can’t fully provide.
Ultimately, the HDRI should be doing most of the work for lighting and reflections, while the visible background is kept simple and supportive. I’d probably be blurring out the background with camera effects and bloom anyway , as I assume the scene is meant to show the design of interior and the stained glass and not the generic image that’s in the background.
in this example I’ve place a sheet of frosted glass behind the window to deliberately blur out the HDRI and the trees. I’ve placed the trees to block out the weirdness of using an HDRI and distract from the building.


ohh thanksss! This is really helpful, thank you so much for taking the time to review and respond. I’m definitely going to try the frosted glass technique.. that looks very slick! I did play around with creating my own landscape beyond but was worried about the extra polys slowing down my render time (which is an animation and already taking ages!) I’m still fairly new to Sketchup Vray and I’m sure there is a way to resolve that too.. but I’m on an assignment deadline so having to compromise is places. haha
Thank you
You’re welcome! It was only a very small patio size area I placed outside of the window with a brick texture on it and then a little bit of lawn with a grass texture.
The trees are from cosmos you could also drop a few bushes around the edge of the “patio/lawn too - that would also just help hide a transition to the HDRI background if there are any hard edges.
amazing - thanks so much! While, I have you do you mind if I ask another question?!
I’m rendering an animation which has x3 scenes at 3 seconds each - by my maths, this should mean 90 frames per scene..
However - my render is now on 280 frames of the first scene - It looks like its rendering all of my lights, not changing through the scenes.. any clues as to what I could be doing wrong or is this how it should be and I need to be patient?!


could it be because I am rendering “entire animation” instead of “frame range”
I just tried a quick animation - for the first time ever actually!
it’s 30frames per transition you have.
3 scenes should be 2 transitions , so 30 frames per second you have specified (3 seconds in my case)
So it should be 180frames.

I tried lights that turn on and off via being hidden objects and hidden tags per scene.
I’m just sitting on a box hanging out with a glowing Pikachu. Not sure why, but I am.
The animation rendered as I expected - so I’m not sure what you are doing differently that means it doesn’t work.
As for there being too many frames, v-ray renders several channels out at once - notice the file names have “denoiser” and “effects result” in them. The one you probably want to convert is the “effects results” as this will contain the image with all affects such as the denoiser and glare and whatnot applied.

Is that really you? Did you get scanned?
Thanks so much @eric-s and @Elmtec-Adam - after a minor meltdown yesterday, I have it slightly working!! I changed the Light Mix from “individual Instances” to layers and is finally moving through each of my scenes (has been for 14 hours now!? ) but its still doing a frame for every light source in my model, soo x12 different variations of the same fame, just with different finish. The only reason I’m not throwing my computer out the window is it seems to be saving them all at the same time so each 12 done every 4 mins..
so yeh, hopefully I should have my animation this time next year - woohoo!
Also @Elmtec-Adam if that is really you, very cool and nice to “meet you”!