I want to create some wood textures for framing lumber that feature a text ‘grade stamp’ and logo to add a level of detail to carpentry tutorial models. I took photos of actual lumber and used photo editing software to ‘print’ the text onto the wood texture:
but even after considerable experimenting and topic searching I haven’t found a way to make the text legible when I import the image. The last tip I tried was to set Preferences>Use Maximum Texture Size but that didn’t help either.
Does it have to be the real stamp on the wood? I think I would probably try to create the stamp separate from the wood and either add it to the wood grain texture in an image editor or apply it in post processing. Also consider that the real thing would be difficult to read unless you are fairly close to it. If you’re looking at the whole model on screen, it probably shouldn’t be readable.
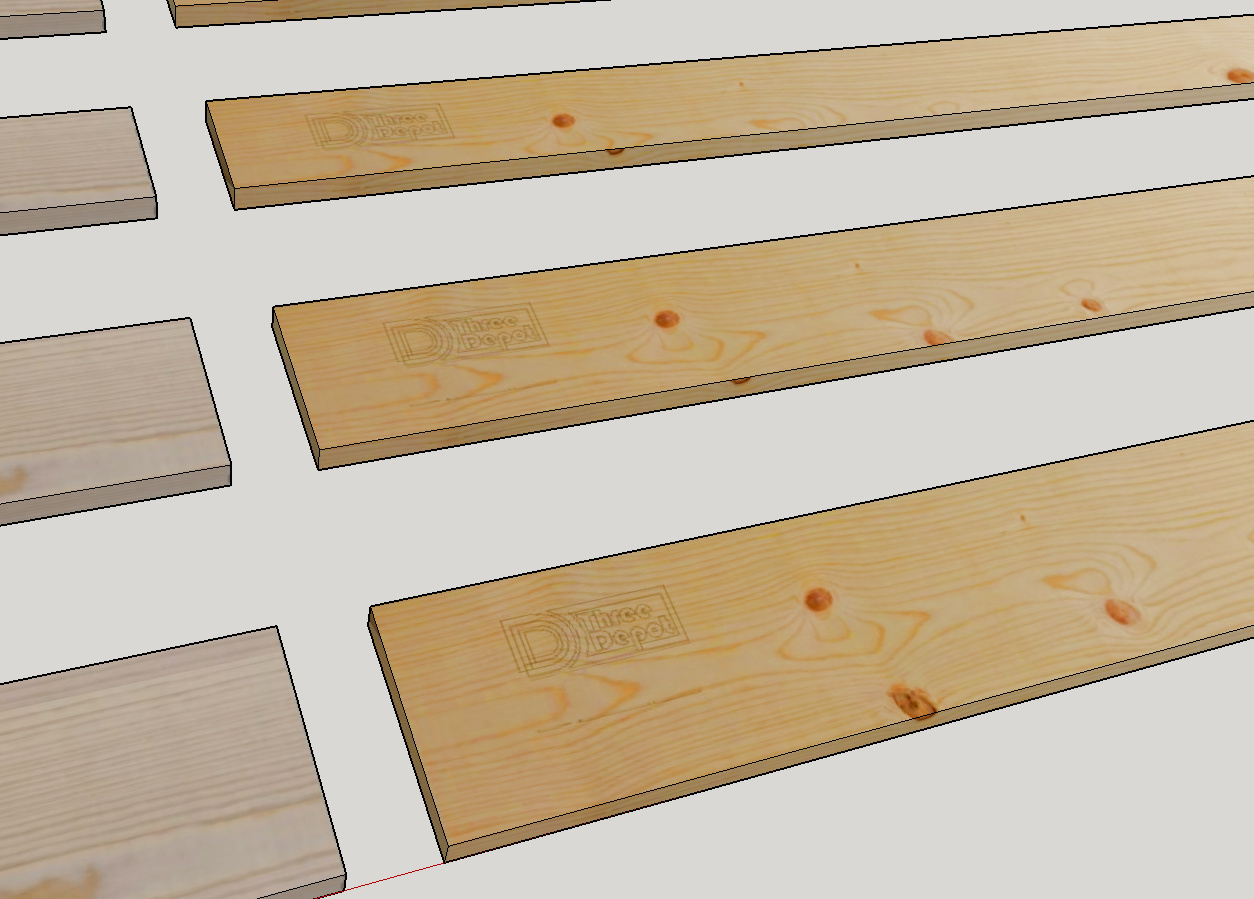
The goal is to have the stamp clear enough in the texture that it’s visible when zoomed in on a piece of lumber, sort of like going to the lumberyard and looking at a bunk of 2x12’s: if you look close at the boards they have a printed grade stamp and often a brand like Boise Cascade or Wasatch. Another factor is that because I’m creating framing lumber I’m trying to create textures that are 16’ long before they repeat. As you point out, it wouldn’t be visible at a distance like when viewing the whole model but would give realistic detail up close.
I did as you suggest using GIMP to manipulate the wood texture (making a 16’ long image from a photo of an 8’ piece by adding a mirror image) and added the logo stamp as you can see in this screenshot directly from GIMP:
I just can’t get this clarity when I try to create a texture in SU from the image. I’m hoping I can get better results than shown here in this screenshot from my SU model:
I expect you’re running into a limitation due to the maximum size of the images used for textures in SU. With a texture image that is wide enough for 16 feet of pine, you don’t have a high enough resolution even at max texture size to display the stamp as nicely as you’d like.
How will you actually use these? Would it be possible to get creative and make a separate set of boards and textures that show the stamp? Leave the long textures without the stamp since it won’t show and make a much shorter texture with the stamp for the closeups. It would be kind of like the props for a science fiction show. The ones the actors use don’t have all the detail of the one shown in the close up shots.
I was led to wonder whether photo-realistic presentation of the lumber including the stamps is really essential to your tutorials, or might be overkill, especially since as you acknowledge the stamps are not legible unless you zoom in quite close. What are you trying to teach by means of such detailed models? Would it work to have a separate enlarged image of the stamp next to the board with an arrow saying something like “look for the grade stamp here”? Not saying you aren’t free to choose how you want your material to look, just trying to offer constructive suggestions.
I was just hoping there was a work-around to bring in extra detail in woodgrain texture images to add an extra level of realism. I could add 3D text to each board component but with so many iterations the additional geometry would be impractical so I was hoping to get it done with texture images. Hmmm…
Don’t take this the wrong way but if you want to add the extra level or realism, there are a bunch of other things you could concentrate on before adding the stamp to the boards.
You could add a “Glue to + Cut Opening” component (say “stamp”) to each board where needed for detailed view. This would mean far less geometry than using 3D text.
The “stamp” component would be on a different layer and this layer would only be active in detailed scenes.
Keep in mind that the opening and its replacing image only shows properly when used on top level faces. This is sort of a bug that was discussed recently. In your case, using groups and components you would need to work with some workaround. I mentioned one in the other thread.
Thanks for weighing in on this challenge… I think anything more involved (ie: more geometry) than just applying a ‘special’ texture is going to put this beyond what is worthwhile for the purpose I’m aiming for.
I think it’s the design that makes it difficult to see.
If you want your logo/stamp to be more legible, try using a heavier line weight.
Or fill it with black. As it is, you’ve just got thin lines among a field of thin lines.