Viking '75 Mars Lander Fuel Tanks and Other Components

The next phase of work is under way for my long-term project to model the Viking '75 Mars lander: the fuel tanks and associated supports and fuel-system plumbing. I recently completed the fuel tanks and their supporting struts.


Published reference material is scant for the lander’s fuel system, but I was fortunate to be able to study in detail lander test units that are exhibited at the California Science Center, the Virginia Air and Space Center, and the Smithsonian National Air and Space Museum. It has been a challenge to reconcile differences between these test units, to decide what is representative of the Flight units that were launched to Mars in 1975. A few press photos of the actual landers during assembly (bought on eBay in recent years) have been helpful.

Here are a few more views (including just the bare-bones lander body for context). All the components are solid.


The fuel tanks (23.5 inches inside diameter) held sterilized hydrazine propellant. This powered the lander’s three Terminal Descent Engines which provided the force to slow the spacecraft during the final 45 seconds or so before touchdown on Mars. The hydrazine was also used to power four small roll-control thrusters that oriented the (immobile) lander such that it would face in the desired direction at landing. The TDEs and roll thrusters will be a future modeling effort.

Next to be modeled will be all the fuel and pressurant plumbing lines (tubes) and valves. I’ve captured many dozens of measurements from the test unit seen below, but it’s still going to be a challenge to make it as accurate as I can. The plumbing for the two tanks are somewhat mirror images of each other, which helps a bit.


Earlier posts on this project are linked below:

21 Likes

When you think it can’t get better it does ! Epic :+1:

Excellent work. The level of detail is amazing.

1 Like

Fantastic work Tom! I’m a huge fan of this project.

I’m curious: what would the total part count be for the lander — and do you have a total of how many parts you’ve modelled to-date?

To date, the model consists of just over 1000 unique components. Hard to estimate what the total will be, assuming that I’m able to “finish” it; probably another thousand or two. Note that this is to represent essentially all of the externally-visible piece-parts of the lander hardware, plus selected items that are not visible (such as the two Radioisotope Thermoelectric Generators, hidden under large wind covers).

Regarding the actual Viking lander hardware, there are a lot of internal parts. Much of that consists of electronics assemblies (which mostly consist of discrete electronics components - resistors, capacitors, etc. plus some small 8-pin integrated circuits) and wickedly-complex wiring harnesses. But there are a few super-complex mechanical systems inside, such as the Biology instrument (which has many thousands of internal parts itself) and the Gas Chromatograph Mass Spectrometer. I’m not planning on modeling any of that (lack of energy, time, and reference material).

If I have any modeling energy when the “external” lander is done, the next aspect of Viking that I would model (some future decade) is the two-layer capsule in which the lander was sealed prior to landing on Mars - the inner layer of aeroshell (heat shield) and base cover (top-half), plus the outer layer of bioshield base and cover. Those components have complex mechanical systems, probably on the order of a thousand unique piece-parts. (That doesn’t include what was inside another mass spectrometer and other science instruments mounted on the aeroshell to take readings during the few minutes of descent.)

2 Likes

Astounding!

I marvel at your persistence and patience — as well as your technical knowledge of the lander, and evident modelling skill.

I have completed modeling the two types of large pyrotechnic fuel valves used on the Viking '75 Mars lander.

  • One type is known as “normally open” (NO), which is manufactured and assembled to allow fuel to flow through the valve. When triggered, the NO valve will permanently close, preventing any further fuel flow.
  • The other type is “normally closed” (NC), which is manufactured and assembled to prevent fuel from flowing through the valve. When triggered, the NC valve will permanently open, allowing fuel to flow.

Pyrotechnic valves were chosen for Viking (and most other spacecraft) because of their high reliability, low weight, and small size. They are one-shot devices which cannot be reset.


Seen in these renderings and photograph of a test lander, the valve bodies are approximately T shaped. In this case (adjacent to the lander’s fuel tank 1), the inverted-T valve on the left is the normally-closed type; the upright-T valve on the right is the normally-open type. Fuel flows from right to left in these images: out the bottom of the large spherical tank, then through the valve pair and on toward the lander’s three Terminal Descent rocket engines (used to soft-land the spacecraft on Mars).

During launch from Earth, cruise to Mars, and the first few minutes of entry and descent into the Mars atmosphere, both valves are in their initial as-manufactured configuration. The NO valve on the right allows pressure-fed fuel to emerge from the tank, until the fuel reaches the NC valve on the left. The NC valve ensures that the lander’s three rocket engines cannot prematurely ignite, even in the event of a closed-but-leaky throttle valve on an engine. (An additional NC valve is located right in front of each rocket engine, as a redundant factor to prevent early firing.)

When it is time to fire the three terminal descent rocket engines (when the lander descends to about 4000 feet above the surface of Mars, with less than a minute until landing), the NC valve on the left is triggered to permanently open. (The three NC valves in front of each engine are simultaneously triggered to open.) Fuel can then flow into the throttle valves of each engine, which open as directed by the lander’s computer and sensors to decelerate the spacecraft and perform a soft landing.

The moment that any of the lander’s three footpads touch the surface of Mars and trip an electrical switch, the NO valve (on the right) is triggered to permanently close. This ensures that additional fuel cannot reach the engines (even in the event of a leaky throttle valve), guaranteeing engine shutdown.

The lander has a second fuel tank with a similar pair of NO/NC valves. Here is an exploded view of a valve pair:

Visible just right-of-center is a wedge-shaped object that is located within the body of the normally-open (NO) valve. When triggered, that wedge is driven downward (as oriented here) puncturing a thin wall section of the fuel line and sealing off both sides of the cut.

Just left of center is a flattened cylinder with a large hole in it, located within the body of the normally-closed (NC) valve. When triggered, that ram is driven upward (as oriented here) to shear off discs that close the inlet and outlet sides of the fuel line. With the discs rammed out of the way, the hole (“port”) in the ram aligns with the inlet and outlet fuel lines to enable fuel to flow. Here is a close-up view with labels:


Each of these valves is actuated by a pair of redundant Viking Pressure Cartridges (VPCs), which are in turn triggered by a Viking Standard Initiator (VSI):

Seen above horizontally are a VSI on the far left, and an exploded (forgive the pun) VPC at center-right. The VSI has a three-pin bayonet plug for an electrical cable on the left end, and threads on the right for mounting into the pyrotechnic device. For some devices, the VSI produces sufficient gas pressure to actuate the device (such as “pin-pullers”). For these valves, however, much more force is needed - provided by the Viking Pressure Cartridge. An initiator threads into the top of a VPC body (at center). Within the VPC is a two-stage explosive charge represented by the tan and dark gray cylinders.

An electrical impulse triggers a small explosive charge in the VSI. The resulting hot high-pressure gas enters the top of the VPC and bursts a thin disc that protects the VPC charges. The VPC charges then ignite, producing a large blast of high-pressure gas that ruptures the bottom sealing discs and flows into the body of the valve. Hollow passages within the valve body (not seen here, but included in the SketchUp model) direct that gas to flow to the head of a piston on the valve’s wedge or ram. A pair of red O-rings surrounding each piston ensure that the gas presses on the piston head to force it into the valve body, actuating the valve.

Next to be modeled with be some of the electrical wiring, and a maze of small-diameter fuel lines for system fill, bleed, and supply to small Roll Control thrusters.

15 Likes

I like your work, the level of details and the technical description. Amazing.

Your dedication and modeling skills are superb. Trimble should be paying for images of your Mars Lander for publicity campaigns. Perhaps calling it
“ You thought SketchUp is a toy”

2 Likes

I have added a model of the ITT Cannon bayonet connectors (with Glenair backshell strain-relief) that were used on the Viking lander’s pyrotechnic devices. The photograph of a partially-exploded connector is of a similar unit that I was able to purchase recently; that unit’s coupling nut (large-diameter shell with splined end) has a shoulder or step, unlike the type used on the lander. I also didn’t want to fully disassemble it, fearing permanent damage. I especially like the “wave spring” that is within the coupling nut, used to provide pressure between the coupling nut and the connector barrel or body, to keep a mounted connector in place. All the components are solid in SketchUp terms.


Here is a view of two such connectors attached to the normally-closed fuel valve that is mounted at the fuel inlet of one of the lander’s three Terminal Descent Engines (TDEs); the rocket engine itself has not yet been modeled. The red object is a protective tape wrap on all the lander’s external wiring, included here for completeness (though it sadly hides some of the knurling on the connector’s backshell!).

Here is a view of two connectors attached to the pyrotechnic pin-puller device at the bottom of a landing leg. The pin-puller was electrically fired shortly before landing to release the stowed or folded landing legs, allowing them to extend for landing on Mars.
Leg Pin-Puller and Connectors

11 Likes

Impressive work.

Hi Tom.

As a mechanical engineer involved in a lot of projects for piping design I can really appreciate the work involved in your models. It is not only amazing, it is astonishing. I like very much the exploded views of the piping components.

I read your resumé in the forum and saw that you are also interested in the space program. I was also interested in all form of space exploration, having followed all the missions of the Mercury, Gemini and Apollo programs. I also watched all the Space Shuttle missions that I could and I also watched with great interest the two Crew Dragon launches and rendez-vous with the ISS.

I like it when someone pushes SketchUp to the limit and beyond.

Keep up the good work going.

6 Likes

I have added the various fuel lines that serve fuel tank 1 on the Viking '75 Mars lander work-in-progress model:


The photograph is of a test lander. The details of the fuel-system plumbing on that test unit differ slightly from the actual Flight landers that went to Mars. I’ve modeled the Flight-type fuel system based on the limited reference material I have that actually shows the Flight lander plumbing.

The larger-diameter (3/4 inch) lines supply fuel from fuel tank 1 (the large sphere) to the lander’s three Terminal Descent Engines (TDEs, not shown). The smaller-diameter (1/4 inch) lines are for filling and draining the tank and to allow bleed-in through the system during pre-launch testing and preparations. The fuel lines and unions are hollow, the coupling nuts and other fittings are threaded, and everything is Solid, naturally.

9 Likes

The fuel lines and associated brackets and fittings that serve fuel tank 2 on the Viking '75 Mars lander model have been added. The general layout of lines and valves for tank 2 is similar (mirrored) to that of tank 1, but there are many exceptions. As is the case for fuel tank 1 posted above, the reference test lander unit (photographed in the Virginia Air and Space Science Center, which is also the official visitor center for the NASA Langley Research Center in Hampton VA, original home of the Viking Program Office) differs in various details from the two landers launched to Mars in 1975.


10 Likes

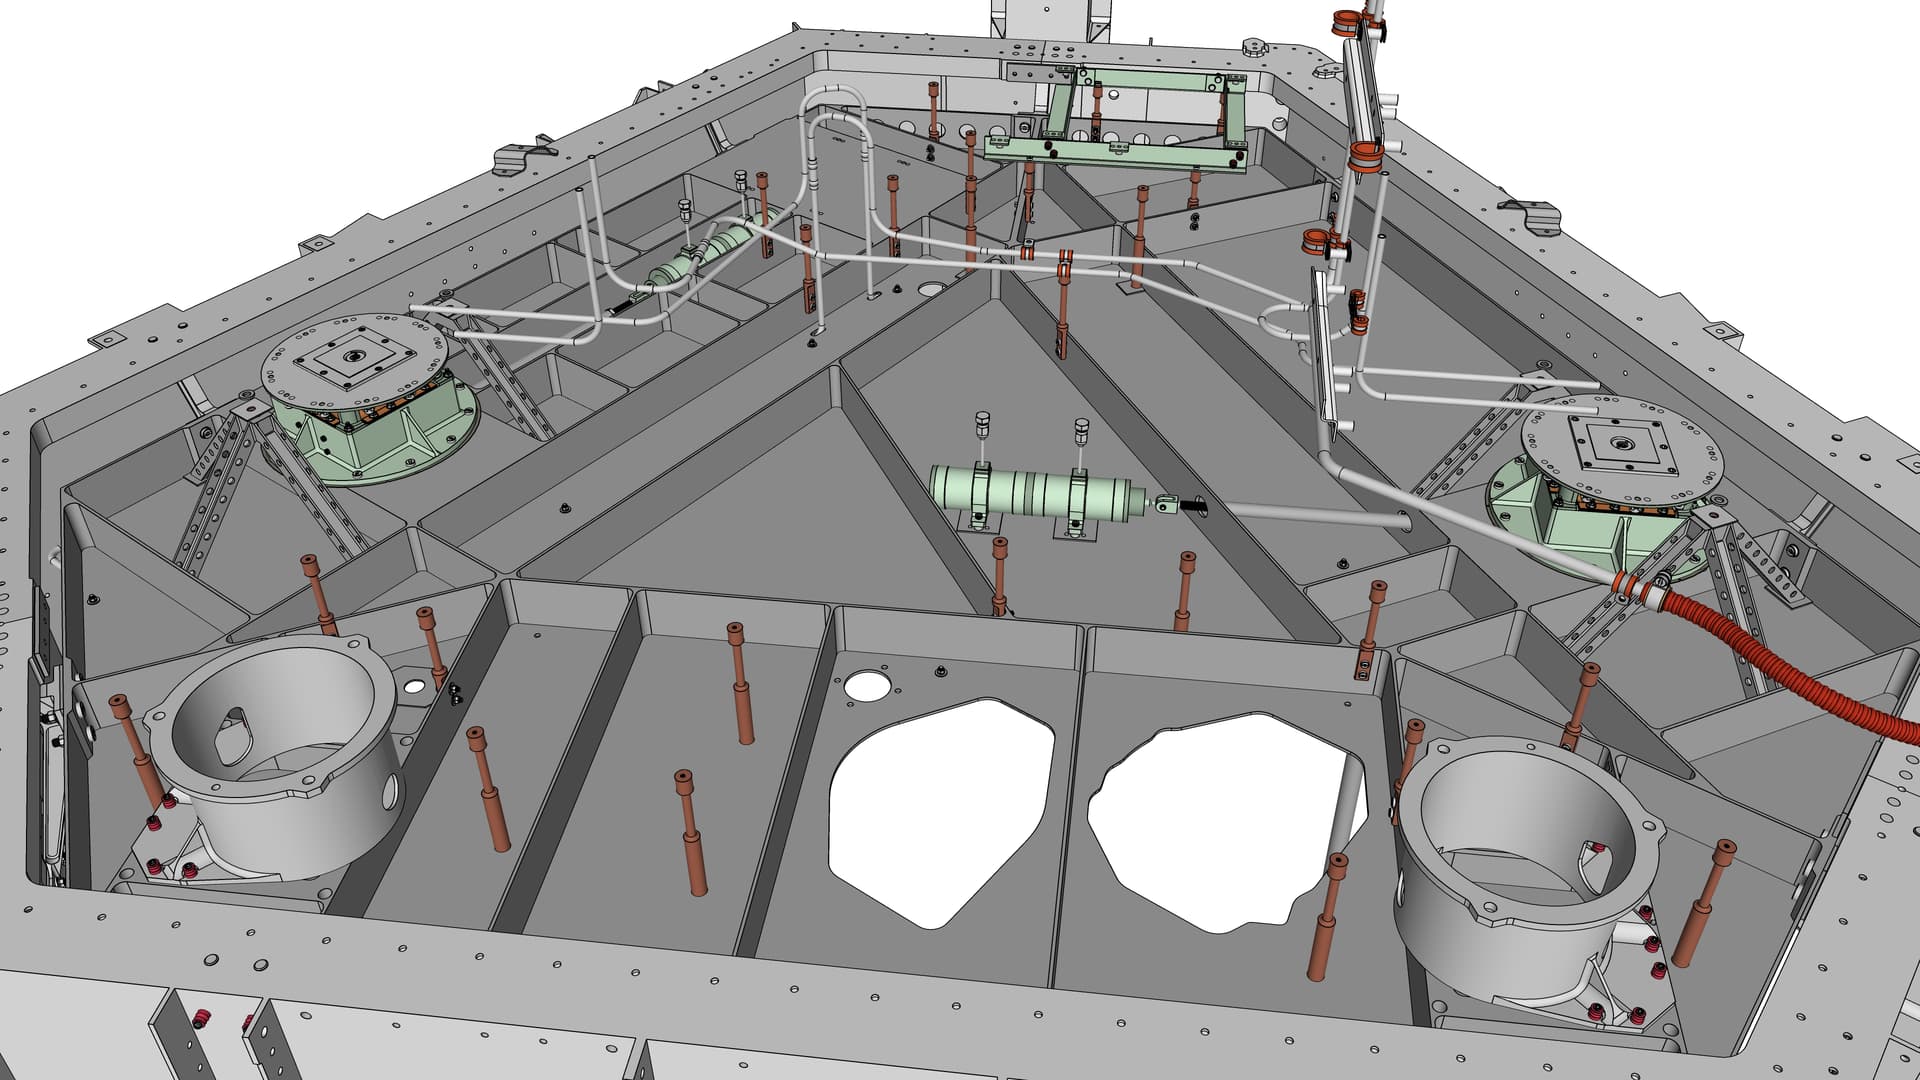
The Viking '75 Mars lander’s fuel system model is complete. Here are overall views of the work-in-progress lander (which is still missing many large external components) with the fuel tanks and all the lines and valves in place, along with the four roll-control thrusters that are mounted on the fuel tanks (two thrusters per tank). Front view:


Top view:

The next image is just the fuel system, without any other parts of the lander. There are about 300 unique Solid components in the fuel system: valves, lines, fittings, and roll-control thruster assemblies. The fuel lines (3/4 inch OD and 1/4 inch OD) were manufactured in sections, which were sometimes joined by welding and other times via couplings. The model represents each distinct section before welding or coupling.

The four small fuel lines in a vertical cluster right of center are for filling the fuel tanks with hydrazine (N2H4) propellant, which was done after the final two-day heat sterilization of the entire sealed lander capsule. The two right-most lines of the cluster are for the lander’s two fuel tanks. The two left-most lines of the cluster are to fill two additional fuel tanks within the aeroshell capsule that protected the lander (not in the model). The aeroshell had 12 small rocket thrusters that were used to brake the capsule out of Mars orbit. The pair of aeroshell tank fill lines are routed horizontally through a couple of turns, then go nearly vertically down to dead-end near the bottom of lander fuel tank 1 on the right. At the dead-end point, a pyrotechnic tubing cutter on the aeroshell severed the lines before the aeroshell was jettisoned, about a minute before landing on Mars.


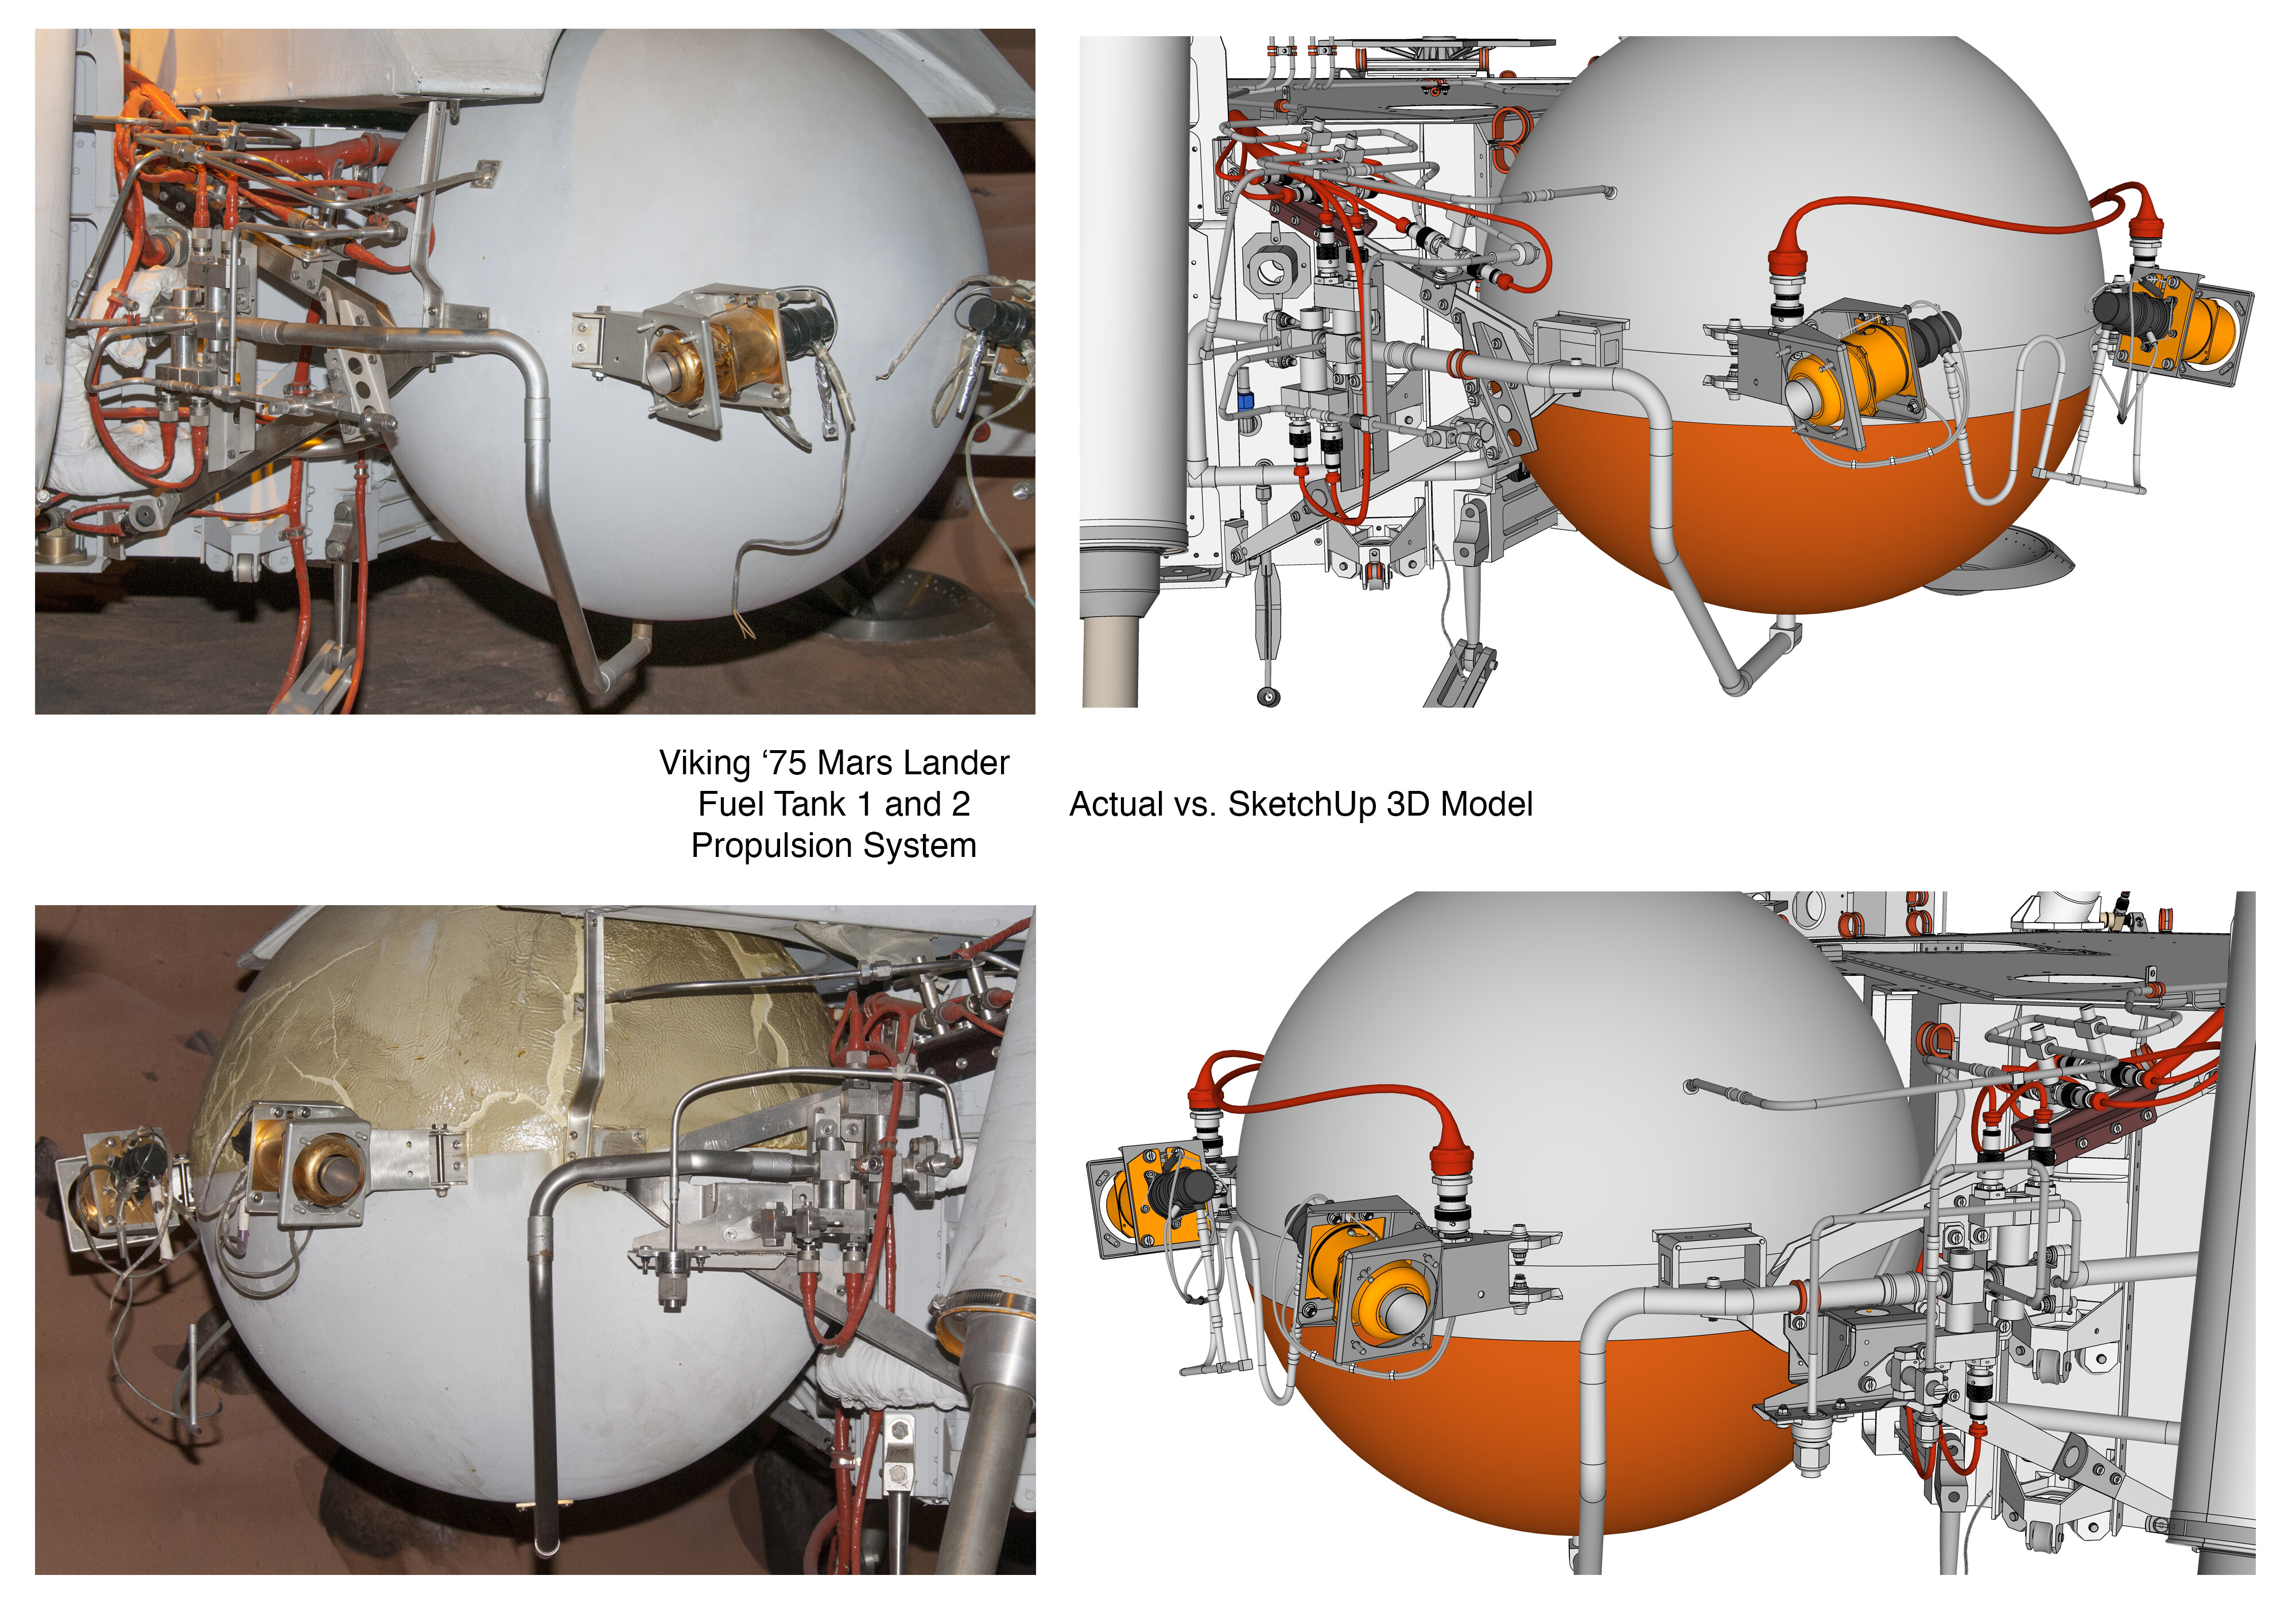
Here are comparisons between the SketchUp model and the test lander unit at the Virginia Air and Space Science Center. This test unit differs in various ways from the actual Flight landers on Mars (and is missing some parts), but it was my primary reference (having taken many many dozens of photographs and measurements of it in 2014). Photographs of the Flight landers during build-up that show these details are extremely limited. Most historic photographs were taken after insulating blankets were installed that completely hide the tanks and nearby plumbing.

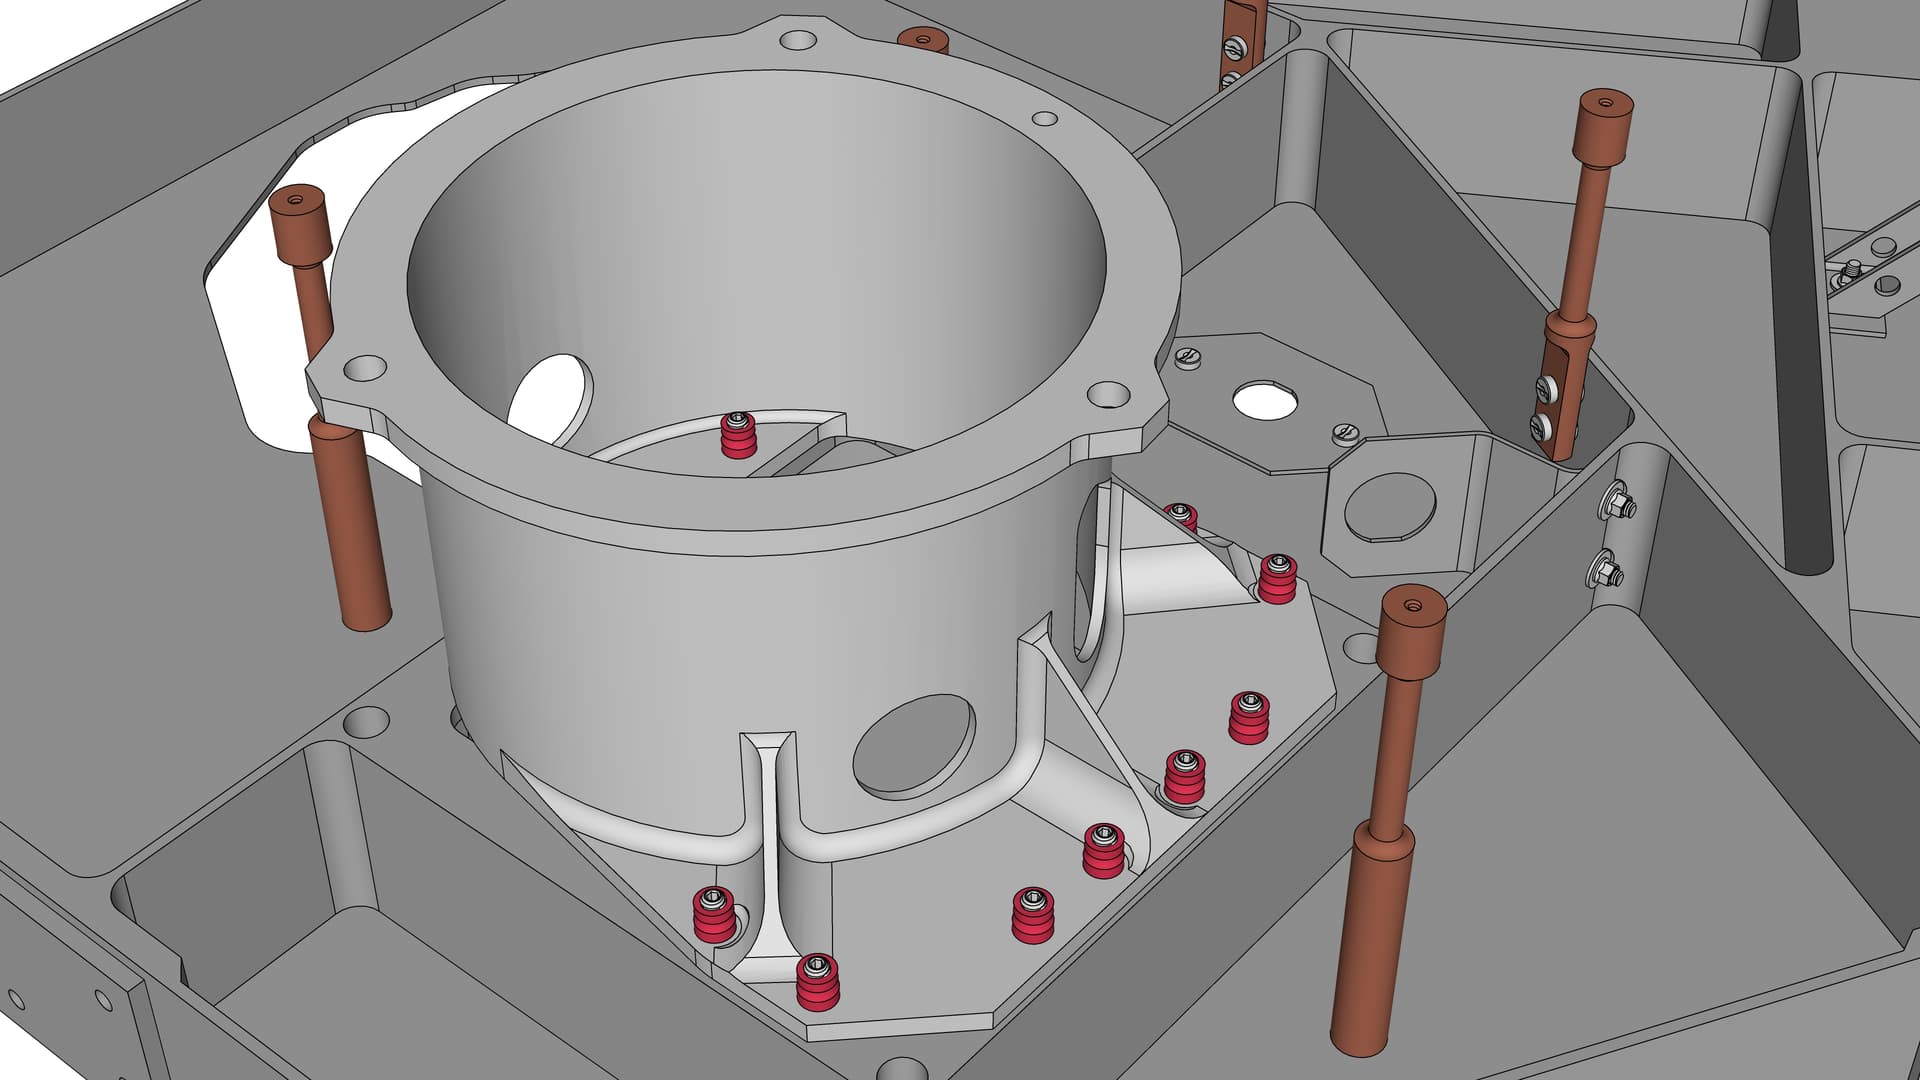
The two MR-50F roll-control thrusters (made by Rocket Research Company, now part of Aerojet Rocketdyne) mounted on each of the lander’s two fuel tanks were mentioned earlier. The 
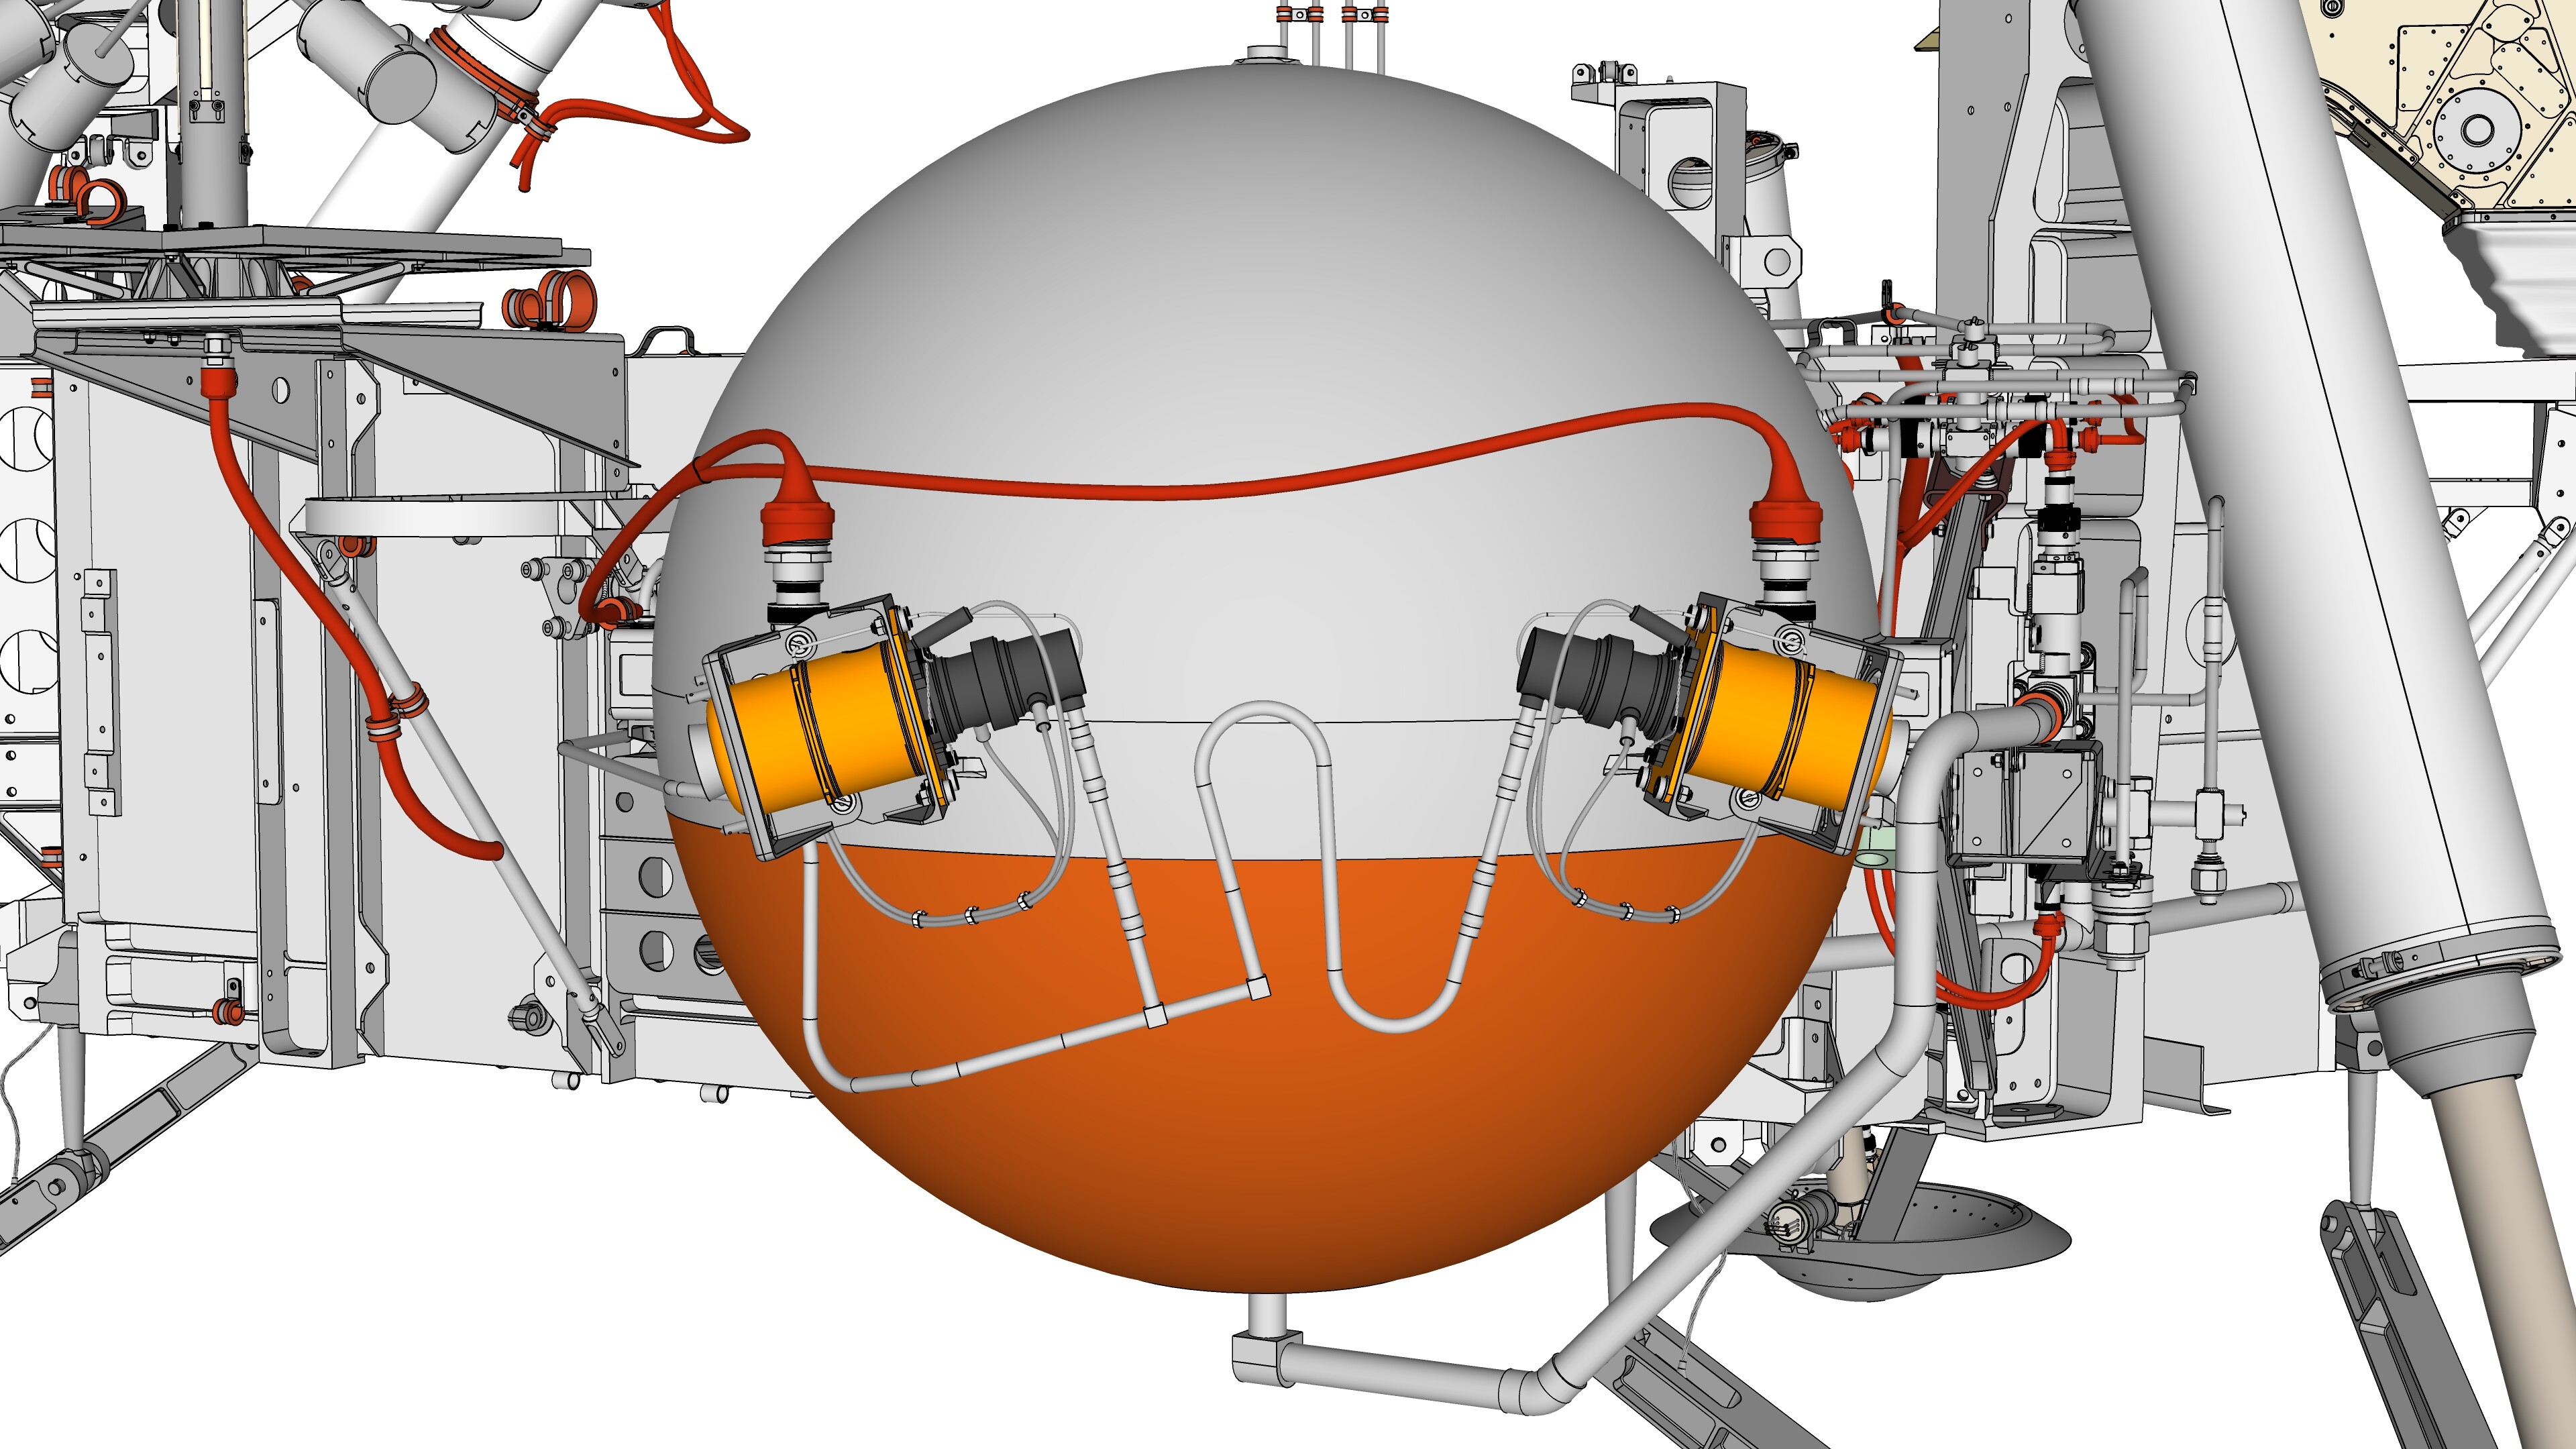
MR-50F SketchUp model is available by itself on the 3D Warehouse. Here is a view of the thruster pair on fuel tank 2:

The purpose of the roll-control thrusters was to control rotation or roll of the lander about its vertical axis during the final minute before landing on Mars. A pre-planned heading was chosen so that the final azimuth at landing would face in the desired direction for optimal mid-day solar illumination of the Mars surface for camera imaging during the landed mission. (This worked as planned for both Viking 1 and 2 when they landed in July and September 1976, respectively.)

The thruster’s gold cylinders are thin heat shields, to limit the heat radiated to the rest of the spacecraft from the thrust chamber within the shields. The black cylinder on the inboard end of each thruster are fuel valves. The light gray thruster nozzle is just barely visible protruding from the outboard end of the heat shield, pointing outward and slightly down (to cope with being off the lander’s vertical center of gravity).

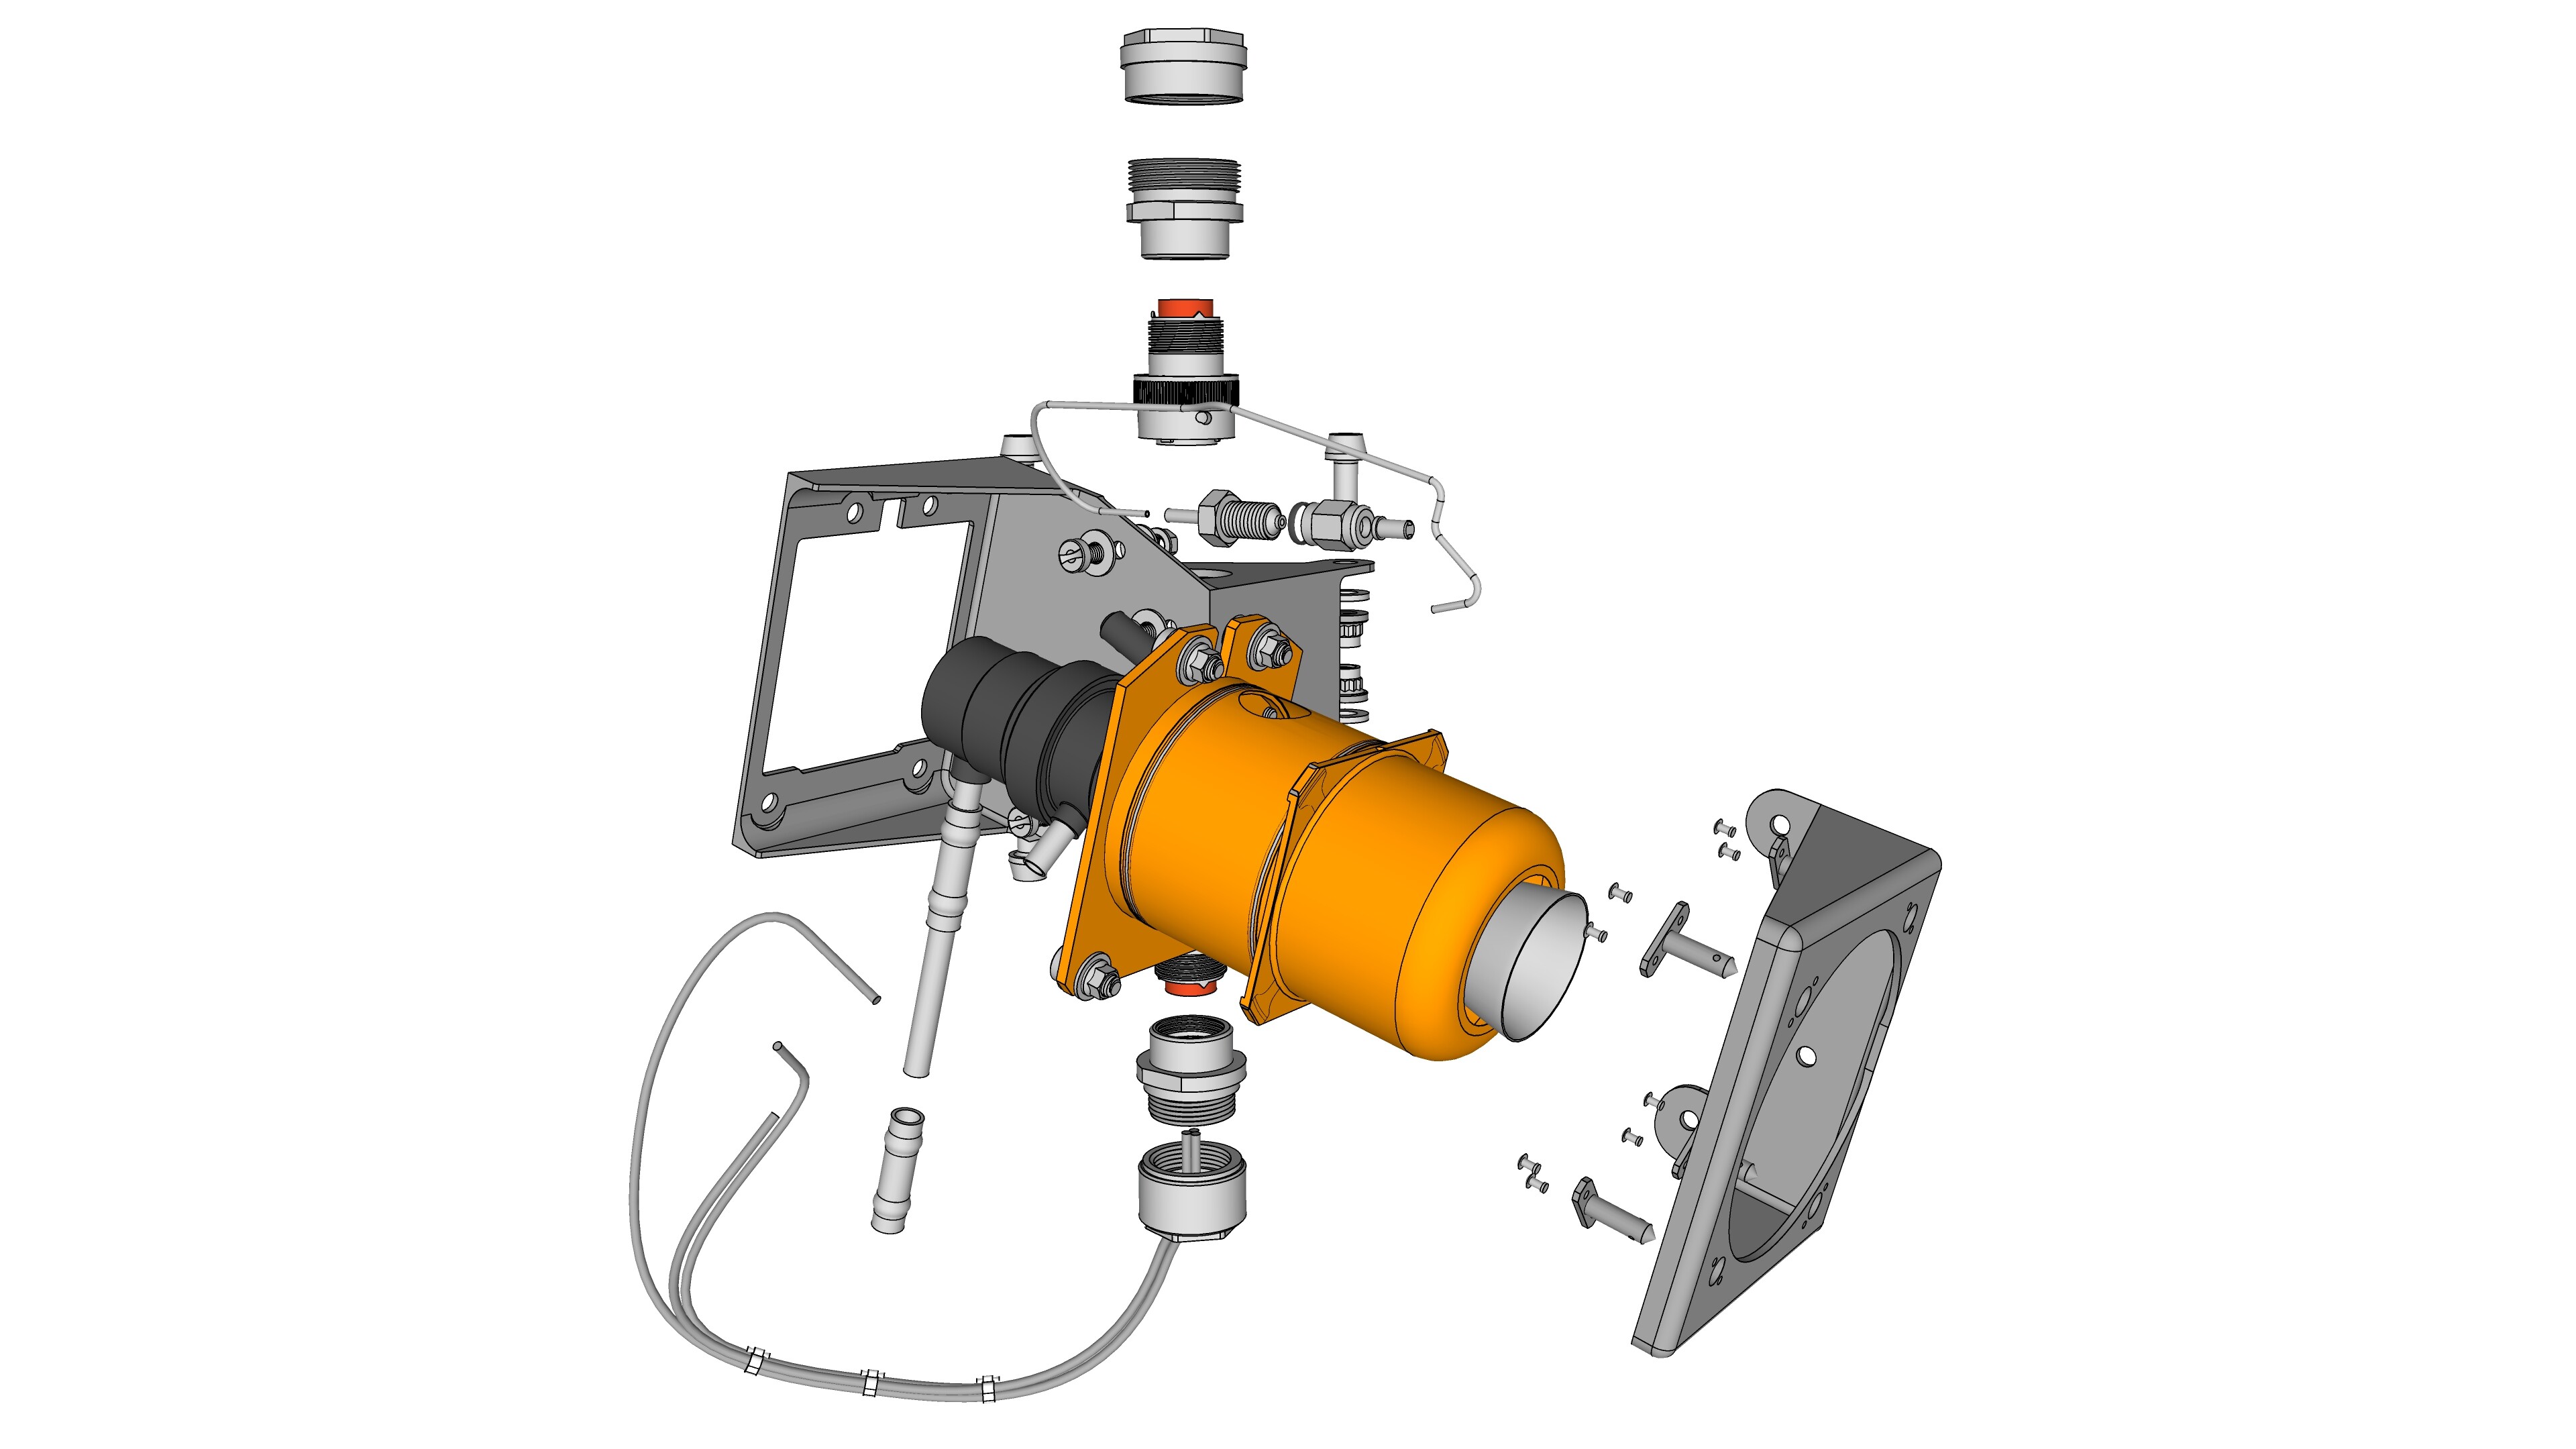
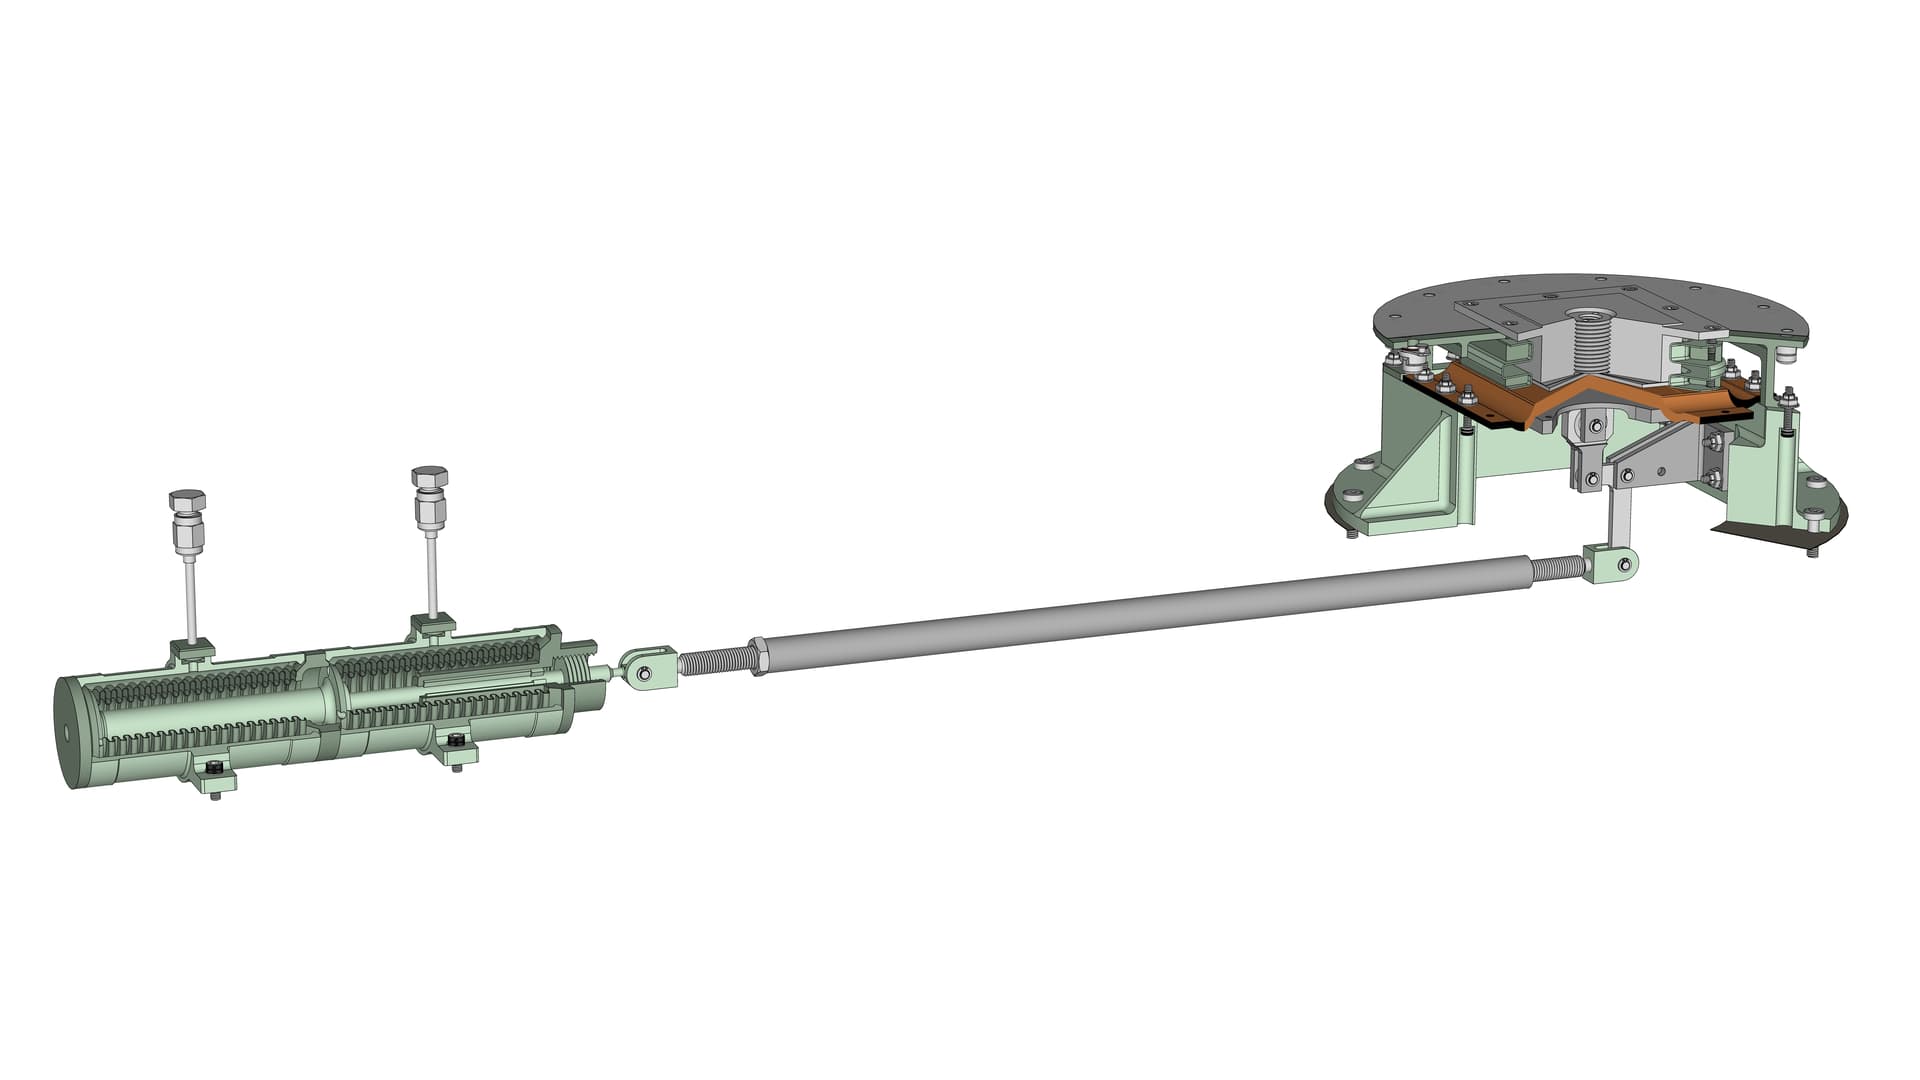
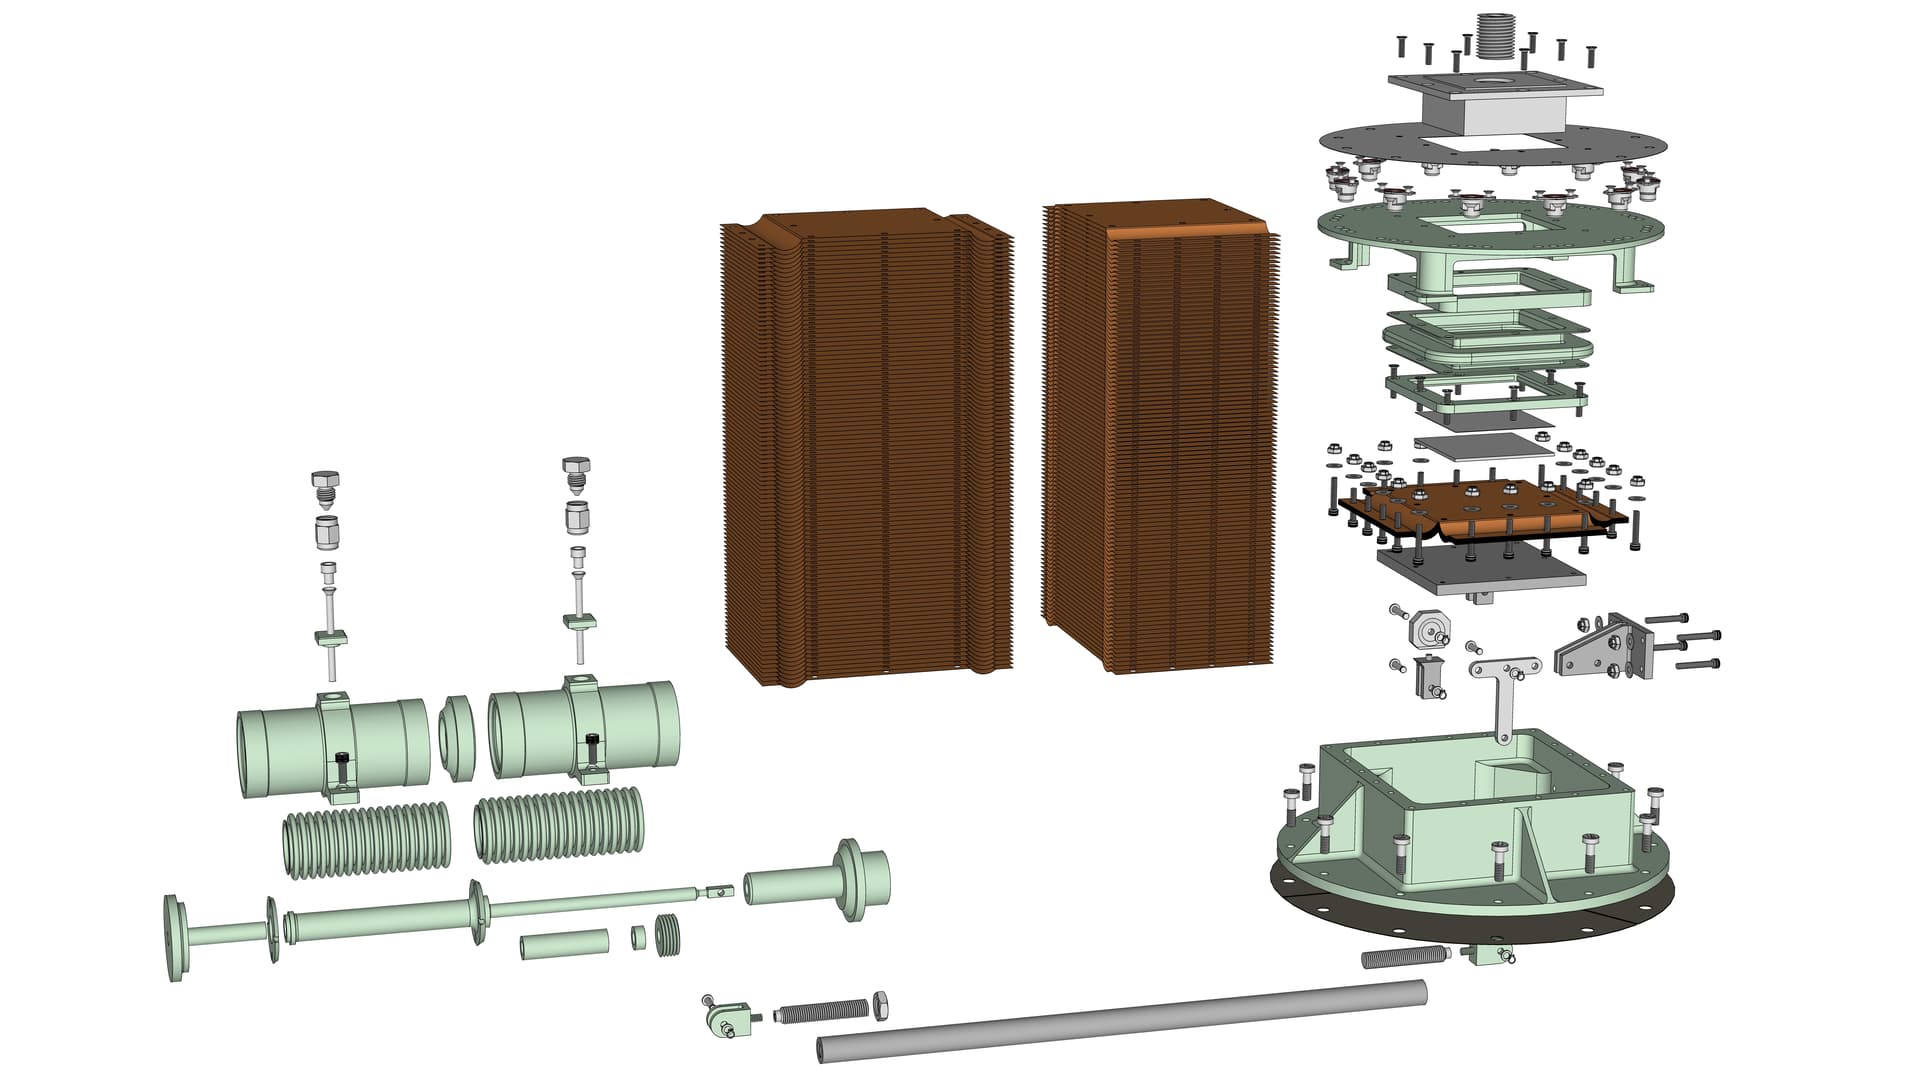
Here is an exploded view of a mounted thruster (which includes a one-piece machined aluminum mounting fitting at center, behind the thruster body):


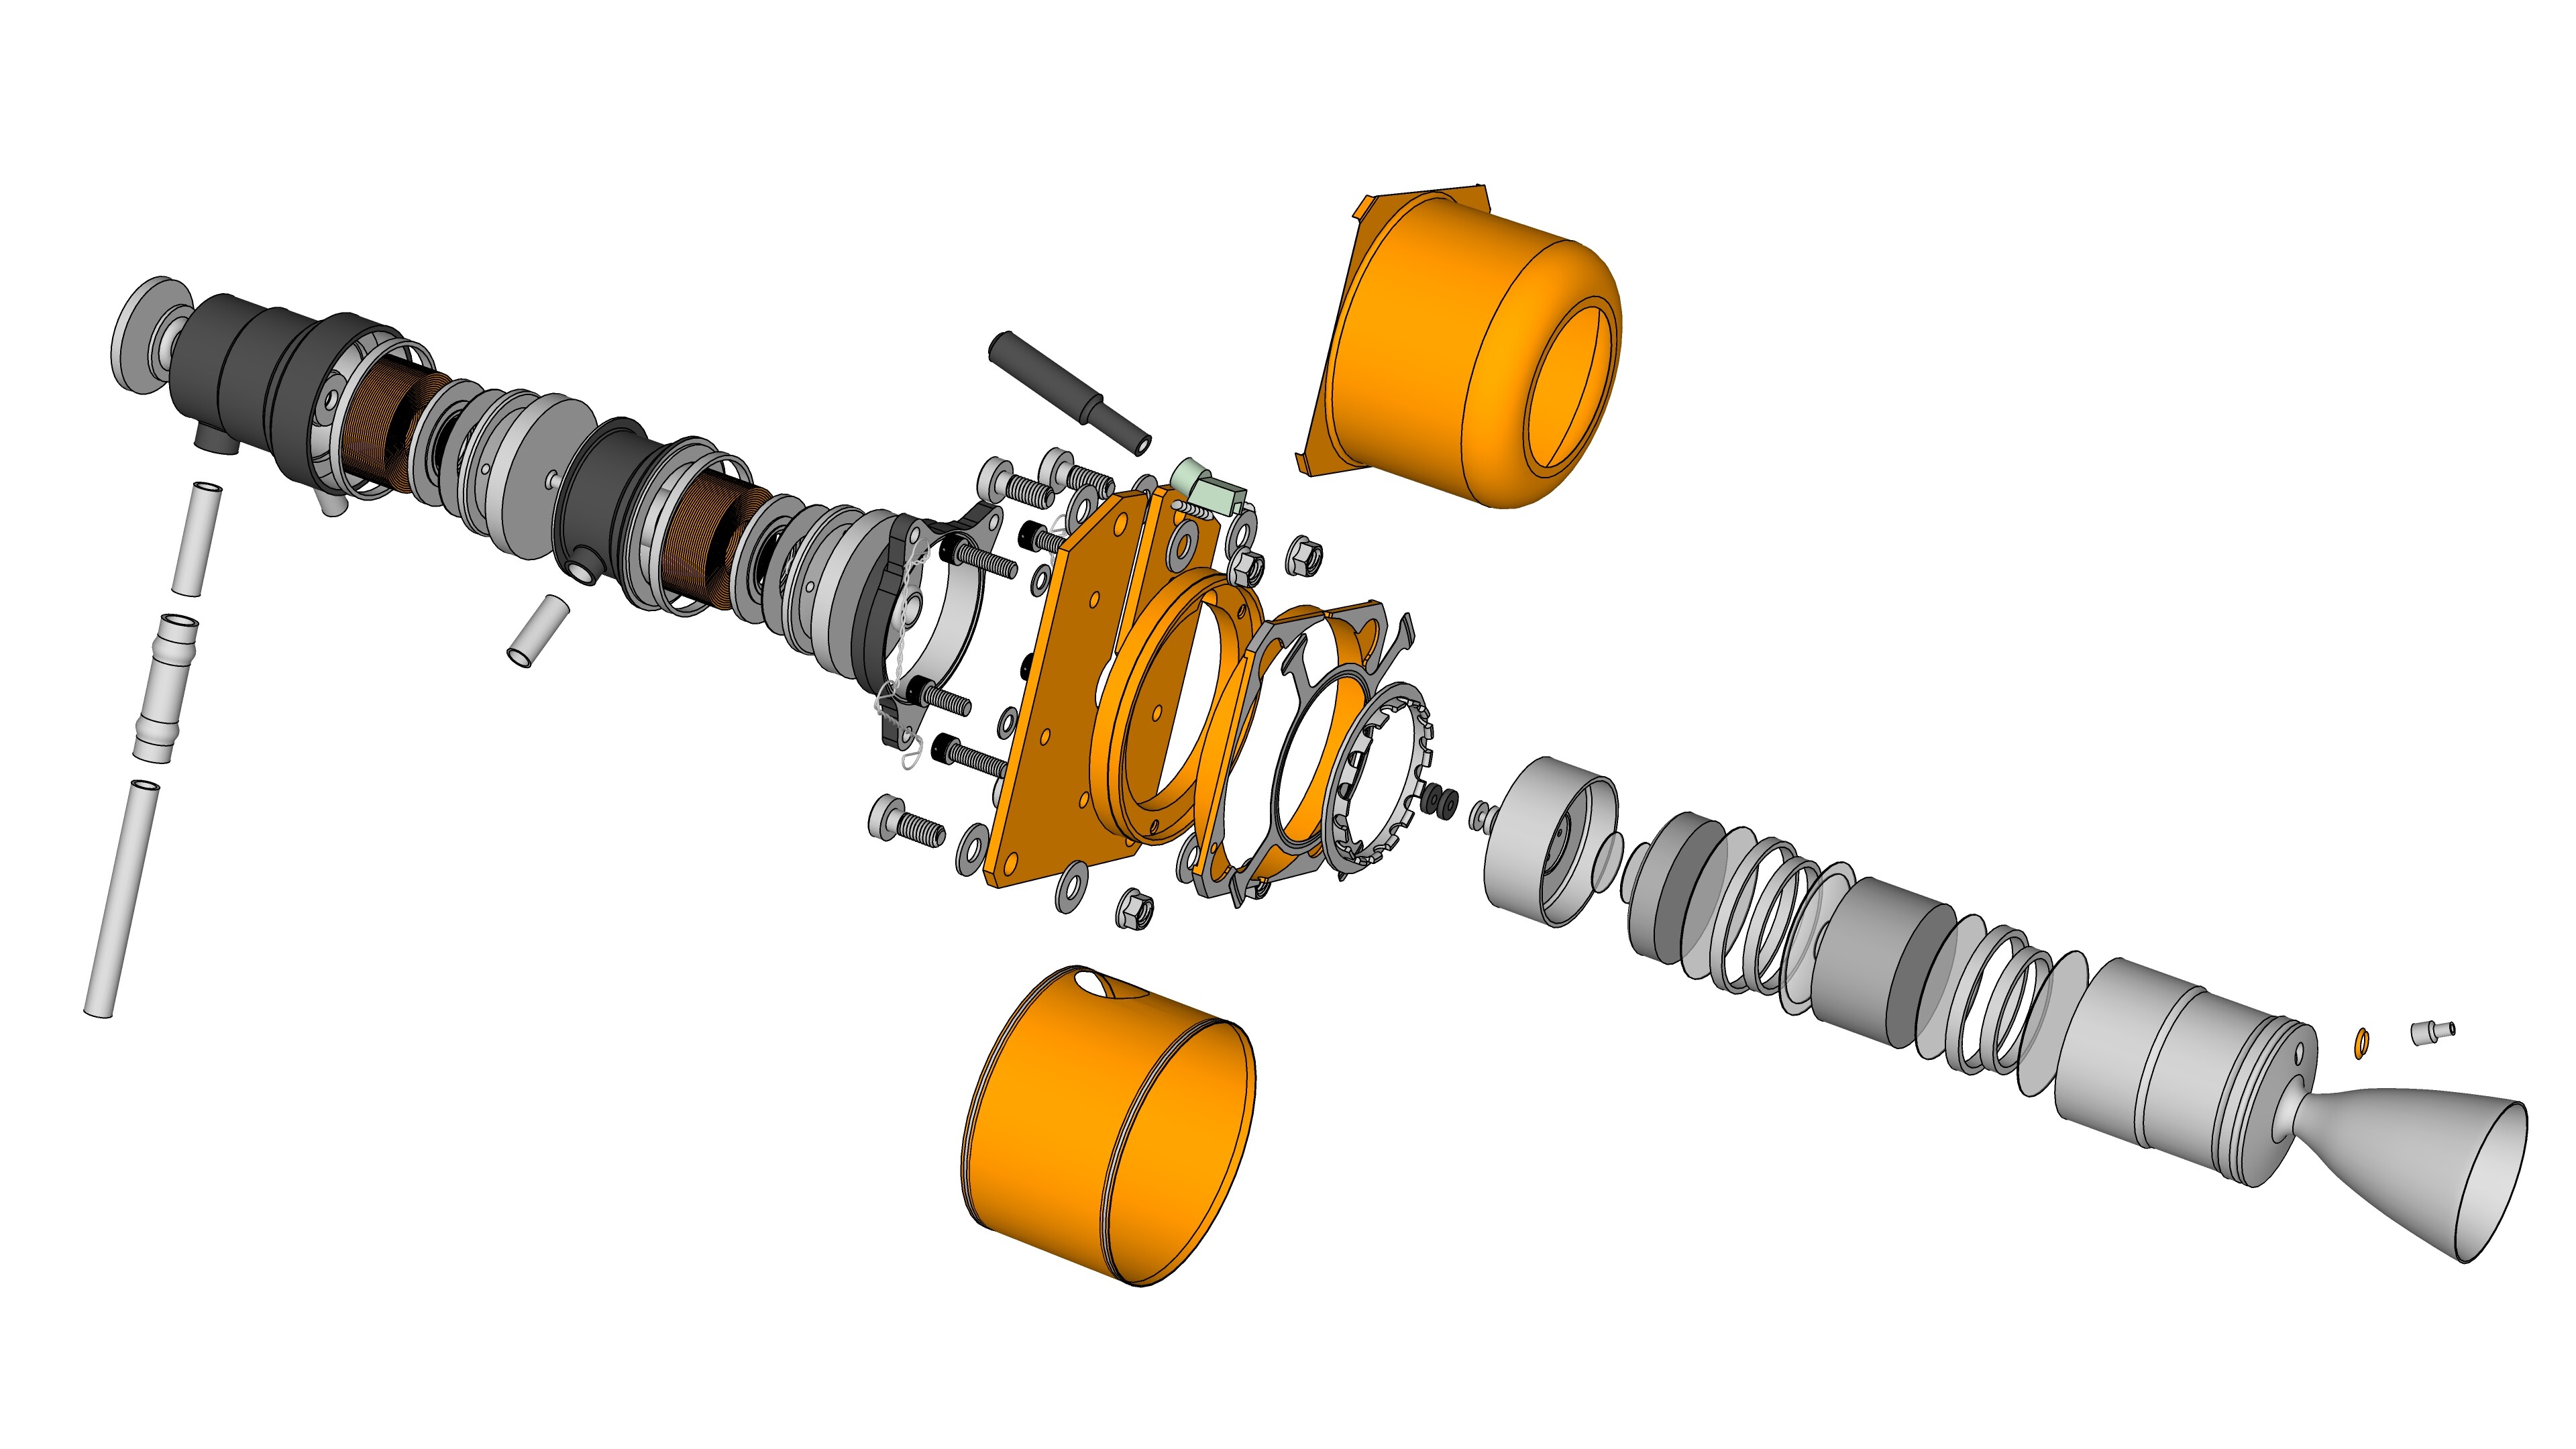
An exploded view of a thruster itself:

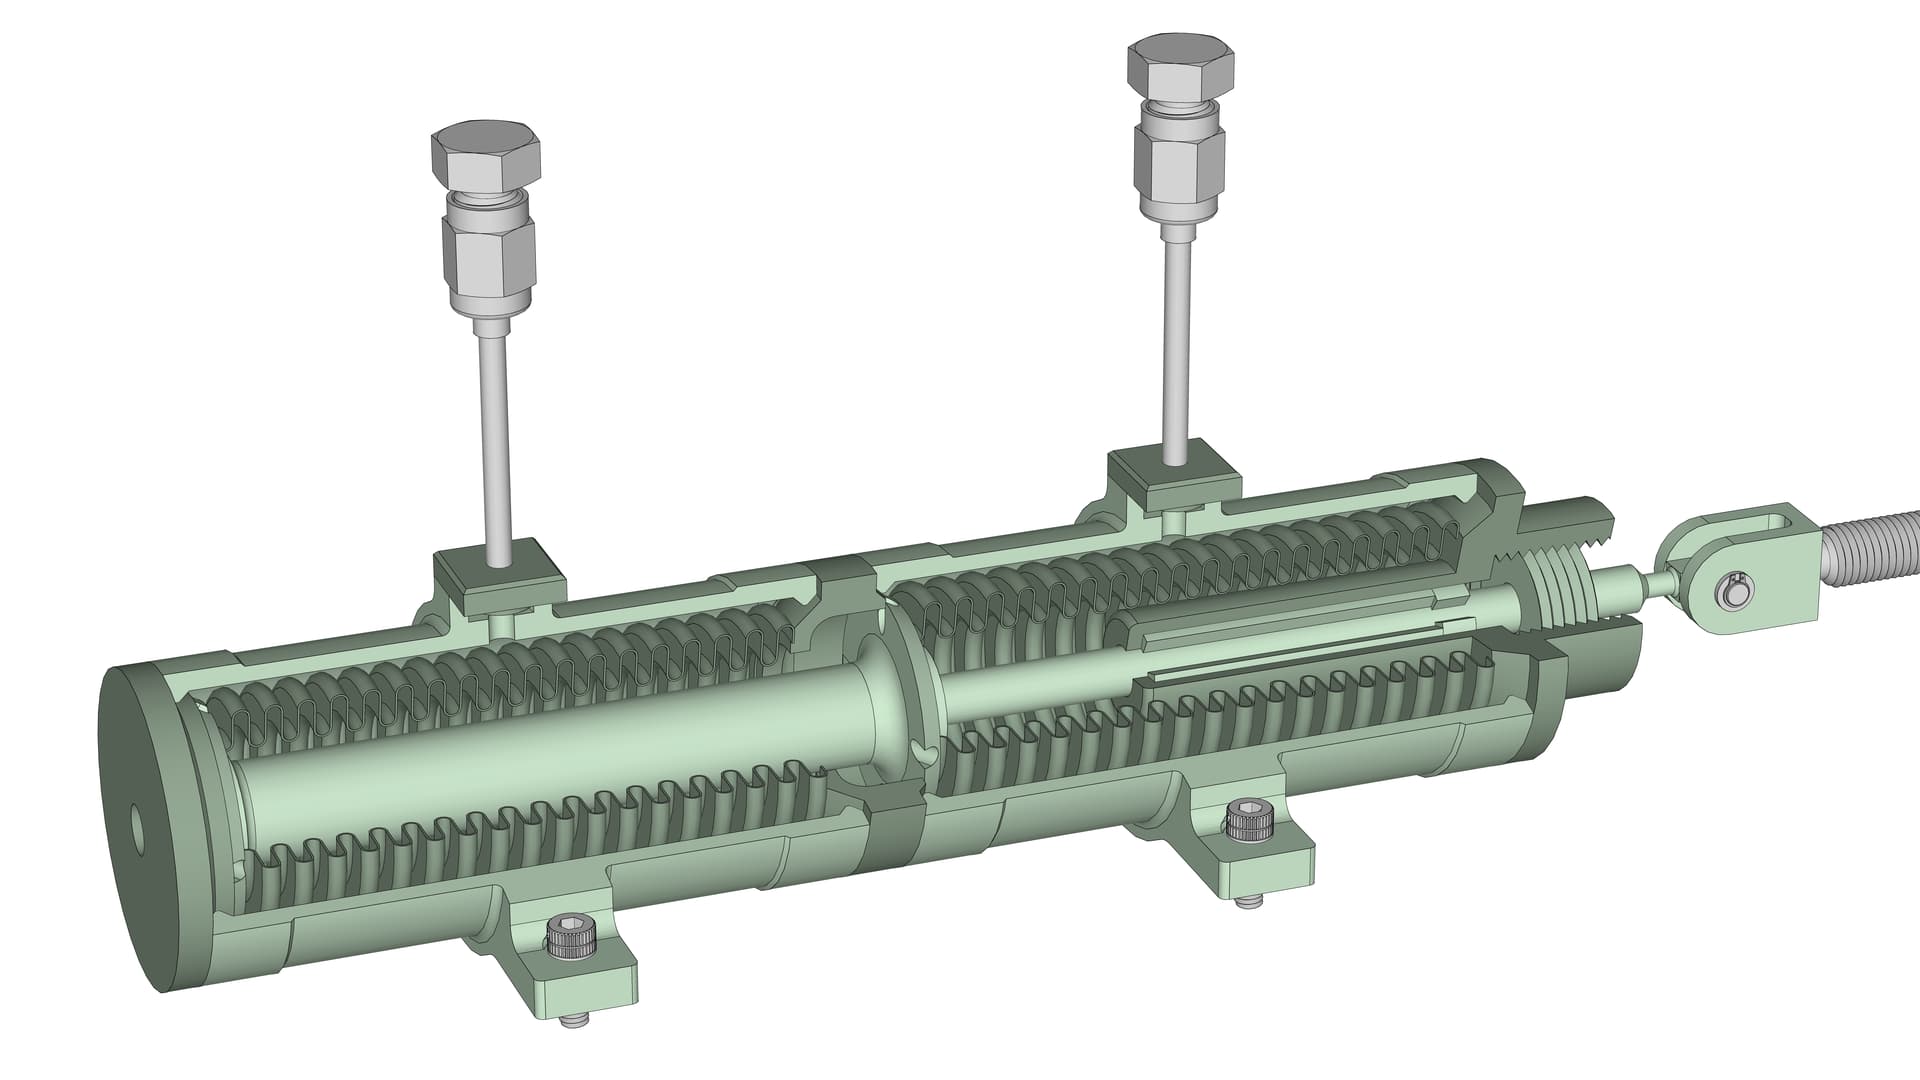
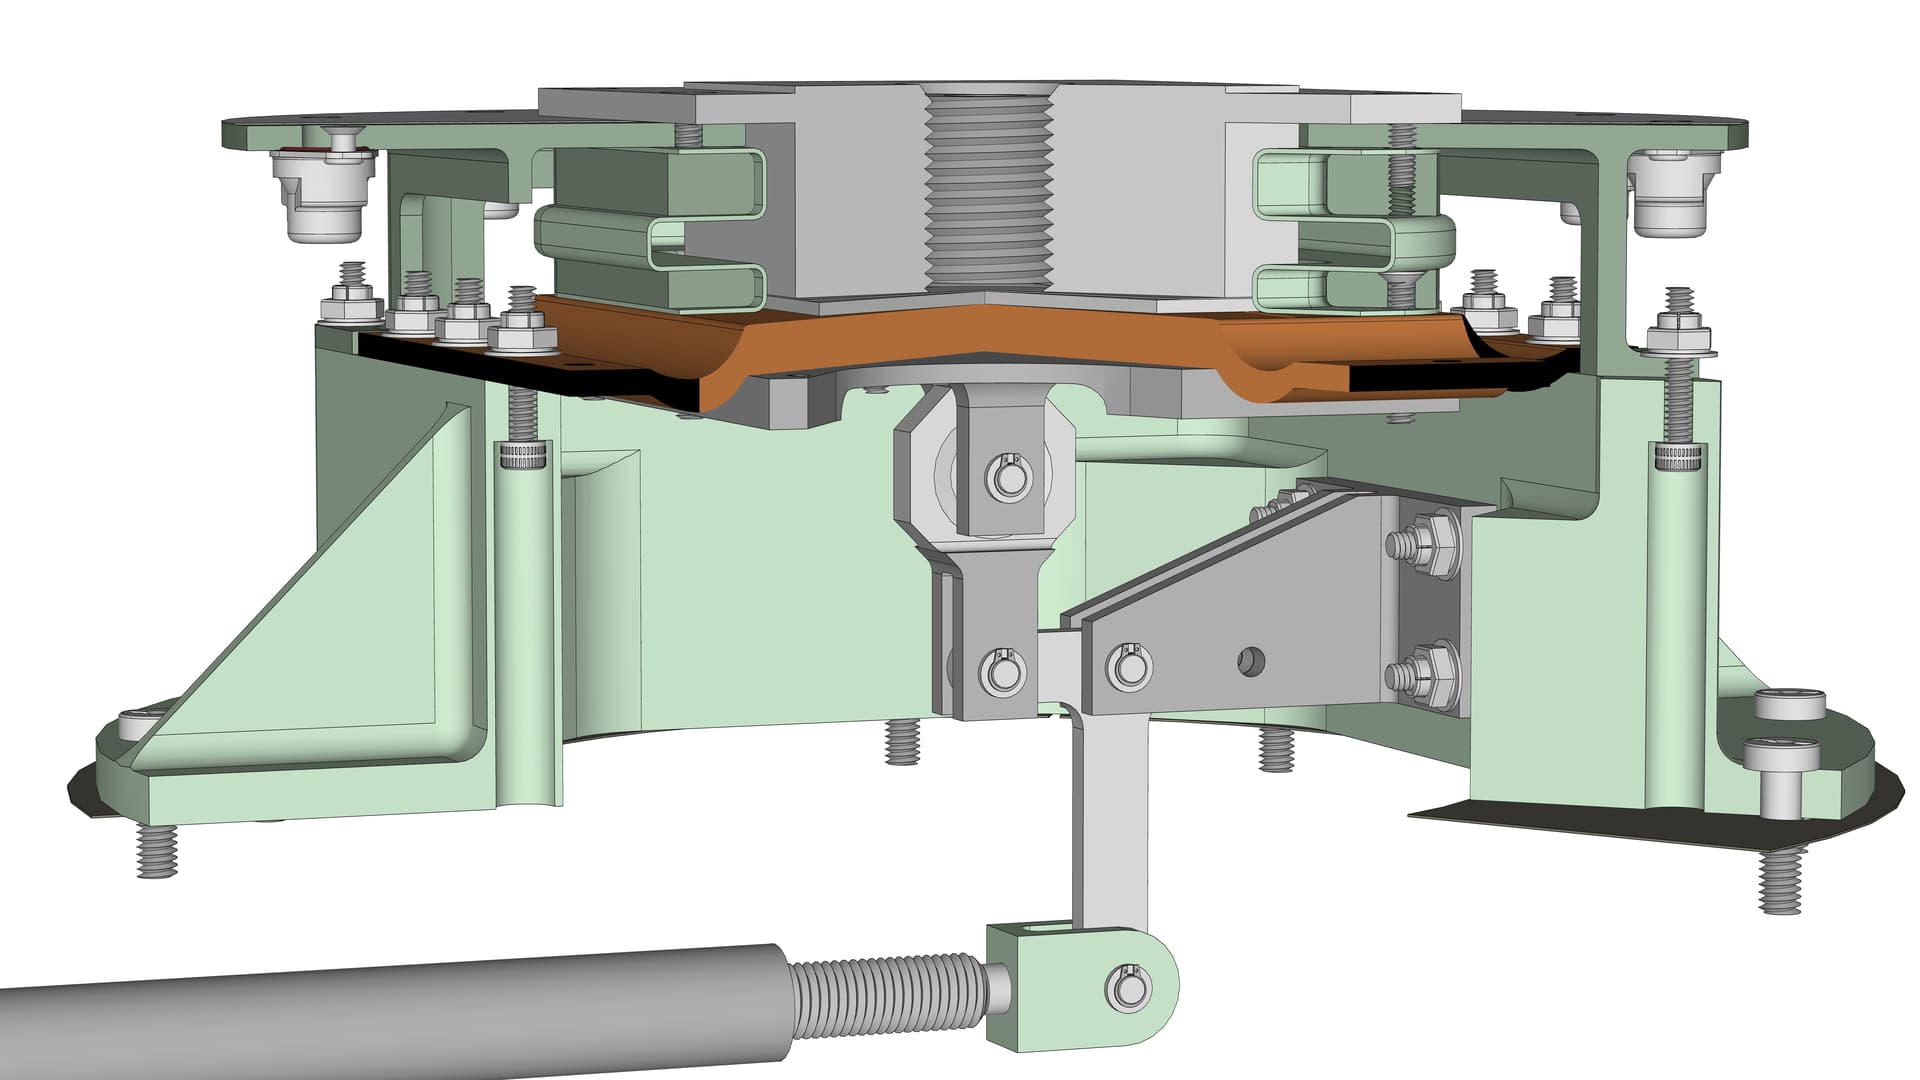
And a cut-away view of a thruster:

Hydrazine propellant was pressure-fed into the end of a dual solenoid valve (into a cavity in the upper-left corner of the above image). The dark striped ovoid forming the right side of the cavity is a fuel filter.

Two identical solenoid-actuated valves are in series. Two valves were included for redundancy. The biggest worry was a failed valve that stuck open, letting the thruster run continuously and forcing an opposed thruster to also fire continuously to counteract the torque. In addition to flight control complications, this would deplete fuel at a rate faster than anticipated. It was extremely unlikely that both of the dual valves would fail open. A failed-closed scenario was less of a concern, because the equivalent thruster on the other fuel tank could do the job (and fail-closed of both equivalent thrusters was also very unlikely).

The two solenoid electromagnet coils are the gold objects with lines representing the coiled wire. When electrically actuated they pulled an armature disc slightly toward the coil (to the left in the above image). The displaced armature compressed a small tapered coil spring at the center of each valve which opened a poppet mechanism (tiny white disc) to allow fuel to flow through the center of the valve, toward the right.

The pressure-fed fuel would then travel through the tiny straight channel connecting the valves to the thrust- or reaction-chamber just right-of-center, at the core of the thruster (within the gold heat shield). The feed channel is split into three tiny branches. The three branches lead to two stacked “Rigimesh” discs which further disperse the fuel before it reaches the upper catalyst bed - the thick light gray disc with a pebble texture. This volume of the thrust chamber was tightly packed with Shell 405 catalyst, which is granules of aluminum plated with iridium - the active catalyst ingredient. When hydrazine comes in contact with iridium, it immediately decomposes into nitrogen gas and hydrogen gas (producing a lot of heat in the process). This is how a monopropellant hydrazine engine works. there is no combustion, no need for a separate oxidizer (thus, “mono” or single-propellant).

Two additional larger Rigimesh screens separate the upper catalyst bed from the larger lower catalyst bed. The lower bed is packed with a smaller granule size (more surface area) to promote a more complete reaction of the remaining hydrazine that passed through the upper catalyst bed without reacting. Two final Rigimesh screens at the bottom of the lower catalyst bed, just before the narrow throat of the reaction chamber and expanding exhaust nozzle, retain the catalyst granules within the thruster. The catalyst is not consumed by the reaction; so long as hydrazine is fed into the chamber, the engine will continue producing thrust.

The hot nitrogen and hydrogen exhaust gasses finally exit the thruster via the expanding nozzle, producing 8 pounds of thrust (in the Viking configuration). This type of engine cannot be throttled, it is either off or on at full power. It can be pulsed in very short operations (milliseconds) for fine flight control.

Recently I was delighted to acquire an actual MR-50F thruster reaction-chamber-nozzle component. I spent a lot of time measuring the unit. The following image shows how I measured a stack of successive diameters of the nozzle exterior, using acrylic shims to control the vertical offset of the measurement plane. To measure the nozzle’s interior diameter I made a resin casting of it, and then used the same technique on the casting. I also made a casting of the chamber throat interior to determine its angle of convergence (which turns out to differ from a published figure) and the curves connecting the convergent and divergent (expanding) portions of the nozzle.


The overall work-in-progress Viking '75 Mars lander SketchUp model remains available on DropBox via this link (warning, the file is ~260MB).

11 Likes

I have been adding some major internal components to the Viking '75 Mars lander 3D digital model, including the large Equipment Plate that spans most of the upper interior of the lander. The Equipment Plate is a one-piece aluminum machined unit which is supported by nine titanium fittings attached to the sides of the lander body. Most of the lander’s interior equipment (batteries, power control, tape recorder, science instruments, computer, communications assemblies) are bolted to the bottom surface of the Equipment Plate and hang down below it within the volume of the lander body. Here is an overall view of the lander body and equipment plate, without the lander’s top dust cover.


For reference, here is the only historic image I have been able to find (after a lot of searching) that shows most of the top surface of the Equipment Plate:

Here is an above view of the equipment plate and attached components, including those nine titanium support fittings arranged around the plate’s perimeter. The 19 little red vertical cylinders are standoffs to support the lander body top dust cover.

Here is a below view of the equipment plate, which is relatively plain. It does show the portion of the serpentine coolant loop which was attached to the underside of the plate. The coolant loop was used prior to launch to circulate chilled water around the lander’s two Radioisotope Thermoelectric Generators (RTGs), which produced more excess heat under Earth seal-level conditions than the lander was designed to sustain. As seen here, the loop also traveled around the equipment plate to reduce internal lander temperatures. The two large irregular cut-outs near top-center allow the soil inlet hoppers (Processing and Distribution Assemblies or PDAs) for the Biology instrument (left hole) and Gas Chromatograph Mass Spectrometer (right hole) to pass up and out through the top of the lander. The lander’s Surface Sampler Assembly (subject of a separate forum post) would scoop up Mars soil samples and deposit them into those inlet hoppers.

Here is a detail view of one of the two camera mount adapters bolted to the top of the equipment plate, to which a camera was attached on top of the lander (this is the mount for camera #1). The little red fasteners are Hi-Lok collars, a specialized type of nut that was used extensively in assembling the lander. The collars work with Hi-Lok pins, a type of bolt. Along with a special installation tool, the Hi-Lok pins and collars can be installed in situations with limited access to the bolt-head side of the fastener. The tip of the pin (where it protrudes through the collar) has a hex recess; the installation tool uses this to prevent the pin from rotating when the collar is tightened. Look closely and you can see those hex recesses.

This detail view shows a small tripod and bipod attached to the equipment plate’s upper surface. These supported the inboard side of RTG #2; the outboard side was supported by the upper edge of the adjacent lander body side beam (not shown in this image, but visible in the first image above). A similar tripod-bipod pair for supporting RTG #1 is located across the equipment plate.

13 Likes

10+ for your modeling skills on details. Thank you for sharing these images.

3 Likes

Your modeling skill and your research and attention to detail still astounds me ! :+1:

1 Like

The next Viking lander component 3D models to be completed represent the lander’s two thermal switches, which were mounted on the upper surface of the lander’s Equipment Plate (the subject of my prior post above). The thermal switches are seen here as green-tinted boxy objects (the contactor assembly) connected to horizontal cylinders (the actuator assembly), on the left and right sides of the rendering. The green coloration represents the fact that I don’t have exact measurements for these components.

The thermal switch model is available in the 3D Warehouse.


The purpose of each thermal switch was to permit and regulate the transfer of heat from the Radioisotope Thermoelectric Generator (RTG, not shown) mounted directly above the switch contactor assembly, into the lander interior. The near-surface atmospheric temperature of Mars, as measured by the Viking landers, varied from about 1F during a summer day to -178F during a winter night. Most of the lander’s components, including electronics and especially its rechargeable batteries, would not survive well-below-freezing temperatures. The RTG’s housing exterior was at a fairly steady temperature of about 330F (thanks to the natural radioactive decay of plutonium contained in the RTG’s internal fuel capsule), and the lander was designed to utilize that heat to maintain adequate internal temperatures. During cold periods the thermal switch actuator would close the thermal switch, forming a thermally-conductive path between the bottom of the RTG and the lander’s internal Equipment Plate. During relatively warm periods, the actuator would open the switch, interrupting the high-conductivity path and allowing relatively little heat to flow into the lander.

When the RTGs were installed onto the landers prior to launch, Earth’s relatively dense sea-level atmosphere provided an excess of available heating during the final months prior to launch. Even with the thermal switches open, there was too much heating. Therefore, a coolant loop was incorporated into the lander which circulated chilled water through End Cap Coolers mounted on the top and bottom of each RTG. The top side of the thermal switch contactor assembly was hard-bolted to the underside of the corresponding RTG’s lower End Cap Cooler. The bottom of the contactor assembly was hard-bolted to a platform machined into the Equipment Plate.

Here is a cut-away view of a thermal switch with actuator assembly on the left and contactor assembly on the right, connected via a linkage that transmitted the horizontal movement of a piston within the actuator to the contactor.


Here is an exploded view of a thermal switch. The brown objects in two stacks at center are 0.001 inch thick copper foils, 100 per stack. These foils are the core of the conductive path. In the assembled thermal switch, the stacks are interleaved forming a 200-foil group (visible in the middle of the exploded contactor on the right). The foils are bonded together where they overlap at center, and also at their ends, forming a cross with short flexible arms.

Among the 200 total foils are 102 unique forms (depending on position within the stack, which determines how much pre-loaded curve there is near each end of a given foil). For the SketchUp model I wrote a Ruby script to generate the foil geometry. Each 0.001 inch thick foil (along with all other parts of the switches) are solid.


Here is a close-up of the cut-away actuator assembly. Freon gas filled the volume surrounding the two bellows chambers. When warmed, the freon expanded and pushed the central piston to the right. The piston pushed the linkage rod which connects the actuator to the contactor via clevises at both linkage ends.

Here are close-up cut-away views of the contactor assembly, first showing the closed configuration and then as opened. The central area of the stack of copper flexible foils is moved up (when closed) and down (when open) via a bellcrank driven from the actuator assembly by the linkage rod. A layer of highly-conductive tin was cast on top of the foil stack. When the switch is closed, the tin “seat” presses hard against the underside of a very thick aluminum block called the platten (at top-center of the images, with a vertical thread hole). The platten is hard-bolted to the lower End Cap Cooler, upon which is mounted the hot RTG housing itself. Heat from the RTG flows downward through the lower End Cap Cooler, the platten, the tin seat, and into the center of the stack of copper foils. The heat then flows sideways through the flexible foil arms and into the boxy lower base (tinted green, across the center of the image) of the contactor assembly. Because the base is hard-bolted to the Equipment Plate, heat flows into the plate and spreads throughout the upper part of the lander interior. The lander’s internal temperature-sensitive components (computer, batteries etc.) that are bolted to the underside of that plate therefore receive heat.

When the switch is opened the central portion of the stack of copper foils moves downward, causing the tin seat to pull away from the bottom of the platten. While the platten remains permanently warm (as the RTG’s plutonium fuel slowly decays over decades), relatively little heat is radiated from the platten across the gap to the tin seat and copper foils. The switch provides an effective 50:1 heat conductance ratio when closed vs. opened.


Lastly, here is a view of the underside of a thermal switch when mounted on the Equipment Plate. The linkage rod is partly visible across the lower third of the image, connected to the bottom of the T-shaped bellcrank (the left arm of the T featured a hole which aligned with a hole on the mounting fork and allowed the mechanism to be locked during installation and testing).

10 Likes

Part of the Viking lander hardware is assembled with Tridair LiveLock type fasteners, modeled here:


These are intended for applications where frequent and quick assembly or disassembly may be required. On Viking these were used to attach the top cover of a large housing for each of the lander’s two Radioisotope Thermoelectric Generators (RTGs). Rapidity was not a critical requirement, but the covers were installed and removed many times during overall lander assembly and test.

The LiveLock family of fasteners consist of two principal components: a receptacle and a stud nut. A third component is a retaining ring which enables the stud nut to be captive to the removable panel or object being assembled. Modeled here and used on the lander were the smallest size part number CA2010, where the threading is of type #4-40 (with a two-lead thread pattern, to facilitate faster screwing and unscrewing).

The receptacle contains a very small ratchet mechanism designed to maintain a load on the stud nut, even when loosely screwed into the receptacle. This is intended to minimize progressive loosening due to vibration, and permits use of a modest level of torque for normal installation. A tapered coil spring within the receptacle bears against the bottom of the lower ratchet. (In the 3D model, the spring is shorter than the unit seen in the photograph because the spring has been modeled in its pre-loaded form as it exists within the receptacle housing.) The receptacle’s lower ratchet has tiny tangs or prongs on opposite sides which slide up and down within grooves cut into the inner wall of the receptacle housing. This prevents the lower ratchet from rotating. The central fixed-position threaded core within the housing also has prongs that engage the housing slots to prevent rotation in the event that the core becomes loose from how it is clamped within a groove around the bottom of the housing.

The upper ratchet has a ridge across its top surface, which engages a slot cut into the end of the stud nut. When the stud nut is inserted and screwed into the receptacle, the slot and ridge operate the ratchet mechanism. The upper ratchet rotates with the stud nut, clicking over every 15 degrees as successive ratchet teeth engage. The stud nut has a hex recess in its pan head to enable installation.

The ratchet is a remarkably small mechanism. As seen in the upper right photograph, the complete receptacle is about 10mm (less than 1/2 inch) high. The two ratchet rings are about 4mm (less than 1/4 inch) in diameter.

9 Likes