Thanks for this suggestion; we are investigating some ways to make tangent arcs quicker and more predictable to draw, so this idea is relevant to what we are working on.
Have you looked at how the 3-point Arc tool creates arcs? In this tool, the radius (and implied pie section) are previewed when the tangent inference is active. However, we are not yet showing the exact radius or allowing you to define the arc you are creating by its implied radius. @AK_SAM , Can you share a bit more about why the radius is a more informative or useful way to define the arc length?
The radius can be specified while drawing an arc. If you enter the letter r before or after a numerical value it will be used as a radius instead of a bulge. For example r1000 or 1000r.
Not to disagree with the feature request, which I think is a good one.
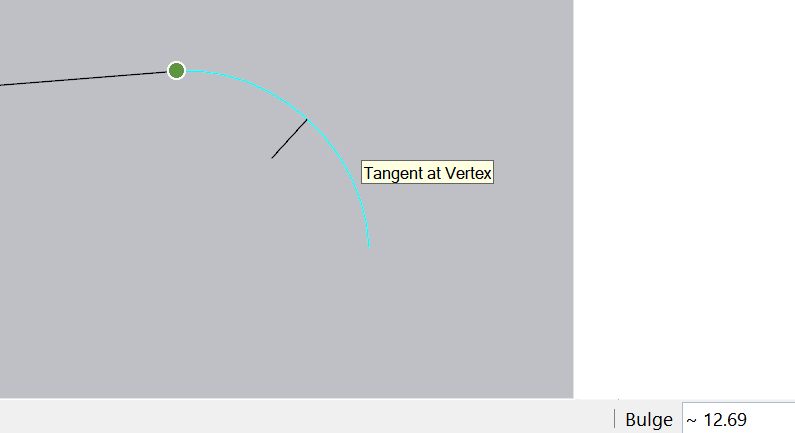
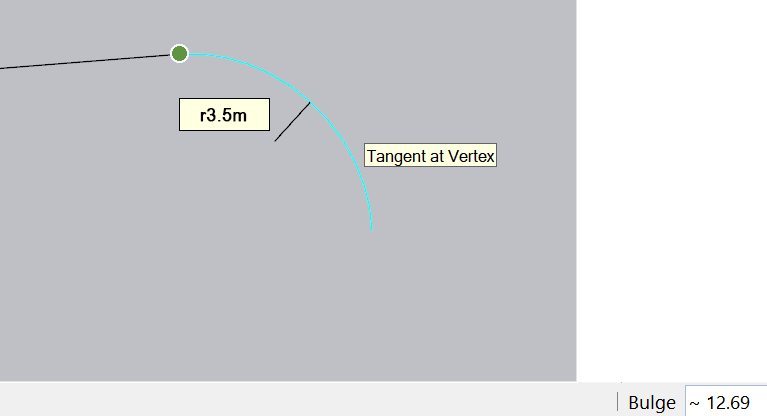
It’s worth pointing out for the people that will inevitably read this thread that you can specify a radius by using the magenta inference.
Draw any arc to the magenta inference, click once, move back along the edge until you get magenta again(don’t click), type the radius you want and hit enter.
In my projects I often set-out urban streets, footpaths or landscaping (eg lawns, retaining walls). These need to adopt a mininum radius (horizontal and/or vertical). These use linked arcs (then an offset to create the other side).
There’s an element of design creativity to this process, eg following a stream edge, or going around a tree, or tracing over a topographical contour line.
I’ve also done modelling in the past that showing pipework, cables, or fencing & balustrades etc, which also use a minimum radius as a key input to the process.
I’ve actually never used bulge - can’t even think what that could be useful for.
I like the simplicity of the arc tool & so don’t want to add a lot of complexity. My favoured approach is for Sketchup to just report on the radius while it is being drawn (using the measurements bar).
A nice addition could be to specify a precise or a minimum radius prior to drawing it… John pointed out that you can type r before the number - I didnt even know that so will try that next.
& Yes I do use all the 3-point arc tools and what Box shows with the chamfer radius (@box it still works if it’s not a tangent (magenta) arc)
Adding my vote for the feature request, arc (filltet) radius is far more common in engineering than bulge length. I also routinely draw pipes and wires, with the same minimum bend radius requirement.
I’m afraid I can’t work out the r# or #r incantation to use @jean_lemire_1 's suggestion though? I keep switching to rectangle or get “invalid length entered” error. @Box 's method works for me - thanks.
Tip: Immediately after you draw a 2-point arc, you can change the bulge, radius, or number of segments with the Measurements box. Remember that you don’t need to click in the Measurements box first; simply type a value and press Enter or Return. Here’s how to change each value:
Bulge distance: After you finish creating a 2-point arc, the Measurements box is ready to accept a Bulge value by default. Simply type the value and units (if different from the default units in your template).
Radius: You can specify an arc radius instead of a bulge distance. Type the desired radius in the Measurements box and add the letter R for radius. For example: 24r or 3’6"r or 5mr
Number of segments: Type a number and followed by the letter S for segments. For example: 20s
Remember that you dont need to (and you should not) click in the Measurement Windows to enter a value for bulge, radius or number of segments. Just type a value and then press the Return or Enter key. If you change your mind, type another value and Return or Enter. As long as don’t change tool, you can repeat this as often as you like.
Read the Status bar in the bottom left below the modelling windows, it gives a lot of information. Use the Instructor Window and scroll down to the bottom to get a link to the help. This is how I got to the text that I included in this post
1 - Select the 2 point arc tool;
2 - Click somewhere to start the arc (a click is a press then a release of the left mouse button);
3 - Move the cursor nowhere else then click again to set the second point of the arc;
4 - Type a value for the radius (do not click in the Dimension Window, just type);
5 - Add the letter r for radius;
6 - Press the Return or the Enter key to validate the input.
If it still don’t work, post the dimensions that you want and someone will certainly help you.