Hi all, I have been working with Sketchup Make for a while to draw out woodworking projects so while somewhat knowledgeable I am by no means a heavily experienced user. I ran across a situation that I’m sure there must be an easier way to accomplish the task. I have drawn a board and cut grooves through it (push pull) not a problem. Now I need to miter (45 deg cut) the edge of the board. The miter cut goes through the grooves. When I attempt to push/pull the miter it stops at the groove, and will continue as a partial miter until it reaches the next groove and so on. I tried first cutting the miter and then the grooves but that results in other undesirable push pull results since the groove is drawn on the angle of the miter. I’m sure there is an easier way to accomplish this task and just looking for some help.I attached a file to hopefully clarify the above. If you look at the yellow gold component you will see the line for the miter I am attempting to push pull.Sharpening station.skp (249.9 KB)

One way to do it would be to use a cutting plane. Think of drawing where the saw would cut the piece off if this was a real piece of wood.
I drew the cutting plane outside the component. It shows as white. Then I selected the cutting plane and hit Edit>Cut to cut the plane to the clipboard. Next I opened the component for editing and used Edit>Paste in place to paste the cutting plane inside. Select all of the geometry in the component and use Intersect Faces>With Selection to cut the faces. Finally, erase the waste.
Is this what you want for the front, back, and sides?

Dave, many thanks for the quick reply and great idea. I have not used Section Plane tool previously, so I guess its time for me to experiment and learn a new skill. Thank You ! ;-D
It’s not a section plane. It’s a cutting plane. A simple rectangle drawn at the miter angle and used to cut the geometry of the box side.
Dave, Ok color me slow! now I got it. I just watched a Youtube video on cutting plane and just for fun the Section Plane video. Very cool solution you offered up here and I like it… ! Your the best and thanks again… and yes your drawing is exactly where I’m heading.
Thank you.
Probably not slow. Maybe you just had a kink in your think. ![]()
Keep in mind that the “cutting plane” doesn’t need to be a plane. It can be a more complex surface. For example you could use the same method to cut the cope joint for a cope and stick door frame. Or to trim the tops of the aprons and legs to match the underside of the seat on a stool or create stopped chamfers on a the stretchers of a hayrake table or any of a number of other cutting and trimming tasks.

You did these using cutting planes? Wow… I apparently have a long learning curve ahead. and yes a kink in my think is a good saying, I’m going to use that.
Well, more accurately, cutting surfaces. The bottom surface of the seat was copied to use as a cutting surface for the tops of the aprons and legs. For the stopped chamfers, I drew the volume of space an appropriately sized and shaped router bit would pass through while following the sides of the boards and used that shape to cut off the corners.
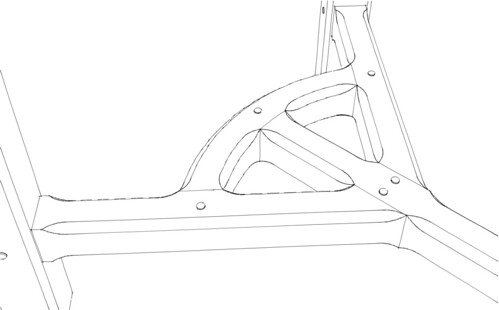
I also used the same idea to make the transition on the pommels for these legs as well as the dome shape at the top of the reeds.

Very cool Dave… its obviously going to take me a while to reach your level of skill… like another 14 years… Thanks again for sharing. I have my box frame built in Sketchup. Sometimes I think it was faster for me to just build my projects from the napkin drawing; of course erasers on a napkin are tough. I appreciate the importance of,using the tool it will eventually save me effort and material. It also makes me think through every aspect of the build, better approaches, joinery, material reduction, etc. Have a good night!
It does come with practice just like woodworking does.
That’s one of the key things I hope students of mine take away from learning to use SketchUp.
i trying to do the same with no luck. i want to cut a miter on the object i sent then combine to miters to form 90Ver6 cabInet door protector.skp (1.1 MB)
Are you really using SketchUp 2016 Make as indicated in your profile?
First get rid of the stray edges.

Assuming SketchUp Make: Draw a rectangle at the miter angle and in the correct location. I did that outside the group. Then cut the rectangle to the Clipboard, open the group for editing, paste the rectangle in place, intersect faces, erase the waste. To make it faster and easier to erase what I didn’t want I first added a bit of length to the geometry. Then a right to left selection around the end selects the waste up to the intersection. I used mostly keyboard shortcuts here.

Thanks appreciate it. Worked good