You paint it again with the default texture. That’s the one that looks like gray and white triangles.
Thank you, Colin! xx Jayne W
Sorry, Jayne, but you seem to assume I know how you’re doing this. I don’t know what is “locking” the dimension.
Look, rather than you calling in help after something’s already blown up or proven to have been a questionable idea to begin with, let’s be a little proactive about this.
From the very outset I have been trying to get you to tell me exactly what you want to accomplish so I could advise you accordingly. Instead, you’ve got us fiddling with “dynamic tiles” and “locked dimensions” and so forth. Allow me to help you look before you leap.
At this point, I hope you’ll believe me when I tell you that using an image-based texture is by far the best way to draw tiles on a 2D face. The tiles are a painting. Like a painting, they can look like anything–just a gray outline or Italian marble or anything in between–anything you can find or make a picture of.
You said you just wanted “grout lines on a plane.” so rather than starting with one of the photos of marble I’ve been looking at, I fired up CorelDraw and quickly drew one 2 x 6 rectangle (or 3 x 9 if you wish) then replicated a bunch of copies into a brick-wall-like array and colored the lines wide and gray on a white background. This I saved as a bitmap, which I brought into PaintShop Pro, where I cropped it and tested the tiling effect. Finally, I saved it in the form I have posted it above. Finally, I resized it in SU and applied it to the walls.
You have been prooccupied with the tiles, which are really nothing, rather than working out the details of the room and the design of the shower, I think. It’s generally a good idea to hold off applying materials until the construction of the geometry is done. For one thing, it’s easier to see when everything is plain white, and for another, until you get the model construction worked out, texturing is just a distraction.
So, do you have the model of the shower and cubbies complete? Let’s focus on that for the moment; I assure you the tile texture will be easy to come up with when the time is right.
I would advise you not to model every sheet and panel making up the thickness of the wall. It’s just a lot of busy geometry that doesn’t contribute to the model. Model the wall surfaces at their net location, and do not model internal faces, like the back of the tiles face.
SU is a surface modeler. Hence SU models are mostly smoke and mirrors. That is; you model whatever faces an outside observer might see from any and all angles, creating the illusion of a solid object. However, it’s completely hollow. It’s like a movie set. There’s no point in modeling anything that won’t show.
Of course, feel free to experiment, but don’t bring us the burnt-up remains of an idea gone south and ask us to fix it. Just tell us exactly what you’re trying to do and let us advise you.
-Gully
1 Like
Jayne,
I’m going to see if I can help as I have done these many times. First, don’t worry about the tile “look” for the moment. Model the room first (walls, floor, anything framed and sheathed) and make as a group. Then model the tub / shower (which should be in there own group) then model the tile. When I say model the tile, I’m talking about all the tile as it occupies the 3d space and make as one big group. After the tile is modeled, draw the rectagle you want for the nook. Offset that back a 1/2" and push/ pull (+) the intermediate rectangle with command key (on Mac, I think CTL on PC) the final depth of the nook. Then delete the in rectangle on the front face of the tile wall and the back face of the tile wall. Then cut in on the nook on the “framing” group. Then Push/ Pull the back of the tile nook with the Command key to add the 1/2" for the back of the tile. After you have modeled it correctly, then add textures as wanted. You can modify the textures by right clicking a face with the desired texture and selecting “position texture”. I hope this helps.
If you simply deaw the rectangle and use push/pull, then you don’t need to delete any faces.
(Also if you use [ctrl] to create a duplicate face, then you will probably have to reverse all the internal faces of the cubby so that the “outside” face is actually facing into the cubby void.)
You don’t need to do the second operation to model the back of the tile either; you will never see it.
With regard to why model each tile as an individual tile? In theory it means you could have gaps and grout textures when it comes to rendering. It also means that you could colour/texture each tile individually. And you can look at the entity info to see how many tiles (components) you would need. And you could place them so that they don’t fill the whole wall…
But I agree, a texture is the best solution 90% of the time - most rendering packages can take a single texture/colour and replace it with tiles that have a slight randomness in them to make it really realistic.

A notable exception to this axiom is when there is a need to provide greater detail, say as in a wall section where both faces of the wall as well as any framing and/or abutting ceiling and floor construction must be seen. Take a look:
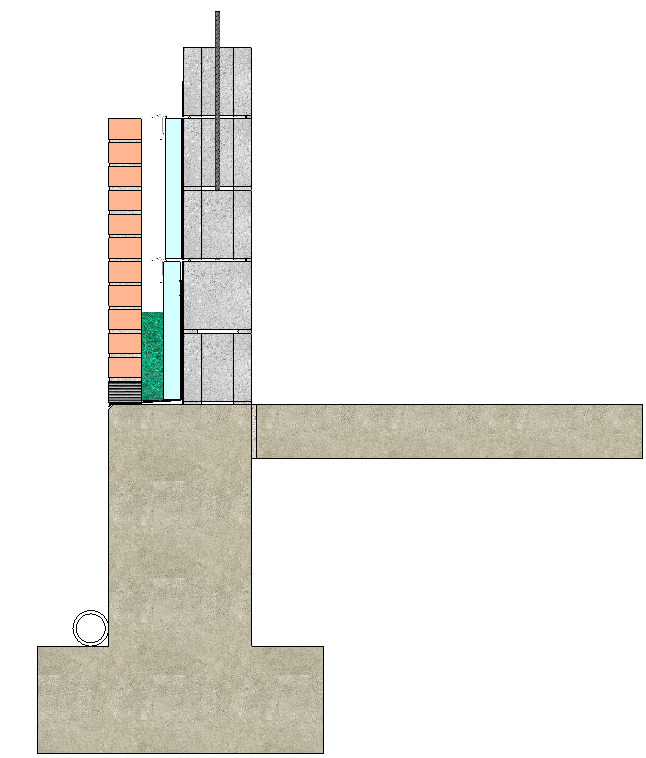
In cases such as this, I usually develop an additional model to supplement the primary design. This way I only need to import the necessary entities into Layout.
Gadget,
If you model the tile with a thickness, you can only push/ pull that thickness. If the tile pattern is being applied right to the wall, than you are correct to just push/ pull the face. There are of course multiple ways to model this situation. However, I felt the original intent of the modeler was to model with the tile as its own entity, (hence the dynamic component they tried to use) which is why I suggested modeling it the way I did.
SPM,
Thank you - yes, that was very helpful…as your instructions help me to get the first 1/2" grout line - which I did not know how to accomplish. I was “content” without it, but more realistic. Also - the directions v clear.
In the future, I will set up the model as suggested - unfortunately, agnostic as I was when I started it - I do not have things on the correct layer 0 and grouped as you suggest…but will do next time.
Thank you again v much!
jayen
Another way to post large files is to simply upload your original file to a hosting site such as FileDropper. There are others, and some are free. They create a link and then you can post the link to your file here.
But only do this if you don’t worry about your file being out there for others to use/copy. Oh, and you forgot to make a beer cooling/holder cubby for the shower.
1 Like
Thank you, Rick re the file uploading topic.
I will keep that in mind for future.
Re beer holder - Nay, Nay, I was working on a graphic sign that says that glass containers are not permitted in the shower facilities area.
thank you, Gully!
I will get back to you tomorrow afternoon.
Jayne W
Beers also come in aluminum and plastic containers… ![]()
Take your time; we’re on your clock, not mine.
-Gully
Rick,
I guess you are the wiley one - who has it covered from all angles!!!
xx Jayne W
Hi Gulley,
Getting back the painted tile and how to create it.
I have read your example below - and though I think it is beyond my level - I suppose I will give it a try.
The method that I had been using was:
Open the Material window
- scroll down to “material symbols”
-select a running bond brick and
-choose create new material
-edit dimensions of the one
You said you just wanted “grout lines on a plane.” so rather than starting with one of the photos of marble I’ve been looking at, I fired up CorelDraw and quickly drew one 2 x 6 rectangle (or 3 x 9 if you wish) then replicated a bunch of copies into a brick-wall-like array and colored the lines wide and gray on a white background. This I saved as a bitmap, which I brought into PaintShop Pro, where I cropped it and tested the tiling effect. Finally, I saved it in the form I have posted it above. Finally, I resized it in SU and applied it to the walls.
the email took off without me…sensitive keyboard.
anyway, I was saying that I created a new material (click on the button) and renamed it.
in the “creating a material window” - it shows the horizontal and vertical dimensions.
At right of dims, is a little key / lock / unlock symbol - I edited the dims there by filling in my own. I was only, however, able to edit the length, not the width.
So, I still have a 2" high tile.
I am not sure whether to tuff it out on the learning process of attempting to make the 3 " tiles as you describe, or push ahead w the 2" that I already have - or the one you created.
Jayne
this link outlines my attempted method - as I say, I was not able to edit the height. I was able to put a number in the height box, but it didn’t take.
You don’t need to create a library. You just need to create one material.
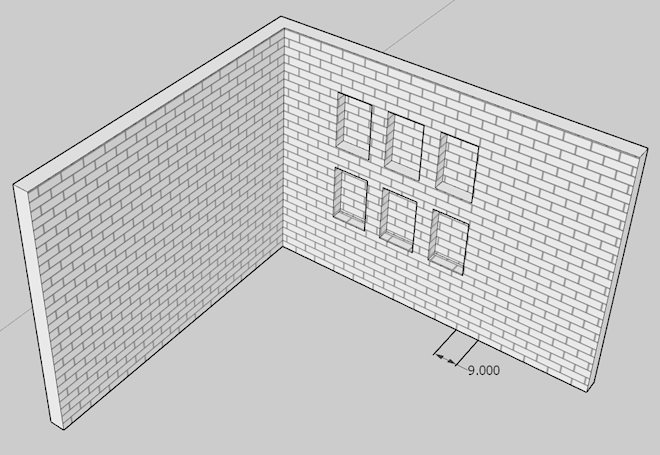
Here’s a picture of 3 x 9 tile:
Here’s the image I used:

Give me some time and I’ll write you a procedure on how to turn the image into a properly sized material.
-Gully
1 Like
Wonderful, thank you. Just not sure why you would take the time!
Will I be able to use the image that you have created? Perhaps put it into my library files for future editing / use?
I really appreciate your effort and patience, Gulley, thank you.
Jayne
There is a little padlock/chain link beside the width/height of a texture in the “edit fill” dialogue box - if it’s locked then the texture will scale. If it’s unlocked, then it will stretch.
NOTE: there is another way to edit the scale of the image - this only works on individual faces (not a fill applied to a group/component);
R-click on a face that has a texture on it and select the option “Texture > Position” (this only shows up if your selection is valid - ie only a texture.)
There are two ways that this works:
- “Fixed pins” where you see coloured symbols on each corner for scale and rotate (green circle), move (red arrows), scale/sheer (blue rhombus), and distort (yellow rhombus).
- The top blue and yellow (scale and distort) ones I don’t recommend touching unless you’re editing a photo-matched image.
- The red (move) is a bit pointless since you can just drag the image over the surface from anywhere (but can be useful to precisely place a texture since it constrains and snaps like any other end point)
- The green (scale) can snap and constrain like moving any other point - note that there is a blue dot on the scale line that represents 100%.
The other method is where the pins are not fixed; here you simply drag each corner pin where you want it. Constrains and snaps work so you can draw one “tile” as a guide on the surface and snap to it’s corners.
If you scale a texture using this method, then you will not see any change in the dimensions shown on the fill dialogue.
2 Likes