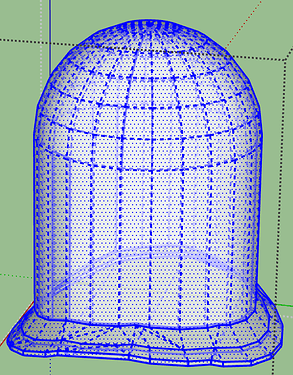
Making a solid from a Curviloft skin

hello

Following an earlier couple of questions and some coaching I have made progress on my locomotive dome. The challenge I have is that I cannot make it a solid. To make this shape I created a frame and then used Curviloft to build the skin.

If I try and make a use Union or Outer Shell the response I get is my shape is not a solid.

I used solid inspector and this threw out lots of errors but did not actually tell me where my errors were.

Any help as always appreciated…trust me I do spend considerable time wresting with the drawing before asking for help!


dome80.skp (2.0 MB)

You could try the Fredo6 plugin Joint PushPull to give the surface a thickness.

I’ll try it in a minute and report back shortly.
Quick note: you have a stray line a good way from the origin in the model you uploaded. Intentional? Maybe a way of registering the dome in the full engine

Are you exploding the groups that Curviloft makes?

I made it all work one time. Now I retract my post because I could not repeat it.

But first:

make a component of everything you want in the shape. Clean up the file might help. Get rid of the extra edges and guides
You have some hidden edges above the main shape

No nested components–just the one component of faces and edges.
Remove the arc inside the shape.
Make all outside faces the front face (white) and the inside backface (blue)
Inspect for extra edges and holes.
Make a copy and scale it up 1000 times. Run CleanUP3 and Solid inspector.
Worked for me once but I couldn’t repeat it.

I think the problem is in the bottom surface. With many of the clean-up steps I note above, add this. Remove the problem extra edges, at very center and at bottom edge.

(done WITHOUT even scaling a component 1000x)

I guess this is a follow on from your earlier post
Locomotive dome.

Your profile says both Sketchup Free, and SU2020? Which is it?

If the former, you can’t use plugins but you talk about using Curviloft, so I think you must be using SU 2020, either the trial Pro or a full version.

Please correct your profile accordingly

Well, taking one group that is a quarter of the sides of the ‘dome’ I select the whole of the face in it, and use Fredo6 Joint PushPull/Thicknesser, choosing 1" for the offset.

It pushes the surface inwards, but loses the original outer surface, [EDIT] unless you tap the Ctrl key (Option/Alt on Mac) and see the little + sign by the tool icon. I thought I’d tried this, but didn’t get it right:
image

When you figure it out it is just as simple as with the built in PushPull tool where you just press the Option key (on Mac) or Ctrl (on Windows) to retain the original surface.

Seems to me there are far too many faces in your model, and groups with reversed faces that I can’t all to face out.

And the bottom of your model isn’t a clean section of a cylinder.
I think it’s worth starting over, with far fewer segments.

So I did that.

I went back to @DaveR’s earlier post, using a minimal number of segments, as he did (the default 24 per circle), then added a cylindrical (boiler) surface at the bottom via Intersect Faces, and a domed top, to make a solid. That worked

I just drew a whole new dome as Dave did. I just used three sizes of circle to get the intersections with the boiler tube, but you could use three or four if you want a slightly smoother curve to 3D print.

Then I selected the two outer surfaces (or three or four if you used more).

Tap Ctrl (windows) or Option/Alt (Mac) and use JPP by Vector straight down on the blue axis, and enter the depth you want - I used 1" but you might need more to get a printable thickness.

That gives you a solid ‘hat brim’ for the bottom rim of the dome.
image

Then I selected the cylindrical part of the dome, and the half sphere on top, and selected the Copy option by tapping Ctrl (windows) or Option/Alt (Mac).

Regular Thickness JPP gives it too a printable thickness.

All done.

Result:

There were a couple of internal faces that didn’t get made, but easily fixed if you first hide or temporarily cut the outer dome to clipboard to get at the inner dome surface.

I agree, I think it’s worth starting over and learn to keep simple clean models. But I seem to have missed the point? You posted the model with some connected surfaces that you said you wanted to make solid. I didn’t know you wanted to create a different shape (a hollow shape with a thickened solid skin).

Yes, too many faces.

I found after I’d finished that Solid Inspector says there were lots of internal faces, but offered to fix them automatically, and did, to produce a solid.

Resulting file attached saved back to v2017 so anyone with Make 2017 can open it.

dome80 with thickness.skp (277.1 KB)

PS. Just replaced the file - forgot to purge it first.

John thank you - the support I am getting from this forum is incredible…I have only been at Sketchup a few weeks and as with any new software there is a lot of learning in the early days…I am going to read all the feedback and have another go tomorrow.

Yes - I have read all the feedback and thank you for yours too…I will look at this and have another go from scratch…I need to learn better to keep the models clean…I will keep practicing but thank you for the guidance.

Thank you your help is very much appreciated.

Note: I only just worked out how to do what I was sure Fredo6 DID make possible - leave the original surface in place when using any variant style of JPP. I’ve amended post 6 above to reflect this. Tap the Ctrl key (Windows) or Option/Alt key (Mac) to toggle between copying the surface or not. You’ll see a little + sign beside the JPP cursor when Copy mode is active.

Here it is.You just have to explode it few times and then group all together.Then you have some holes and internal faces resolvable in few clicks with Susolid plugin.dome80_solid.skp (3.7 MB)