I’ve had a quick look at the first of your models.
It looks really good visually, but isn’t constructed in Sketchup as well as it could be (so it’s making it harder for you to create and edit).
You would find it easier to draw and edit the model if you have it centred at the origin, and show the axes - they were hidden in the model I downloaded.
And make it up of components roughly corresponding to how it is physically constructed.
You will also find it easier to see what you have drawn, as you go, if you go to the Styles window and go to Edit - then check the box marked Edges, so they show up. And turn on View.Hidden geometry.
Most of your faces are drawn reversed - with the back of the face outwards. This can cause problems later - for example, if you try to make the object into what Sketchup calls a ‘solid’ component or group. To fix this, you can select a white (right side out) face, then R-click and select Orient faces, to turn all the faces right side out.
You can see this by setting the View/Face Style/Monochrome, which looks like this: blue faces are reversed.
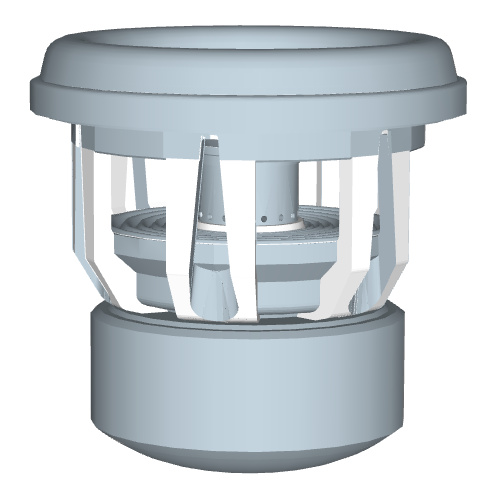
I’d suggest making the whole of this model into a single component, move it to the origin, then re-draw it using a separate component corresponding to each physically separate part of the speaker.
For example, you should make a component of each of the following (not a complete list - just illustrative): the speaker cone, the upper steel ring round the cone, the spokes (a ring of them, copied and mirrored so you only have to draw one half of one spoke). Then the base magnet and its housing, and whatever other parts are left that I haven’t identified or don’t recognise.
The hardest part to redraw will be the spokes, as you have found. But you only need to draw one half of one of them.
Assuming those are the white bits, I’ve tried copying part of the model to a different place, then trimming off (Erasing) the blue faces around them to leave a single spoke.
But even when I’ve cleaned it up as best I can in a few minutes, it is still, I’m afraid, a mess.
I’ve used a Section Plane, and Camera/Parallel projection and Front View to show a cross section of the speaker, to see if I could extract a profile and make faces for the FollowMe tool, but it wasn’t as helpful as I thought it might be…
I guess you have used FollowMe to draw the circular parts. Do that again, but make each element into a separate component as you go.
There is however one clean face in the spoke: highlighted here.
You could pushpull that into part of a spoke, then ‘carve it away’ using the Pro trial (download to your computer) and the Solid Tools to subtract the ‘space’ between spokes. Or use Sketchup Make, and (again drawing the space) use Intersect Faces to make the opening.
Not sure how much of this you could do in Free - most, I think. But easier in the full program, whether 2017 Make or 2018 Pro trial.


