In developing a workflow for importing DWG/DXF files, what is the general consensus about the procedure to follow? I’m guessing the procedure might start with:
Use DWG/DXF file for reference only (After other steps, lock, then trace over)
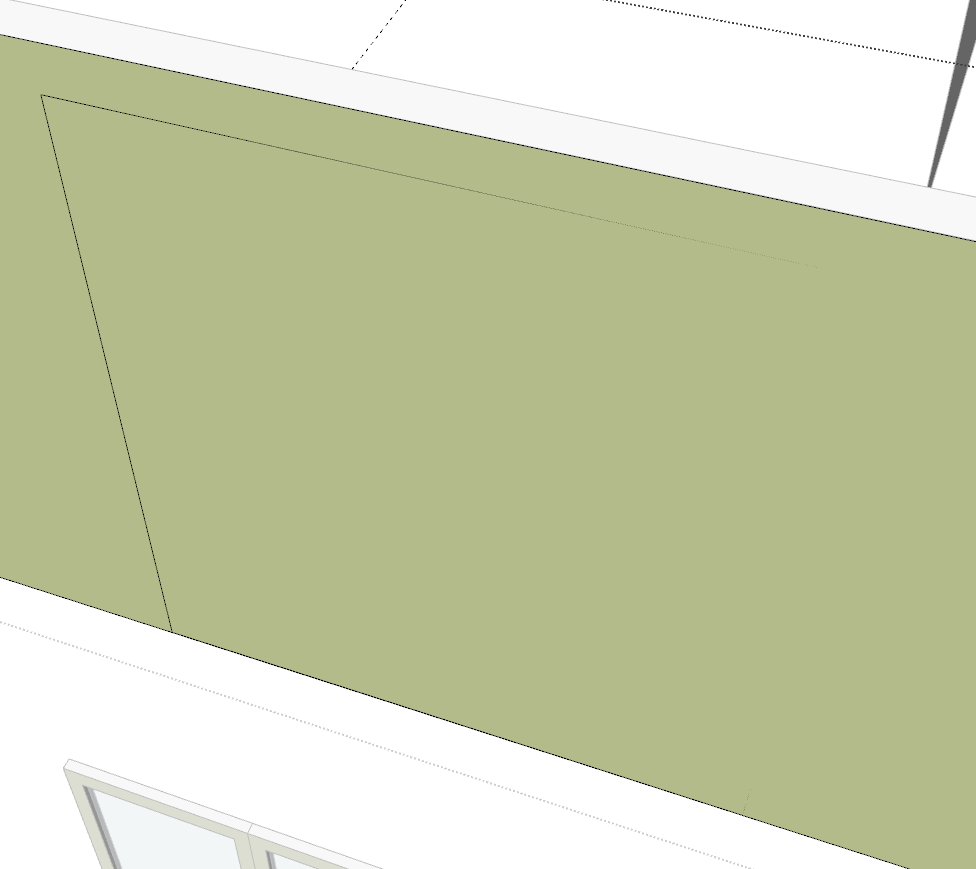
The green is my default style’s back face color. As I mentioned before, your style with the back face color set the same as the front face color makes it difficult to identify incorrectly oriented faces. That’s a bit like putting black tape over the low oil pressure warning light so you can’t see the light. It doesn’t fix the problem.
I ran TIG’s Default Tag Geometry on your model and got this.
Interesting. I’m wondering why and how I drew that square off of the surface in the first place.
My guess is that somehow I have microscopically mis-alligned major sections of the model.
I have questions regarding the back face color and styles but will search for other posted threads first and try to find out a little more about it. I just don’t know enough about it to have a conversation. I do remember that you mentioned in the past that rendering requires a different backface color.
The ‘30x40 soft linework style’ I’m using is from a really good architect in Maine who uses AutoCAD lite for production work - and SU only (no rendering) for design development and client orientation and presentations. I don’t know a lot about styles yet.
One thing that gets in the way of accurate modeling is having Length Snapping turned on in Model Info>Units.
The best advice is to turn off Length Snapping for your default template(s) and my preference is to set Precision as high as it will go for the selected units while I’m modeling. I wouldn’t normally dimension anything in 64ths but I want to see them if they occur so I can deal with them ASAP.
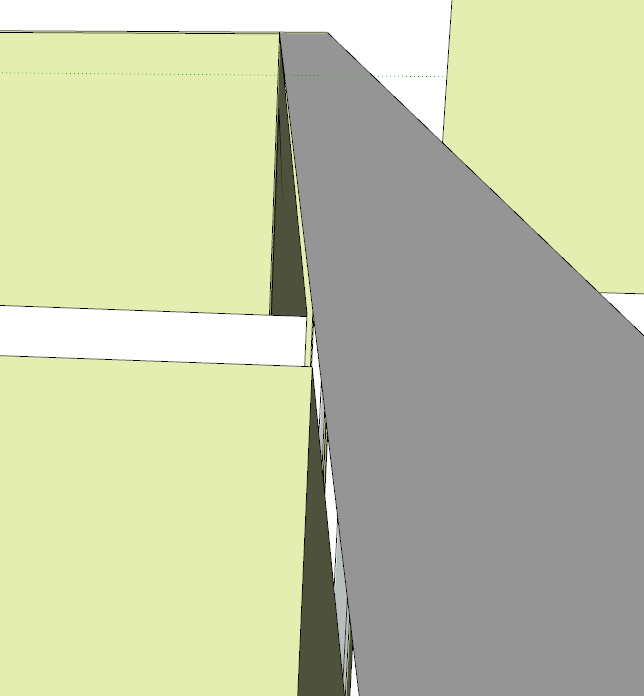
You’ll notice there are no top faces on some of your walls. This is due to some bad and missing geometry. This is another thing that’s very hard to detect with the style you have chosen but it’s very clear when back face color is different from front face color. When you zoom in close to the top of the wall we’ve been talking about you can see the gap between the inside face and the top.
As to the back face color being different from the front, it helps to identify problems like holes and other missing faces. Having face orientations correct also makes adding materials easier and if you plan to use a rendering program, many of them won’t render back faces even if those faces have materials applied to them. You might not be interested in 3D printing your model but face orientation tells the 3D printer which side of a face is the print media and which side is air.
The style you have set is a nice display style but between the face colors, the light gray edge color and the extensions being turned on, it’s not a great style for modeling with accuracy or precision.
Model is not a CAD import. I drew all this from scratch myself.
All the micro inaccuracies are down to the way I’m drawing.
At least we’ve isolated the problem. … !
I don’t know if it is mentioned above, but I’d try to avoid drawing without entering dimensions by the keyboard. That is, when you draw an edge etc and watch the box for the right distance, instead of typing, you can end up with approximate dimensions and the tilde symbol. It’s probably one way that things get so slightly out of square, you can’t tell.
Ha. I said that all in the negative --might be confusing. Use the keyboard to enter accurate lengths instead of just the mouse movement!
So, … the way I’ve been drawing so far is that I am concentrating on building the model with Groups and Components and organizing all that with the Outliner. So far, Tagging the elements, comes after that. Consequently during my drawing process some groups and components remain untagged until I decide there is a need to Tag them.
I have not yet advanced to creating a lot of Scenes. In my mind I think that Tags are a more important function in Scenes and a less important function while building the model.
There are many ways of doing it “right”. The approach you have described above sounds reasonable. Groups and components and a well organized outliner is a solid foundation.
A reason to explore using tags on elements earlier in the process would be to control visibility of entire classes of objects. For instance turning off visibility for all windows in a model, it might be tedious to track down every window in the outliner, which would be spread out hierarchically under different sub components depending on where they are and how your model is organized. By assigning a window tag you can keep the outliner organization clear and still make all windows invisible with a single click. This kind of control is useful for scenes, but it can also be useful during the modeling process.
While there are a few different “right” ways there is one certain wrong way, which it sounds like you are avoiding. Never assign tags to raw geometry. Only groups and components should be tagged.
I’ll add to this: Never do your modeling with anything but the “untagged” tag active. Rather, MAKE SURE your active tag is “untagged”. Often. Doing otherwise is the path of misery, regret, and whiskey. There are easier ways to get whiskey.
Don’t think I know what or where the Active Tag is? Where do I look?
(BTW. my last name is Patteson (no ‘r’). I explain this by saying we started shooting at each other somewhere in the mountains around Virginia and North Carolina - probably over whiskey.)
Look in the Tags panel in the Default tray. There’s a pencil icon on the far right. It should be at Untagged at all times. That indicates Untagged is active.
It’s a good thing it’s too early for me to be drinking or I’d have spewed something on my keyboard!
Funny. Most of us started with something like that. My grandfather changed ours from Pattison. He wasn’t a first generation or anything, but that’s a MUCH bigger story than we should go into here.
Not off base at all. Tags are used primarily to control visibility, as you can easily show/hide anything on a tag instantly. Scenes can be set to show specific tags only, which is very useful.
If you don’t NEED to hide anything at any point while modeling or presenting, then you MIGHT not need to tag anything
If you don’t NEED to hide anything at any point while modeling or presenting, then you MIGHT not need to tag anything
As monospaced says, but for me and for others modelling is easier if we can quickly hide tags, e.g. while I’m modelling I might toggle off the roof, ceiling and floor tags off to quickly see inside a building.
Yes. Of course that’s why tags are useful. For hiding stuff in the way, like roofs and walls. But if you don’t need that, you don’t need it. That’s exactly what I said the first time.
May I interject here how refreshing this thread is!
Someone had questions/issues with the program.
Those questions/issues were explained and delved into by knowledgeable people. Correct examples were provided, suggestions of how to improve were offered, solutions were found, and clarity was established.
The OP received the instructions, explanations, clarifications, and offers of help with out any divisiveness or squabbling and with friendly banter and thankfulness.
There were no claims by the OP that the program was stupid, didn’t work, had a definite bug, or that those providing help failed to do so or did so in a manner that was regarded as insufficient or was not what they wanted to hear; it seems so many posts of late have devolve into this type of exchange. I have enjoyed reading and being a part of this forum for 5 years but had started to avoid it due to the plethora of foolish people who expected Sketchup to provide beautiful work for them with out doing the actual work of learning how to use the program. My post has gone on for too long now, it probably belongs under another topic and if it should have been posted somewhere else, someone more savvy than me; please move it.
Thanks for reading!