How those farmers made those curved rafters is something to think about. And then lumber being generally rectangular in all dimensions, sawing curved rafters could be rather wasteful of material. And lastly how might all those curves have been sawn.
About a “ridge beam”; I can’t imagine how the farmers would have put that beam in place.
Note: I grew up on a small farm in the 1950s. Never saw a bandsaw. But sure seen a lot of those “round roof” barns.
yes, but no. by “wasting” a bit of wood, you create a structure that requires no extra bracing, that’s the beauty of curves. In term of structure, it works like any standard framework, but with fewer elements, less weight, more space.
The fact that you’ve seen many of these round roof bards is a testament to their quality. Both halves holding each other, like a pair of shells (in french, architecture à coque, like the Sydney opera). you can leave it open ended to allow airflow or to park stuff, you can close it independently form the structure itself, it’s an elegant design that allows an economy of materials, compared to more standard framework.
either sawn or carved, by hand, by bandsaws… a bit of steam to bend the wood too…
I mean, it’s basically just an inverted ship hull. and we’ve been making curved shiphulls for a long time with a variety of tools.
They’re laminated Douglass fir. It used to be a much taller affair before it was taken down by a tornado in the 20’s, and then rebuilt shorter. This is technically the third story on the original barn.
Built in November 1906, according to the signature of a carpenter on one of the barn boards up near the ridge… The original owners (brother and sister) had a bit of a family feud going over whether the barn originally belonged to the grandmother’s family before she married the grandfather, or whether the grandfather had it built when they got married… A difference of about 20 years.
I wasn’t expecting the 120 year mark with it being laminated lumber of this size, but research tells me that laminated beams were a patented thing by 1901… Which means as strange as it is to look at this barn and think of it as ‘new style or technology’ it really was a new and expensive thing in it’s heyday. It has stamps on it from a local company marking it as a “5040” and the hardware is all cast iron.
But that kind of ruins the ‘old barn’ feel of things. I would think a simple covered porch at the entryway would be more appealing and useful. Nothing better than sitting in a rocking chair on your porch sanding or polishing a thing. Actually, there isn’t much better than a rocking chair on a porch. Mmmm, nap time…
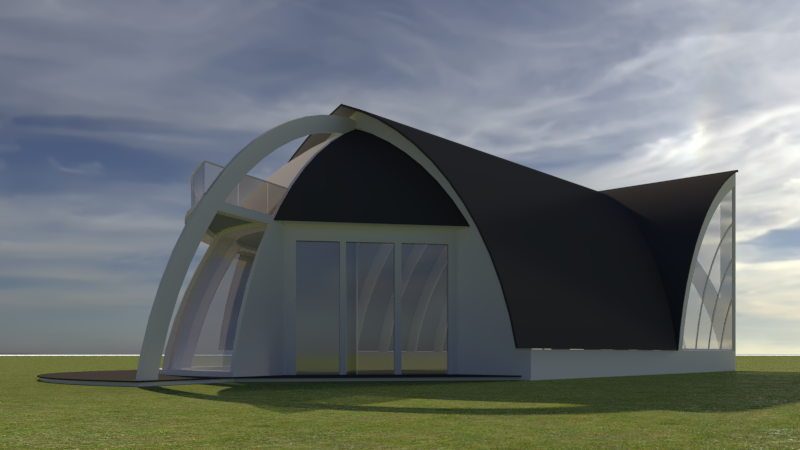
A couple of observations, and both could be wrong (I’m a registered architect, but have been known to be wrong lol), but here goes: 1) I don’t think you need a riidge beam. The whole point of pre-fab “barn” trusses like this is to NOT need a ridge beam–the two opposing curved sections of each truss work to hold up the roof, cannot collapse inwardly, and are rigid enough when working with all the other trusses as to need no additional ridge beam to carry down their loads. 2) Is the folded end wall your design or something about the original barn end walls? I can’t really tell in the photos. If its original, then it would seem to be in keeping with the whole idea 1920s-1950s era idea of engineering these utility structures with the most minimal materials possible, and angled end walls–like origami–would have provided just the tiniest bit of additional rigidity for the structure in the longitudinal direction. Said another way, would have helped the trusses to NOT collapse like dominoes during tornadoes, etc. Conclusion: once reassembled, your beautiful barn will need longitudinal bracing to avoid collapse. Angled end walls might be a brilliant solution in keeping with the DNA of the original barn, and in stabilizing what will be very tall end walls–especially if they are walls of windows! I’ll stay tuned to find out if others agree/disagree ). Bottom line, what a fantastic workshop you are going to have–and looking out over a lake, no less!!!
PS–It would appear that the origanl builder–or the demolitionists–have placed long diagonal bracing at an angle along the interior trusses. You’ll need something like that again, and they seem to be working perfectly. Again…so jealous, in a good way.
The barns I helped build as a youngster in Minnesota were very thrifty in use of materials, tools and labor.
Sorry if this is a bit Off Topic. I felt it should be part of the discussion.
I’ve seen some laminated rafters but they were not Farmer built.
The curved rafter segments were cut on a table saw with the blade set to a wide kerf. the wide kerf allowed the blade to clear an arc. We cut 1" x 10" x 120" boards to a 28 foot radius.
The segments were then nailed together as shown to form the rafters. No glue, just lots of nails. Stack as many layers as needed per the engineer (farmer, barn owner).
The rafters were set upright a few at a time and sheath boards were nailed on horizontally. As the sheathing went up 2x4s were spiked on to get a toe hold for workers as the barn went up. No ladders needed!
The blue rectangle is the Table Saw
Completely agree with iPad4Architects. if the curved trusses are all erected without longitudinal bracing, there is nothing to hold them vertical. They fall like a row of dominoes. The ‘folded’ end elevation will definitely help, as would tension ties, holding / tying each end of the ring beam to the ground, like each end of a tent.
Lovely building, lovely project. Good luck.
If you want to observe the sheathing on the inside, use 2x nominal board that can make the arch smooth enough and carry snowload. Out side of that, you can use simpson tie strapping on top or alternative for windshear in the longitudinal direction. Nice finish plywood is roughly similar in a psf price and would offer shear, maybe less historical. adding heat? Maybe consider 10psi continuous eps foam or other, on the outside for insulation, select for flex for that radius.
Liking the protruding view options, maybe a recessed door entryway in consideration of snow sliding and loading.
There are a number of easy windows options for light on the sides. Suggest slightly reduced radius arch to lift up a tapered shed dormir. Can use metal roof. These can be on top of the existing arch. Using more flexible roofing, if you’ve a passion, mimicking the arch in a shed eyebrow style would be pretty high end if the taste suits the situation.
Something you may want to consider, you have what could be called a nice ceiling line above the roller door. While a full open arch is a nice thing to have you are probably going to want some private sectioned off areas, bathroom, bedroom, paint booth etc and some straight walls.
By creating a stud wall structure touching the arch at your choice of ceiling height you can resolve racking issues and give yourself a straight wall to build from. The whole structure need not be closed off, just enough ‘panels’ to give it structural stability. Windows, wardrobes, storage areas all possible and done well you can still have the feeling of space created by the arch. This would also mean the end walls can be non structural.
A 2 min rough.
The laminations definitely prove that it was a Rilco prefab as no farmer would go to those lengths (no pun intended). But kudos to the gentleman on this thread who showed the table saw solution. That’s definitely farmer problem-solving style!
At 50 ft long and 20 ft of tributary area, a ridge beam would probably never work, or at least be absolutely jaw dropping in size if you figured out what it would take.
In principal, even though the members are curved, the basic structure is a gable which doesn’t need a structural ridge beam per se; all the weight goes to the heal of the rafters. That said, a gable structure does produce outward thrust. In gothic cathedrals, they came up with flying buttresses for that, but in your typical everyday house, it’s the ceiling rafters that tie the rafter heals together. In this case the heals aren’t at a ceiling, they’re at the ground where that could take the thrust. Those certainly are nifty pieces of hardware to anchor those heals and resist uplift and lateral sliding, but it looks like the heals actually sit on a low CMU wall probably 8" wide and 16" high, not right at grade. My seat of the pants reaction is that’s not adequate. A properly reinforced poured concrete wall could be. I should hope the cores of the CMU are filled and have some rebar in them, but you couldn’t see rebar now of course. I would look at the inside of those walls for any sign of cracks.
The end walls are too tall and thin to resist lateral (wind) load perpendicular to the face of wall, especially given the door openings and the non-continuous (scabbed together) studs up high. That’s why there are all those “kickers” coming out from the wall into the space. To that end, a folded end wall could help a little, but you don’t have to. The end walls will need at least one or two pretty serious “posts” (really beams turned sideways) to handle it.
Usually laminated beams are an industrial product, but I recently watched a Swedish TV show that featured an exceptionally skilled woodworker who built his own house - he produced his arched laminated beams himself in his shop, with glue and nails.