Hi Sketchup Team,
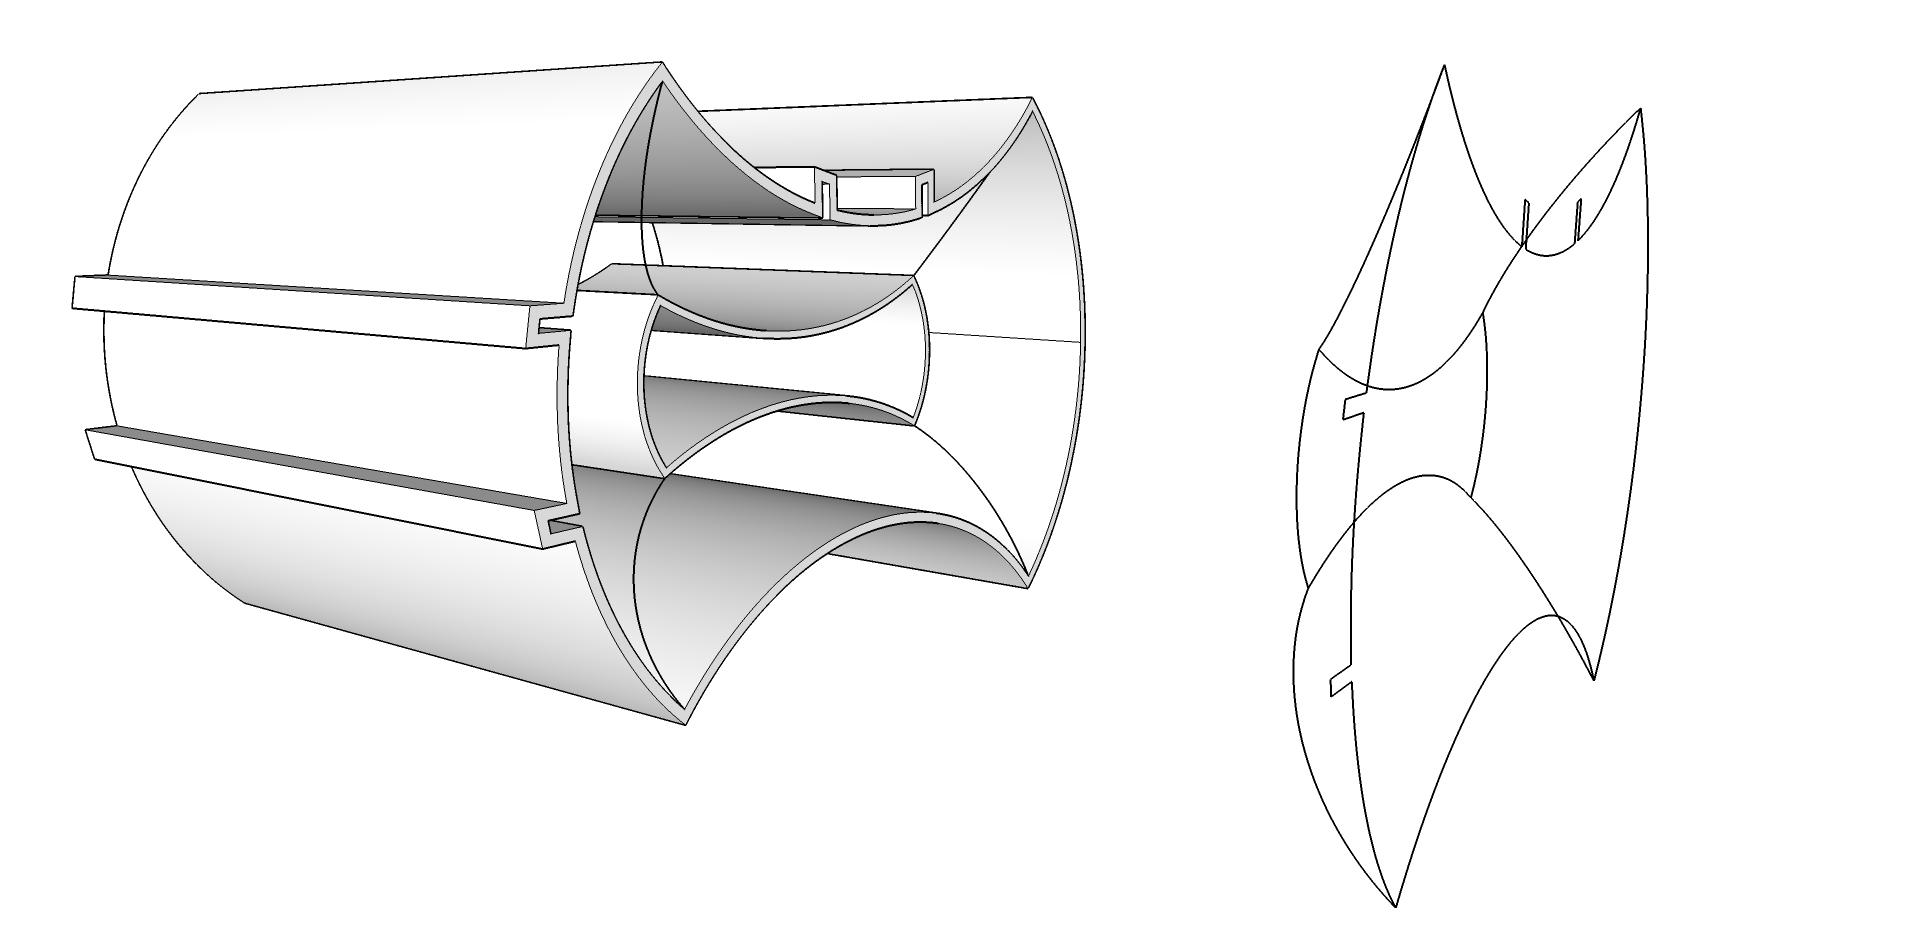
I am Rutvik Rao and i am a candidate of masters of interior architecture at the Boston architectural college in Boston. I have been using sketchup for a long time now and have been very satisfied and content with the way it helps interior designers in everything. (love how its soo user friendly). So in this image as you can see i am working on a module which i wanna 3d print and with the user manual which my college provided i have been able to make 75% of the model 3d printer friendly. But i wanna close the open ends of the module from both the side and have tried every possible method to make these lines as a surface but failed alot many times. If anybody is able to help me it’ll be a great feeling. Thank You.
Maybe posting the model would help. I can’t quite tell what you are going for here. It would also help if we knew what kind of 3d printing process you were going to use, FDM, SLS, etc.
It looks like you want to have a concave surface, and if so, it will matter what kind of printer you are using.
SketchUp only deals with straight edges and planar faces. So, to skin over those end surfaces you will need to “stitch” vertices on the curved edges across the empty space to create planar bits. Since any three points define a triangle in space, this is usually simplest using triangles. To do this by hand (which I recommend as a first attempt since it will educate you in what is going on), you use the line tool and join appropriate vertices until the surface is fully formed. If the geometry is complex with a lot of vertices,hand stitching can get tedious, so there are extensions such as Fredo6’s curviloft that can automate the heavy lifting.
2 Likes
Maybe something like this?

Instead of stitching the surfaces by hand, I created the green shape to use as a “cutter”. To get the concave surface on the end, I copied the surface of the cutter and pasted it into the module component. Then I selected the involved faces and used Intersect Faces>With Selection. After that I erased what wasn’t needed.
You said you wanted to close both ends. I assumed with the same concave surface so instead of repeating the intersect process at the opposite end, I just selected the module geometry, copied it back, flipped it and joined it to the original copy.
I did all the drawing at a large scale. It would need to be scaled down to the right size after you do all this intersecting.
thing.skp (362.1 KB)
2 Likes
Clever, Dave!
It is a nice shape but it think the OP model is different. I don’t see it as a continuous curve, it’s looks more like an extrude tools or curviloft to me.
Would be nice if the original was attached.
Thanks. I use this same process for many things where I need to cut and leave complex (and sometimes not so complex) surfaces.
@Box, Maybe you’re right. Not enough info to go on I guess.
My take on the image is two planer faces connected by an arc, possibly different arcs.
Could be. Maybe I should withdraw mine.
Not at all Dave. It is a good solution, albeit not necessarily the one for now. But well worth posting.
I agree that we can’t tell from the original figure exactly what shape that end closure needs to be, but Dave’s method is worth putting into the bag of tricks for when it does apply.
Hey guys i am really sorry for the late reply, been caught up with a lot of studio work recently. Firstly thank you for all the discussion. Secondly about the model i am uploading the model on which i have been working on and @jesse_s i am gonna use the 3d printer for the first time so i am gonna say that the name of the printer is makerbot, also it is indeed a concave surface and i was also curious about will it 3d print just the concave surface or it needs some thickness ? Final Plug And Play.skp (816.3 KB)
@raorutvik92, Someone better than I am at SketchUp will probably chime in on how to fill in the gap with a nifty plugin like soap skin and bubble or the like (and hopefully I will learn something new).
As far as the MakerBot, it’s a FDM printer, so it relies on building layers of filament that need support from the layer below in order to fill in properly. So it depends on how you print the item, but the goal is usually to have the item print without removable supports. If someone doesn’t beat me to it, I’ll try to find a good guide to slicing that will illustrate the point, or I’ll slice your finished model to show you a little later.
@jesse_s i am trying to understand where you are hinting me at but i feel maybe ll be more clear with it only after an experience. but thanks alot for the comments i am sure getting somewhere from here.
Sorry, I wish this was easier to explain quickly, but check out this link on the limits of FDM printing. The overhang is what I’m worried about, it’s midway through the page. https://innovationstation.utexas.edu/tip-design
Edit: I’ve tried the curviloft plugin from Fredo6, and it will fill in those surfaces.
You need thickness, otherwise the model won’t be a solid which is needed for 3D printing. From your first image it looks like there’re a lot of overhangs…
raorutvik92 ;
- If you can upload your model to 3d ware house. That allows downloads in other versions of SU vs limiting to 2016 per present model;
- Here is another link giving you info. about printing. If you require supports for over hangs those must be include in you model, there are printers, two nozzle, that can use a soluble support material but do not think yours is one so you need to plan on removing after the build;
- Some programs will analyze you model and look for optimal mounting on the printer, even to point of mounting at angle, to minimize effects of over hangs;
- Printing model in pieces and then gluing is a option if end caps get to point of causing too many problems. Hopefully you can get some advice from you advisor;
- This post ,some what old, but covers mistake areas https://i.materialise.com/blog/5-mistakes-to-avoid-when-designing-a-3d-model-for-3d-printing;
Good Luck
That was useful as I am thinking of a wood design for a motorcycle group . . And that had info for the material . . Seen the Wood filament up on Amazon and wondered about it as Geeetech ( My 3D printer maker ) does not have anything on it as to how or any other info . . Will send them the page also
Most of the commercial printers have info on materials Like Shapeways. imaterialize. The best I have found is info at Capink and Itrastays . They are big time in 3d printing & put others to shame. Their low end printers are in the 14K range though but you can find goods videos there. Try capinc.com
@jesse_s i am simultaneously working on something else, is it alright if i could email you a file to clarify a doubt ?