Hello to you all,
some help to close the face…see pictures…
Thank you
Joseph.


Proteo.rb (3.2 KB)
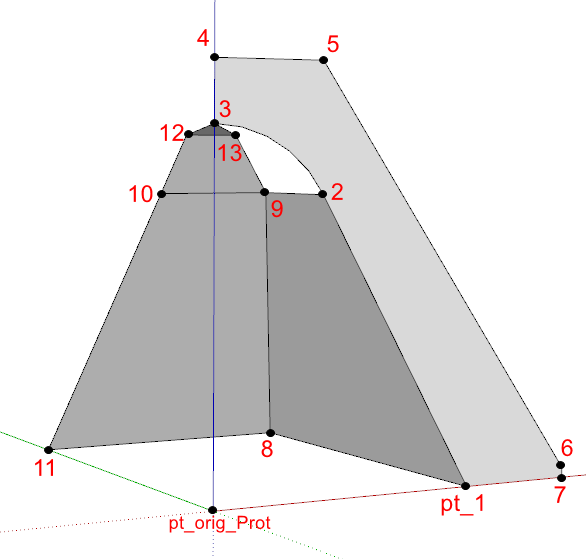
You can’t just use add_face as these points aren’t coplanar. Think of how you’d cover that awkward hole in SketchUp. It might be easier if the edges (pt_3, pt_13) and (pt-13, pt-9) were an arc with the same number of segments as arc(pt_2, p_3)
Here’s one way: I Divided the edge from pt_9 → pt_13 into 3 then drew lines from each vertex to the corresponding vertex on the arc. Drew diagonal lines across these to form triangular faces.
Divide the edge from pt_3 to pt_13 into 2 and drew a line across to the 2nd-from-top point on the arc. Again, I drew a diagonal line across this to form a triangular face.
That’s just one way out of probably infinite ways. Pick one then write your code to draw it.
Then hide/soften/smooth the edges you don’t want to see.

I thank you for your answer… I try to see what I can do…
Joseph.
Dear Mr Dan, a little more detail in particular is possible…
Thank you
Joseph.
I was thinking something like this …
          faces_adicional = 0
          arc.each {|edge| faces_adicional += edge.find_faces }
          puts "faces adicional: #{faces_adicional}"
… BUT this does not work either.
You must do as @McGordon suggests above.
Here is the code fixed up. Indents at 2 spaces. A module instead of a class. The extension module wrapped in a toplevel namespace module. And a few nifty support methods added.
Beppe64_CodiceProteo.rb (4.9 KB)
Oh, and I commented out the material assignment, so I could see which way the faces were facing.
You shouldn’t assign material whilst trying to get geometry building code to work.
Dear Mr. Dan,
a sincere and heartfelt thanks for his help,
now all I have to do is study the lines of code he wrote,
to honor the time he has dedicated to solve my problem…
Thanks again.
Joseph.
Feel free to change the toplevel author namespace module identifier (as it’s your unique namespace.)
All of your extensions and code must evaluate within this unique namespace module.
I just made up “GiuseppeBeppe64” for the example. You need to settle upon a good unique namespace module identifier. Use something that identifies you or your company.
I put some ### brackets around places I modified in your original proteo() method.
Line 62 is where I commented out the material assignment.
Also Line 86 …
#edges_adicional.each {|edge| edge.find_faces }
… can be deleted … because the code now uses the make_faces() method instead.
Line 99 …
#edges_adicional.each {|edge| edge.soften; edge.smooth }
… can be uncommented if you wish to soften and smooth the curved surface.
I also placed #{# … #}# brackets around this …
    #{#
      lato_x = 75.cm
      lato_y = 125.cm
      altezza_z = 82.cm
      pt_orig_Prot = ORIGIN #Geom::Point3d.new(0, 0, 0)
      pt_1 = pt_orig_Prot.transform([53.cm, 0, 0])
      pt_2 = pt_orig_Prot.transform([22.cm, 0, altezza_z-25.13.cm])
      pt_3 = pt_orig_Prot.transform([0, 0, altezza_z-12.cm])
      pt_4 = pt_orig_Prot.transform([0, 0, altezza_z])
      pt_5 = pt_orig_Prot.transform([22.cm, 0, altezza_z])
      pt_6 = pt_orig_Prot.transform([lato_x, 0, 2.cm])
      pt_7 = pt_orig_Prot.transform([lato_x, 0, 0])
      pt_2arc = pt_orig_Prot.transform([0, 0, altezza_z-37.cm])
      pt_8 = pt_orig_Prot.transform([53.cm, 90.cm, 0])
      pt_9 = pt_orig_Prot.transform([22.cm, 25.55.cm, altezza_z-25.13.cm])
      pt_10 = pt_orig_Prot.transform([0, 25.55.cm, altezza_z-25.13.cm])
      pt_11 = pt_orig_Prot.transform([0, 90.cm, 0])
      pt_12 = pt_orig_Prot.transform([0, 13.cm, altezza_z-14.cm])
      pt_13 = pt_orig_Prot.transform([10.cm, 13.cm, altezza_z-14.cm])
      #pt_mesh = ([pt_2, pt_9, pt_13, pt_3])
    #}#
… because it doesn’t make sense.
You are adding this geometry into a new group entities context, where all coordinates are based upon the group entities’ ORIGIN point. There is need to transform every point.
You can simply do this …
    #{#
      lato_x = 75.cm
      lato_y = 125.cm
      altezza_z = 82.cm
      pt_orig_Prot = ORIGIN
      pt_1 = Geom::Point3d.new([53.cm, 0, 0])
      pt_2 = Geom::Point3d.new([22.cm, 0, altezza_z-25.13.cm])
      pt_3 = Geom::Point3d.new([0, 0, altezza_z-12.cm])
      pt_4 = Geom::Point3d.new([0, 0, altezza_z])
      pt_5 = Geom::Point3d.new([22.cm, 0, altezza_z])
      pt_6 = Geom::Point3d.new([lato_x, 0, 2.cm])
      pt_7 = Geom::Point3d.new([lato_x, 0, 0])
      pt_2arc = Geom::Point3d.new([0, 0, altezza_z-37.cm])
      pt_8 = Geom::Point3d.new([53.cm, 90.cm, 0])
      pt_9 = Geom::Point3d.new([22.cm, 25.55.cm, altezza_z-25.13.cm])
      pt_10 = Geom::Point3d.new([0, 25.55.cm, altezza_z-25.13.cm])
      pt_11 = Geom::Point3d.new([0, 90.cm, 0])
      pt_12 = Geom::Point3d.new([0, 13.cm, altezza_z-14.cm])
      pt_13 = Geom::Point3d.new([10.cm, 13.cm, altezza_z-14.cm])
    #}#
… or even this (as Arrays are compatible with points and vectors.)
    #{#
      lato_x = 75.cm
      lato_y = 125.cm
      altezza_z = 82.cm
      pt_orig_Prot = ORIGIN
      pt_1 = [53.cm, 0, 0]
      pt_2 = [22.cm, 0, altezza_z-25.13.cm]
      pt_3 = [0, 0, altezza_z-12.cm]
      pt_4 = [0, 0, altezza_z]
      pt_5 = [22.cm, 0, altezza_z]
      pt_6 = [lato_x, 0, 2.cm]
      pt_7 = [lato_x, 0, 0]
      pt_2arc = [0, 0, altezza_z-37.cm]
      pt_8 = [53.cm, 90.cm, 0]
      pt_9 = [22.cm, 25.55.cm, altezza_z-25.13.cm]
      pt_10 = [0, 25.55.cm, altezza_z-25.13.cm]
      pt_11 = [0, 90.cm, 0]
      pt_12 = [0, 13.cm, altezza_z-14.cm]
      pt_13 = [10.cm, 13.cm, altezza_z-14.cm]
    #}#
Dear Mr. Dan,
a further thanks for the new tips…
Joseph.