In the model at all levels, yes, this is true. (It was for related information, not specific to your case.)
My attempt to get around the problem failed!
I therefore have to find a solution to finalize Click-Cuisine 2.
New idea:
If I select “Furniture A” and “Furniture B”.
Is there a way to import a handle, only for furniture that does not have a handle?
Example:
  array = []
  mod = Sketchup.active_model
  sel = mod.selection

["Handles"].each do |n1|
  match = /#{n1}/
  path = Sketchup.find_support_file("#{n1}.skp","Plugins/TNT_ClickCuisine2/Components/")

  defs = mod.definitions
  definition = defs.load(path)

  sel.grep(Sketchup::ComponentInstance).each{ |s|
  s.definition.entities.grep(Sketchup::ComponentInstance).each{ |e| array << e if e.definition.name=~match }}

    if array.length < 1
      sel.each do |s|
        point = Geom::Point3d.new(0, 0, 0)
        transformation = Geom::Transformation.new(point)
        instance = s.definition.entities.add_instance(definition, transformation)
      end
    end
  end
This method counts all the handles in the selection.
So if one of the 2 furniture has a handle, the method no longer loads the handles.
Should the problem be solved in another way?
Your help would be of great help to me.
Thank you
David
If you want anyone to be able to read your code, please make sure the indentation is correct.
Hello, eneroth 3
I edited my post to save his presentation.
Is it more readable now?
When you’re new to ruby, it’s easy to follow all the rules.
It is still not correctly indented.
The contents of every do … end and { … } block should be indented. So that the start line of code is lined up with the end line and the indent guidelines are unbroken.
The indent guidelines in my Ruby lexing style (Notepad++ editor) are set to cyan color. See how the first do aligns at the same indent as it’s end, with all the subordinate code indented 1 ident.
Then again, the if is aligned with it’s own end and it’s subordinate code indented.
And again, the inner do … end block is indented. And so on,… and so forth …

It will often help when you are coding a block to create the end line immediately after typing the starting line. Then go back up and insert the code between the lines. (Some code editors can do this “automagically”.)
Nor is it color lexed correctly. Again see …
1 Like
I use “Notepad ++” how to adjust the indentation in automatic mode?
How to adjust the color of texts according to the conventions of the ruby script?
I edited my code to correct the indent following your remarks Dan.
Thanks for these informations.
Concerning my problem, I ended up finding a solution that works.
Instead of looking in “Furniture A” and “Furniture B”, if there is a sub-component “Door”.
I control the value of a dynamic attribute inside each piece of furniture, which informs whether the door is present or not.
If the attribute says that the door is not in the furniture, it is imported if not “nil”.
So I can have as much furniture as I want in my selection and apply the method only for furniture without doors. ![]()
It is better than is was, but still not totally correct … ie …
  sel.grep(Sketchup::ComponentInstance).each {|s|
    s.definition.entities.grep(Sketchup::ComponentInstance).each {|e|
      array << e if e.definition.name=~match
    }
  }
… and for the THIRD time …
READ THIS! ![]() [How to] Colourize code on the forum? (pinned topic)
[How to] Colourize code on the forum? (pinned topic)
Settings (menu) > Preferences… (dialog) > Language (panel)
Tab Settings (group) > ruby (choice)
- uncheck “Use default value”
- set “Tab size” to 2
- check “Replace by space”
You can also switch on “Auto-Completion” but you may need to get an autocomplete xml file for Notepad++. @tt_su made one at one time. You may be able to use the stubs at the SketchUp GitHub repo: > GitHub - SketchUp/ruby-api-stubs: Auto-generated stubs for the SketchUp Ruby API. Useful for IDE intellisense and auto-complete.
(This is a complex issue and there are other threads on this. We are going too far off-topic as it is.)Notepad++ has it’s own forums where you should ask questions:
Home | Notepad++ Community

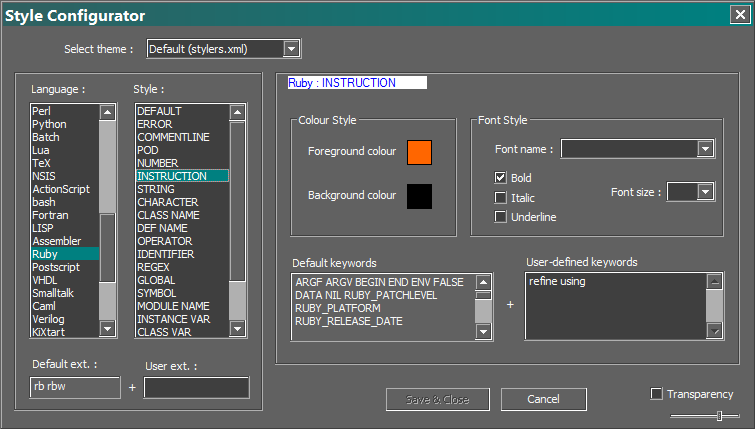
Settings (menu) > Style Configurator… (dialog) > Language (picklist)
- choose “Ruby”
- choose a style from the “Select theme:” drop down control
(You can further modify the chosen style afterward.
My style is based on “Deep Black” with certain feature color changes, such as I changed “INSTRUCTION”, which are keywords to a bright orange.) - You must also make some global changes to the “Global Styles” (at top of “Language” picklist,) and it will apply to all coding languages. (I myself set “Consolas” as the global font for all coding.) Many of the global style features cannot be set per language.
- press “Save & Close” button when done.
Sorry to answer so late but I had to take a break.
Tomorrow I will follow step by step your settings.
Thank you for these explanations Dan.
This topic was automatically closed 91 days after the last reply. New replies are no longer allowed.