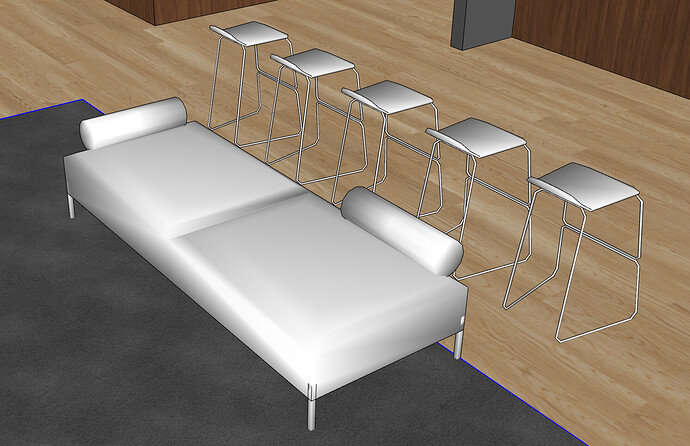
I’m trying to replicate the low-poly assets that Enscape uses for their placeholder assets, but since I need to do it in SU I’m asking here. How would I go about taking a regular model and creating what I call the “bed sheet over the model” look that they use here?
That looks to me like taking boxy models and, using the smooth/soften window, moving the slider way to the right (further than you normally would) so that edges with sharper angles between faces are softened. It gives you that odd shading.
I’m not sure if that’s the case (it may be) because you’re taking a fairly complex object and then somehow distilling it down to just this simple object.
When I select a group that contains the object geometry and try to “soften” it doens’t really have this effect, but I may be using that tool wrong. Can you help me here? Here’s a typical object that I’d like to achieve this effect with.
Large Square Planter + Ball Bush.skp (12.0 MB)
That’s just what it looks like. I didn’t know you wanted to remake it out of the actual complex version. You may try the “Skimp” plugin, but I haven’t used it myself.
And I don’t know exactly how you want to use it, but you may look at Fredo’s “GhostComp” plugin too.
Your planter box has some irregularities and can be made more simple. Click in sequence on the Scenes tabs of this SU file for ideas.
Planter.skp (2.3 MB)
I could have made a smaller file by using arcs with less segments, for example 4 instead of 12.
Don’t consider the size of this SU file since there are about 20 copies of the planter at different stages of construction.
The plant itself is taking a large percentage of your file size since it has a lot of edges and faces. I delete it from my file.
You can combine the two if you want.
Is there a way to create a version of this model where the only geometry is the “shell” on the outside?
@jean_lemire_1 Thank you for taking the time to show me this. I can see how the geometry could be approached very differently. However, per my earlier comment, do you have an idea of how I can capture just the “shell” of an object so that there is no inner geometry? I need a simple, repeatable workflow for this.
In the methods I showed there is no internal geometry. See my same model without the ends and with a few variations in these SU files. BTW these ends allow you to pull either end to prolong the conduit. Click in sequence on the Scenes tabs.
Square transition.skp (92.2 KB)
Square to circle transition variations.skp (149.5 KB)
