Any suggestions how to supply the missing pieces? I thought I could easily whip this out but instead have sat here for (4?) hours trying everything I could think of.
pinch spring.skp (54.3 KB)
Any suggestions how to supply the missing pieces? I thought I could easily whip this out but instead have sat here for (4?) hours trying everything I could think of.
pinch spring.skp (54.3 KB)
I’d use Follow Me. Due to the size, I would make a component of the path and the end profile of the wire, make a copy and scale that up by a factor of 100 or 1000. When the large one is finished, exit component edit mode and delete it. Then you can return to the original with Zoom Extents.
Simple answer, scale up. As Dave has shown just as I posted.
Thanks DaveR, I’ll try scaling. Never tried before. I guess FollowMe doesn’t like the line joints when too sharp.
Worked perfect. Thanks
No. Follow Me won’t create the tiny faces you were asking it to do, at least directly. Working at the larger scale gets around that.
DaveR - Tried the scaling tip a few more times while working on what at first I thought would be a simple item.
quick-release pin.skp (592.3 KB)
Used the scaling on the ball on the one end. Used to get some kind of donut thing in the past when trying to make a sphere. Scaling worked perfect first time here.
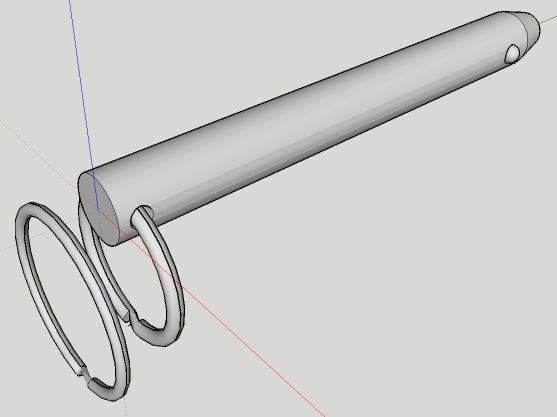
Tried the tip again on other end on the split ring. The transition from one coil to the other was a bit of work but got it looking good enough. On first try (the lose ring) I wasn’t too happy with the transition area but it actually came out closer to the proper size (just a modified circle with a line across to give appearance of split). The attached ring doesn’t quite fit but is close enough (drawn using 2 half circles which makes a real split).
Not quite sure how the hole the ring goes thru is done. The edge of hole should be radiused all around hole on the cylinder shaped pin. The intersect function is the most frustrating thing to use arg. End up drawing the stuff in most of the time.
Looks like you did a respectable job on the split ring as well as the pin and the ball. You have some excessive nesting of groups which makes it harder to work with the parts but that’s easily remedied by exploding upper level grouping. I’d have used components instead of groups, started the pin and ring at the real world sizes and then scaled up copies of the components to do the stuff that needs to be done at the large size. That would leave me with the correctly sized pin. ring, and ball at the end.
As for chamfering the edges of the hole in the pin, you could probably skip it but if you want to show it, draw a “countersink” (which is what they’d use in the factory to ease the edges), position it in the hole and use Intersect Faces with the pin. Then erase the countersink and the waste on the pin that should be removed.
Two countersinks:
Moved into place:
After intersect faces, clean up, and correcting any reversed faces:

Ring back in place:
When Dave R says “you did a respectable job” that is a high complement! Right Dave? ![]()
I don’t know. I think the model will certainly do the job it’s intended to do. I’m not sure I’ve ever modeled a split ring before but the way it is done looks like a reasonable job and anyone ought to understand what it is. ![]()
Yup, certainly took Dave’s comments as praise and always welcome his suggestions. I also happen to follow his suggested M.O. of drawing to a tee except the component bit. I did use quite a few nested groups. I had contemplated cleaning them out a bit at time of posting but left alone as it was still a work in progress.
I had an individual group for each side of ring and a group for each side of the transition pieces and then an overall group to keep them all together. As I’ve stated I haven’t found much use for comps but in this case it would be interesting to have made the trans pieces comps as I had to do a lot of work twice to fit and clean them up.
Then I did some odd things while drawing. I measured object cross section as 0.1 but drew it as 0,125 for some reason. The ring O.D. was sized correctly so after up scaling and then back down (for the follow-me bit but maybe it would have worked fine without scaling - didn’t try) it wound up too big to fit thru hole in pin. Don’t know if there is a way to scale one diam (cross sect) without affecting the other (ring diam). The free ring is about correct diam but cross sect is too small.
Dave’s method to chamfer gave me an idea how to radius instead but when I took another look at actual item it wasn’t reamed out to begin with so is/was fine as drawn.
And for some reason I deleted the surface of the flat faces of the rings before posting (don’t see much of them except if zoomed way in at ring ends). A simple thing to fix but when I tried to go back in today to correct when I got into the proper nested group the drawing clipped like crazy especially the transition piece in that free ring. I couldn’t even get near enough to draw a line.
As I prefer the appearance of the free ring more I wanted to try and fuss with the transition areas between rings but that won’t be possible with the extreme clipping. Any suggestions how to deal with the clipping? I mean when I select to edit group the drawing practically disappears with only a little open sect of ring remaining. Do any of you others have that problem if you’re looking at mu .SKP file?
BTW I’ve uploaded the complete model that the spring clip clamps and quick release pin are a part of. Search for “Soloflex” if interested. The quick release is hidden under the bench end attaching glutes extension. Spring clips hold the weight in place.
Nice work on that model. I don’t see the clipping until I get in extremely close, like camera in the hole of that locking pin next to the split ring close. If you have the camera set to Parallel Projection, it would be more likely that you’d see clipping, though.
I would suggest correcting the reversed faces shown green in my default style.
DaveR - Thanks for the compliment.
Re the clipping. Specifically I selected the free ring and (being close to object) when I chose edit group the image seems to disappear but is there and requires me to zoom back out to see again. Can’t get in close enough to chose a line or anything. May be just as well, sometimes it ends up being a lot easier to re-draw than to modify (except in this case area is grouped by itself).


