As windows and doors are added to the wall they will automatically cut holes into the framing and these three other building layers. The code to cut holes in solids is actually not to difficult, I developed it with the foundation plugin when I needed to add foundation vents into stemwalls.
I will probably put the cavity insulation and the holdowns on the backburner for a a while as I focus on the wall edit function and the window and door (framed opening) module.
I’ve also added one additional (Tee Corner) corner configuration for each end of the wall.
I will also be adding in two additional parameters so when you edit a given wall panel you can offset the sheathing and cladding above or below the actual wall panel to tie into a rim joist above or below. Some contractors also like to lap the sheathing and cladding over the foundation rather than having it flush with the sill/bottom plate.
On a similar note it might also be useful to allow the user to set the bottom plate as pressure treated (ie. garages where the wall is directly in contact with the foundation). I’m not sure yet where I want to put this parameter.
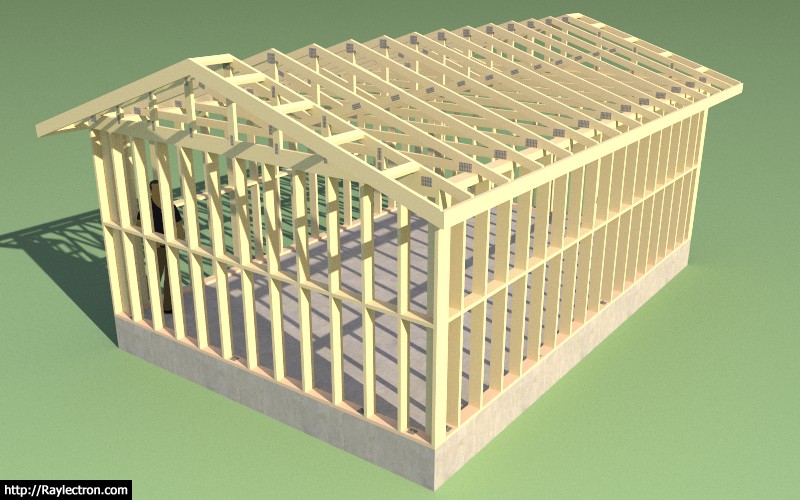
The little structure below is not much to look at (no windows or doors yet) but it is the first time I’ve been able to create an entire building envelope with absolutely no manual editing of the SketchUp model. This in itself is a major break through for me. I used all three plugins to create the model: Foundation, Truss and Wall.
All principal architectural elements are there: sheathing, cladding, gypsum, anchor bolts, rebar, concrete, roof cladding, gutters etc…
The only items missing are exterior and interior trim/molding and of course the windows and doors.
My next push will be the windows and door module.
The time required to create the walls was under a minute however once I have the polyline tool enabled this will cut down the initial wall creation time to literally seconds.
Insertion of doors and windows will always take a bit longer primarily because the designer actually needs to determine where they want to place their openings. There is not much one can do about that other than to make the actual placement/insertion process as intuitive and automated as possible.
Originally I was going to have all the windows and doors load up within this same menu but given how big it has grown already I think a separate edit menu for door and windows would be more practical.
I will also need to add in some additional code so that when certain parameters are modified in the wall edit menu those changes are then propagated to other wall panels that are assigned to the same wall group letter.
I’d assume they would be placed by choice typically at intervals dictated by sheathing ~8’
You can install as many as you want but as I recall the minimum is every 8 feet.
This option will probably need additional parameters (mid-span, 8’ on center, 4’ on center) to make it really useful but at least it is a placeholder for now.
This feature will only get more interesting as windows and doors are added.
I supposed there will be some utility to this option for some since it will allow the designer/contractor to calculate the volume of insulation needed with fairly decent accuracy.
I could use some better textures for my insulation, the ones shown are pink and yellow fiberglass, rockwool and cellulose. I also have a blown fiberglass (white) not shown.
View model here:
I’ve now started wading into the window and door module, this may take me a 2-3 days to sort out since it is fairly complicated.
We do staggered blocking (easier for nailing). Building codes vary. Fire Blocking was implemented when balloon framing was common. Now - not so much. In some areas blocking is only necessary on tall walls greater than 8 or 10 feet in height.
On another note. You would be better off to separate windows and doors from walls. This would give designers the ability to choose their own door and window package. Perhaps it would be better just to concentrate on door openings. Unless that is you want to get into all the features of doors and windows such as this.
These doors are interactive and open and close. This double door with side lights include an astragal.
My primary concern with windows and doors right now is the framed openings. At some point I would like to provide my own window and door plugin which is tightly integrated with the wall plugin but that is a chore for another day. Besides as you have shown above there are plenty of options for well made door components and other plugins that fill this niche.
My question to the SketchUp designer community is how do I best serve you so that you can utilize your favorite components or plugins for windows and doors. It would be nice to tie in with another plugin so that one could easily place the windows and doors into the framed openings.
Tell me what you want to do with this, I am open to whatever makes the most sense.
Given the plethora of doors and windows available in the 3DW, for my purposes specifying the rough opening and having it magically appear with proper framing is more than sufficient.
What would be nice, but not necessary, would be round, 1/2 round and 1/4 round rough openings. I’m seeing enough of them in home designs that it will likely be worth the effort. I’m afraid I can’t suggest how you might do the framing of the curved edges of the rough openings - I’ve never actually done one, just gazed longingly at designs that impress me which include them!
I suppose so. I’m not really up on the terminology. Is that how they are framed? I would think it would be easier to have a horizontal header for a rectangular framed opening, then infill a bit with non load bearing framing to create the curved portion of the rough opening.
My door plugin already works with rough openings. Click 2 adjacent corners and the door inserts itself leaving a 1/4" around the sides and top of the door (you specify the rough opening).
Having built lots of curved stairs we were often asked to build curved casings for 1/2 rounds and arches. Builders would bring us jamb templates of the actual window. This was do to the fact that although the windows looked good the jambs were not completely symmetrical.
The framers would generally leave the sheathing overhanging the square opening and then jig saw out the shape based on a template of the outside of the window. They would then add in several angled pieces of framing material to roughly fill in the opening.
My wife brought up the same topic with arched windows and door ways about two days ago. She has a thing for arched doorways (interior).
In all practicality an arched framed opening is really no different than a regular rectangular framed opening. All that is required is some additional infill framing and the sheathing/cladding/gypsum conforms to this modified opening. Structurally nothing really changes, at least with the cases I’ve seen.
I will add one more additional parameter to the window and door menu which allows for arched or other exotic geometry.
Window Shape:
Half Round
Quarter Round
Arch
Gothic Arch
Octagon
Left Triangle
Right Triangle
Left Trapezoid
Right Trapezoid
Half Octagon
Circle (Oval)
Pentagon
Triangle (Isosceles or Equilateral)
Clipped Corners
There are even more shapes than this but I have to start somewhere:
Just when I think I’m getting close to releasing this thing you guys go and add another level of complexity to it, I guess that is why it’s so much fun.
Since the model can get quite heavy with all of the studs, blocking, insulation and other geometry I’ve decided to add one additional option to the basic parameters called “Wall Framing”. By turning this option to “NO” the walls are drawn with all of the internal geometry removed (ie. plates, studs, headers, kings, trimmers, insulation, holdowns etc…)
However, you can still use the advanced wall options and display sheathing, cladding and gypsum:
The model is now quite boring but is significantly more lightweight and will lend itself to quick edits by the designer. Walls and Doors can be inserted and all of the internal framing can be turned on at any time within the wall edit menu.
See model here:
The wall framing parameter will also be available within the global settings so that its default behavior can be set.
I think having the wall framing options is great, and they will be really useful.
Have you considered adding in an additional option for ‘transparent’ (/ ‘x-ray’) mode?
There could be some nice benefits in having selected sections viewed in a transparency… while others are presented in one of the other 3 options you already have… 2D, 3D (yes/no).
–
These options also offer a new enhancements (or alternatives) to having section cuts in ones model.
Or when combined… A well placed section cut, along with the Medeek wall framing options, seems like a potential step up from whats currently available w/ section cuts alone… either independent, or when nested within groups.